 This post describes the procedure for the end-to-end upgrade of the firmware for a Cisco UCS Blade System. At the time of writing, the UCS is delivered from the factory with version 2.2(1b) and the latest stable release is 2.2(1d).
Eight part series, describing how to configure a Cisco UCS from start to finish for a vSphere deployment:
- Cisco UCS Configuration Guide – Part 1 – Overview
- Cisco UCS Configuration Guide – Part 2 – Equipment
- Cisco UCS Configuration Guide – Part 3 – LAN
- Cisco UCS Configuration Guide – Part 4 – SAN
- Cisco UCS Configuration Guide – Part 5 – Server
- Cisco UCS Configuration Guide – Part 6 – Admin
- Cisco UCS Configuration Guide – Part 7 – Firmware Upgrade
- Cisco UCS Configuration Guide – Part 8 – ESXi Driver Upgrade
Overview
Upgrading the Cisco UCS is a hierarchical “top-down” approach with the following steps:
- Upgrade UCS Manager.
- Upgrade Fabric Interconnect B (subordinate) & “Fabric B” I/O Modules.
- Upgrade Fabric Interconnect A (primary) & “Fabric A” I/O Modules.
- Place each ESXi Host (B-Series Blade Server) in “Maintenance Mode” and upgrade the Blade Firmware.

Assumptions
- With vSphere DRS, ESXi Maintenance Mode, redundant Fabric Interconnects and fabric redundant vNICs/vHBAs, there will be no downtime.
- You have a valid Change Request from your Release Manager to perform this upgrade.
Requirements
- Valid Cisco Support login.
- Administrator access to UCS Manager and vCenter.
- vSphere DRS, ESXi Maintenance Mode, redundant Fabric Interconnects and redundant vNICs/vHBAs are configured.
Download the Cisco UCS Firmware from Cisco.com
You will need a valid Cisco Support login to download this firmware.
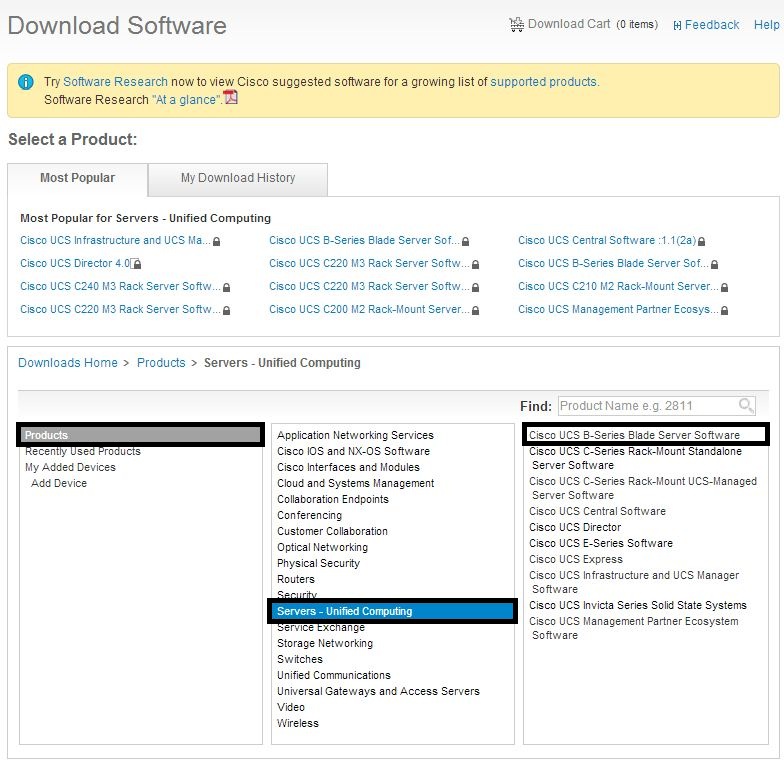
- Open a Web browser to software.cisco.com
- In the “Products” window, select “Servers – Unified Computing”
- Then select “Cisco UCS B-Series Blade Server Software”
- A “Download Software” screen will appear, select “Unified Computing System (UCS) Server Software Bundle”
- A new window will appear displaying the versions of software for the “Cisco UCS B-Series Blade Server Software”
- My advice is to select the highest version of “Suggested” firmware, which in this example is “2.2(1d)”.
- There are three binaries to download – “Infastructure Software Bundle” eg. ucs-k9-bundle-infra.2.2.1d.A.bin, “Software for the UCS B-Series blade server products” eg. ucs-k9-bundle-b-series.2.2.1d.B.bin and “Software for the UCS C-Series rack-mounted servers” eg. ucs-k9-bundle-c-series.2.2.1d.C.bin.


Upload the Cisco UCS Firmware Binaries to Cisco UCS Manager
- Login into UCS Manager
- Select the “Equipment” tab, select the “Equipment” tree and then the “Firmware Management” tab.
- Select the “Download Tasks” tab and press the “Download Firmware” button.
- Select “Location of the Image File:” is “Local File System”.
- Press the “Browse” button and locate the three binary files downloaded earlier.
- Select the first binary and press the “OK” button. Wait for the binary to be uploaded to UCS Manager.
- Follow steps 2 to 6 for the remaining two “bin” files.
- Under “Firmware Management”, select the “Packages” tab.
- The three binaries should now be displayed.
- Under “Firmware Management”, select the “Installed Firmware” tab.
- Expand the “tree” to view the “Running”, “Startup” and “Backup” Firmware Versions of the UCS.
- Take a backup of the UCS configuration from the “Admin” tab, “General” tab and select “Backup Configuration”.


Upgrade UCS Manager
- Select the “Equipment” tab, select the “Equipment” tree and then the “Firmware Management” tab and select the “Installed Firmware” tab.
- Select “UCS Manager” at the top of the tree and press the “Activate Firmware” button.
- In the “Activate Firmware” window, select the new version of firmware from the “Startup Version” menu and press “OK”.
- “UCS Manager” will now upgrade and the “Management” process of the Cisco UCS will “reset”, this does not interrupt the “data” plane of the system.
- This process takes 4 minutes.
- Your “UCS Manager” session will disconnect and you will have to reconnect. A new “.jar” file will be downloaded and installed on your PC. Accept any Java warnings.
- Log back into UCS Manager and check that the “UCS Manager” Firmware version has changed.

Upgrade the Fabric Interconnects and I/O Modules
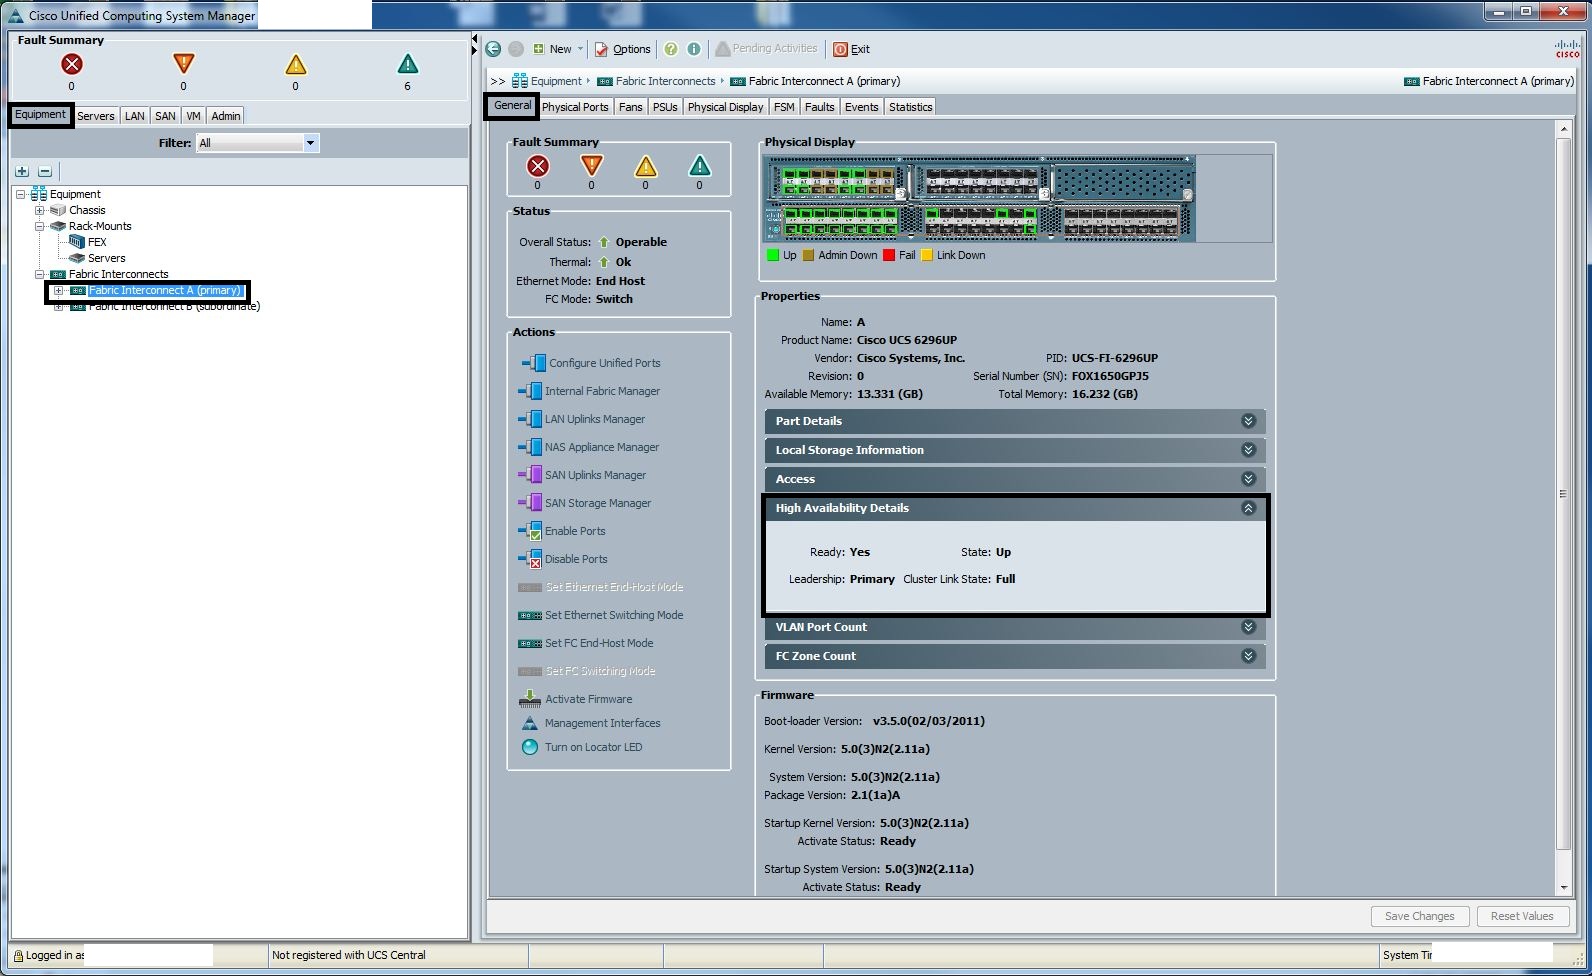
- Select the “Equipment” tab, select the “Equipment” tree and expand the “Fabric Interconnects” object.
- Select “Fabric Interconnect A (primary)” object, select the “General” tab and click the “High Availability Details” object.
- Verify that “Ready:” is “Yes”, “State:” is “Up”, “Leadership:” is “Primary” and “Cluster Link State:” is “Full”.
- Select “Fabric Interconnect B (subordinate)” object, select the “General” tab and click the “Activate Firmware” icon.
- From the drop down menus, select the latest “Kernel” and “System” versions and then press “OK”.
- “Fabric Interconnect B” will now upgrade and then the I/O Modules will also upgrade.
- “Fabric Interconnect A” will continue to operate and all vNICs and vHBAs will be switched through Fabric A.
- This process will take 16 minutes for the Fabric Interconnect “Management”, 2 minutes for the Fabric Interconnect “Ports” and 6 minutes per I/O module.
- Use the “FSM” tab to monitor the progress of the firmware upgrade, wait for the “FSM” progress status to reach 100%.
- During the upgrade process you will witness many alarms for Fabric B, ignore them; they will clear once the upgrade is completed.
- Make sure you monitor your Business Services and vCenter events, this will warn you of any impact to Fabric A.
- Select “Fabric Interconnect A (primary)” object, select the “General” tab and click the “Activate Firmware” icon.
- From the drop down menus, select the latest “Kernel” and “System” versions and then press “OK”.
- “Fabric Interconnect A” will now upgrade and then the I/O Modules will also upgrade.
- “Fabric Interconnect B” will continue to operate and all vNICs and vHBAs will be switched through Fabric B.
- This process will take 16 minutes for the Fabric Interconnect “Management”, 2 minutes for the Fabric Interconnect “Ports” and 6 minutes per I/O module.
- Use the “FSM” tab to monitor the progress of the firmware upgrade, wait for the “FSM” progress status to reach 100%.
- During the upgrade process you will witness many alarms for Fabric A, ignore them; they will clear once the upgrade is completed.
- Make sure you monitor your Business Services and vCenter events, this will warn you of any impact to Fabric B.
- Select the “Equipment” tab, select the “Equipment” tree and then the “Firmware Management” tab and select the “Installed Firmware” tab.
- Check that the “Fabric Interconnects” and I/O Modules have been upgraded to the latest version of UCS firmware.


Upgrade each Blade Server
- Select the “Servers” tab, select the “Policies” tree and expand the “Host Firmware Packages” object.
- Right mouse click the “Host Firmware Packages” object and select “Create a new Firmware Policy”
- Enter the “Name” with “FPn.n.nx” with a “Description” and “How would you like to configure the Host Firmware Package?” as “Simple”.
- From the drop down menus, select the highest level of “Blade” and “Rack” Packages and then select “OK”.
- Select the “Servers” tab, select the “Policies” tree and expand the “Maintenance Policies” object.
- Select the existing policy and verify that the “Reboot Policy” is set to “User Ack”, otherwise the Blade will reset immediately after applying the new Firmware Policy.
- Select “Show Policy Usage” and verify that your ESXi hosts are listed.
- If any of your ESXi hosts are not listed, select the “Servers” tab, select the “Service Profiles” tree and then the “Service Profile” name of the ESXi host missing from the “Show Policy Usage” list.
- Select the “General” tab and then the “Change Maintenance Policy” object to select the correct “Maintenance Policy”, then press “Save Changes”.
- Now you are ready to start upgrading the Blade firmware of your ESXi hosts.
- Select the ESXi host that will be upgraded.
- Place the selected ESXi Host (B-Series Blade Server) in “Maintenance Mode”.
- Select the “Servers” tab, select the “Service Profiles” tree and then the “Service Profile” name of the ESXi host in “Maintenance Mode”.
- Select the “Policies” tab and then expand the “Firmware Policies” object. From the “Host Firmware” drop down menu, select the new “Host Firmware” policy and press “Save Changes”.
- Select the “General” tab and press “Reboot now” from the “Pending Activities” section.
- Wait while the Blade “BIOS”, “Adapter”, “CIMC Controller” and “Board Controller” firmware is updated.
- This will take 40 minutes per half blade.
- Use the “FSM” tab to monitor the progress of the firmware upgrade, wait for the “FSM” progress status to reach 100%.
- Exit “Maintenance Mode” of the upgraded ESXi host.
- Repeat steps 11 to 19 until all of the UCS Blade Servers have been upgraded.
- Select the “Equipment” tab, select the “Equipment” tree and then the “Firmware Management” tab and select the “Installed Firmware” tab.
- Check that the Blade Servers (“BIOS”, “Adapter”, “CIMC Controller” and “Board Controller”) have been upgraded to the latest version of UCS firmware.
- Congratulations, your Cisco Unified Computing System has now been fully upgraded to the latest stable firmware version!


Additional Resources

Reblogged this on 49514262200010.
Awesome post, love the step-by-step instruction. However how would one plan such firmware upgrade for non-vmware UCS Oracle RAC Cluster? I have 4 blades between 2 chassis, that make up Oracle RAC (4-node cluster).
It would be very similar, you would place each RAC node into maintenance state while you performed the UCS blade upgrade in sequence (one at a time).
Fantastic Information about UCS, I really appreciate your work Thanks a lot.