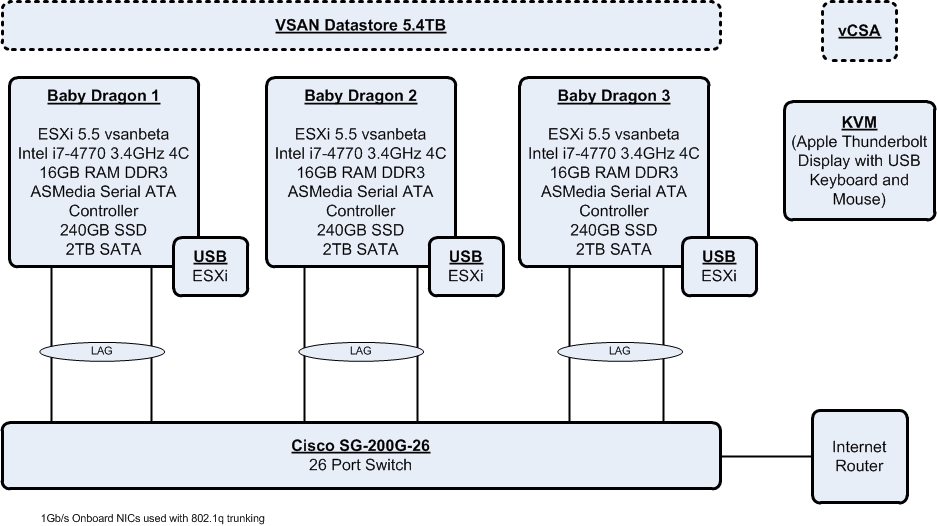
 Allow me to introduce Drogon, Rhaegal and Viserion, my three host, “VSAN Baby Dragon” Home Lab. Straight from “Game Of Thrones”, if you are wondering what the names mean. I finally bit the bullet and invested in some new kit to move away from the limited Embedded ESXi lab I was running on my MacBook Air. I sourced everything from the Computer Souq in Riyadh, since I did not want to wait for shipping, which can be expensive. I have provided the details for anyone who wants a vSphere lab that works without the head scratching.
WARNING: If you are not technically proficient, do not go down this route. Spend the extra money and buy a VMware VSAN compliant model from a Vendor (HP, IBM, Cisco, Dell, etc.). Otherwise you may end up with an expensive pile of parts that does not work.
Any IT professional who wants to develop their skills when not at work, there are a number of options:
- Home Lab – Baby Dragons, Junior Dragons with Embedded ESXi or Adult Dragons (see list at the very end for examples)
- Work Lab – May have problems with access on weekends and maintaining a static configuration
- Paid Labs – Pay as you go, need remote access, do not get to setup the hardware
- Free Labs – Good for functional testing, not good for configuration guides and performance testing, tend to be slow and cumbersome
Design Requirements
- Quiet operation.
- Reasonably small footprint.
- Budget – keep the entire build under US$5,000.
- Be able to deploy vCloud suite, VSAN, NSX, VDI, Orchestration, Directory Services, Virtual Appliances for functional testing and building documentation sets (architecture designs, configuration guides, standard operational procedures).
- Have the capability for a small amount of performance testing (>=5,000 IOPS @ 4K, 50/50 R/W, 100% Random). To be confirmed in a later post.
- Have the capacity to build medium size enterprise environments of 50 VMs (vCPU to pCore ratio of 9:1, approx. 2.5TB of storage, approx. 100GB RAM) – NOTE: need 32GB of RAM per Host and possibly a 4th host to meet this requirement. The 16GB configuration can support approx. 14 VMs.
Bill of Materials
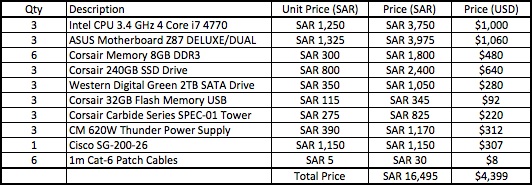
If you are in Riyadh, Saudi Arabia: Computer Souq, Olaya Street, Riyadh, KSA: Softland PC Hardware and Accessories and Anas AlZaid Trading Company Networks and Wireless (both stores are directly behind the Golden Tulip on the corner of Makkah and King Fahad Roads).
Otherwise, you can order similar from B&H Photo Video in the US, which are very competitive and deliver world-wide (including KSA).
Limitations
- Hardware is not listed in the VMware Compatability Guide. There is no official support for this hardware configuration with VSAN.
- Must use ESXi 5.5 vsanbeta (Build 1439689) – this is because the “AHCI” storage controller driver is not supported in ESXi 5.5U1. It may be fixed in the future, but for now, vsanbeta is the only way to go. The VSAN beta has finished and the binaries are not publicly available, you will have to source them yourself.
- You must install ESXi 5.1 U1 (Build 1065491) and then upgrade it to ESXi 5.5 vsanbeta Build 1439689 (“update-from-esxi5.5-vsanbetaref.zip”) using esxcli.
- You must customise the ESXi 5.1 U1 (Build 1065491) image with a driver to support the Intel NIC. Use ESXi-Customizer.
- The ASUS motherboard BIOS cannot be updated using a flash drive, you must use a CDROM for this task.
- VSAN is quite RAM hungry (4GB/host), you may have to implement 32GB of RAM per host depending on your workload requirements.
- 10Gb Thunderbolt adapters are not officially supported, hope to get that working for VSAN communications, would be cool to connect a Thunderbolt NAS box. this way also. The Mac Mini builds use the Ethernet to Thunderbolt adapter to provide a second Gb Ethernet link.
- Unless you buy VMware vCloud suite and VSAN licences, you will have to address the 60 day trial licence expirations.
Assumptions
- vCenter Server Appliance will be initially hosted on a PC with VMware Workstation or Fusion and then exported to the VSAN Datastore.
- KVM hardware is available.
- Internet service is available.
Alternatives
- Go with a 2 Node configuration with a NAS box (QNAP, Synology) and implement shared storage instead.
- Stick with the 3 Node configuration, but load the third node with all of the storage and run it as a FreeNAS box.
Configuration Guide
This configuration guide will get VSAN working with the minimum of fuss. You can customise vSphere later.
- Build the Baby Dragon towers from the Bill of Materials
- Connect the SSD and SATA drives to the YELLOW Serial ATA connectors
- Configure the BIOS (procedure below)
- Install ESXi 5.1 U1 (Build 1065491) from your Flash Drive. Prepare the flash drive with UNetbootin. Make sure you use the “Shift-O” option and add the “formatwithmbr” option, since this motherboard does not support booting from GPT partitions. Also make sure your ESXi flash drive is plugged into a USB 2.0 slot, not 3.0.
- Format the SSD to copy the ESXi 5.5 vsanbeta Build 1439689 (“update-from-esxi5.5-vsanbetaref.zip”) to SSD (or present it via a URL)
- Enable SSH on each host and upgrade the ESXi version from 5.1 t0 5.5 vsanbeta with the command “esxcli software vib update –depot=/vmfs/volumes/<name>/update-from-esxi5.5-vsanbetaref.zip”.
- End result: three Baby Dragons running with ESXi 5.5 vsanbeta, configured with management IPs that you can ping from the PC (Workstation, Fusion, Parallels) where you will initially deploy vCSA to configure VSAN. If you do not have a PC with this capability, then you will need to install an additional SSD or SATA drive that will become your vCSA staging area (not included in the BoM).
- Deploy vCSA, give it an IP and make sure you enable Synchronise Time from VMTools (otherwise the DB init process will fail).
- Login to the vCSA Web Client and create a Datacenter object.
- Connect the 3 hosts to vCenter.
- Add vmkernels to each vSwitch with VSAN enabled.
- Create a Cluster will DRS, HA and VSAN disabled.
- Add each host to the Cluster.
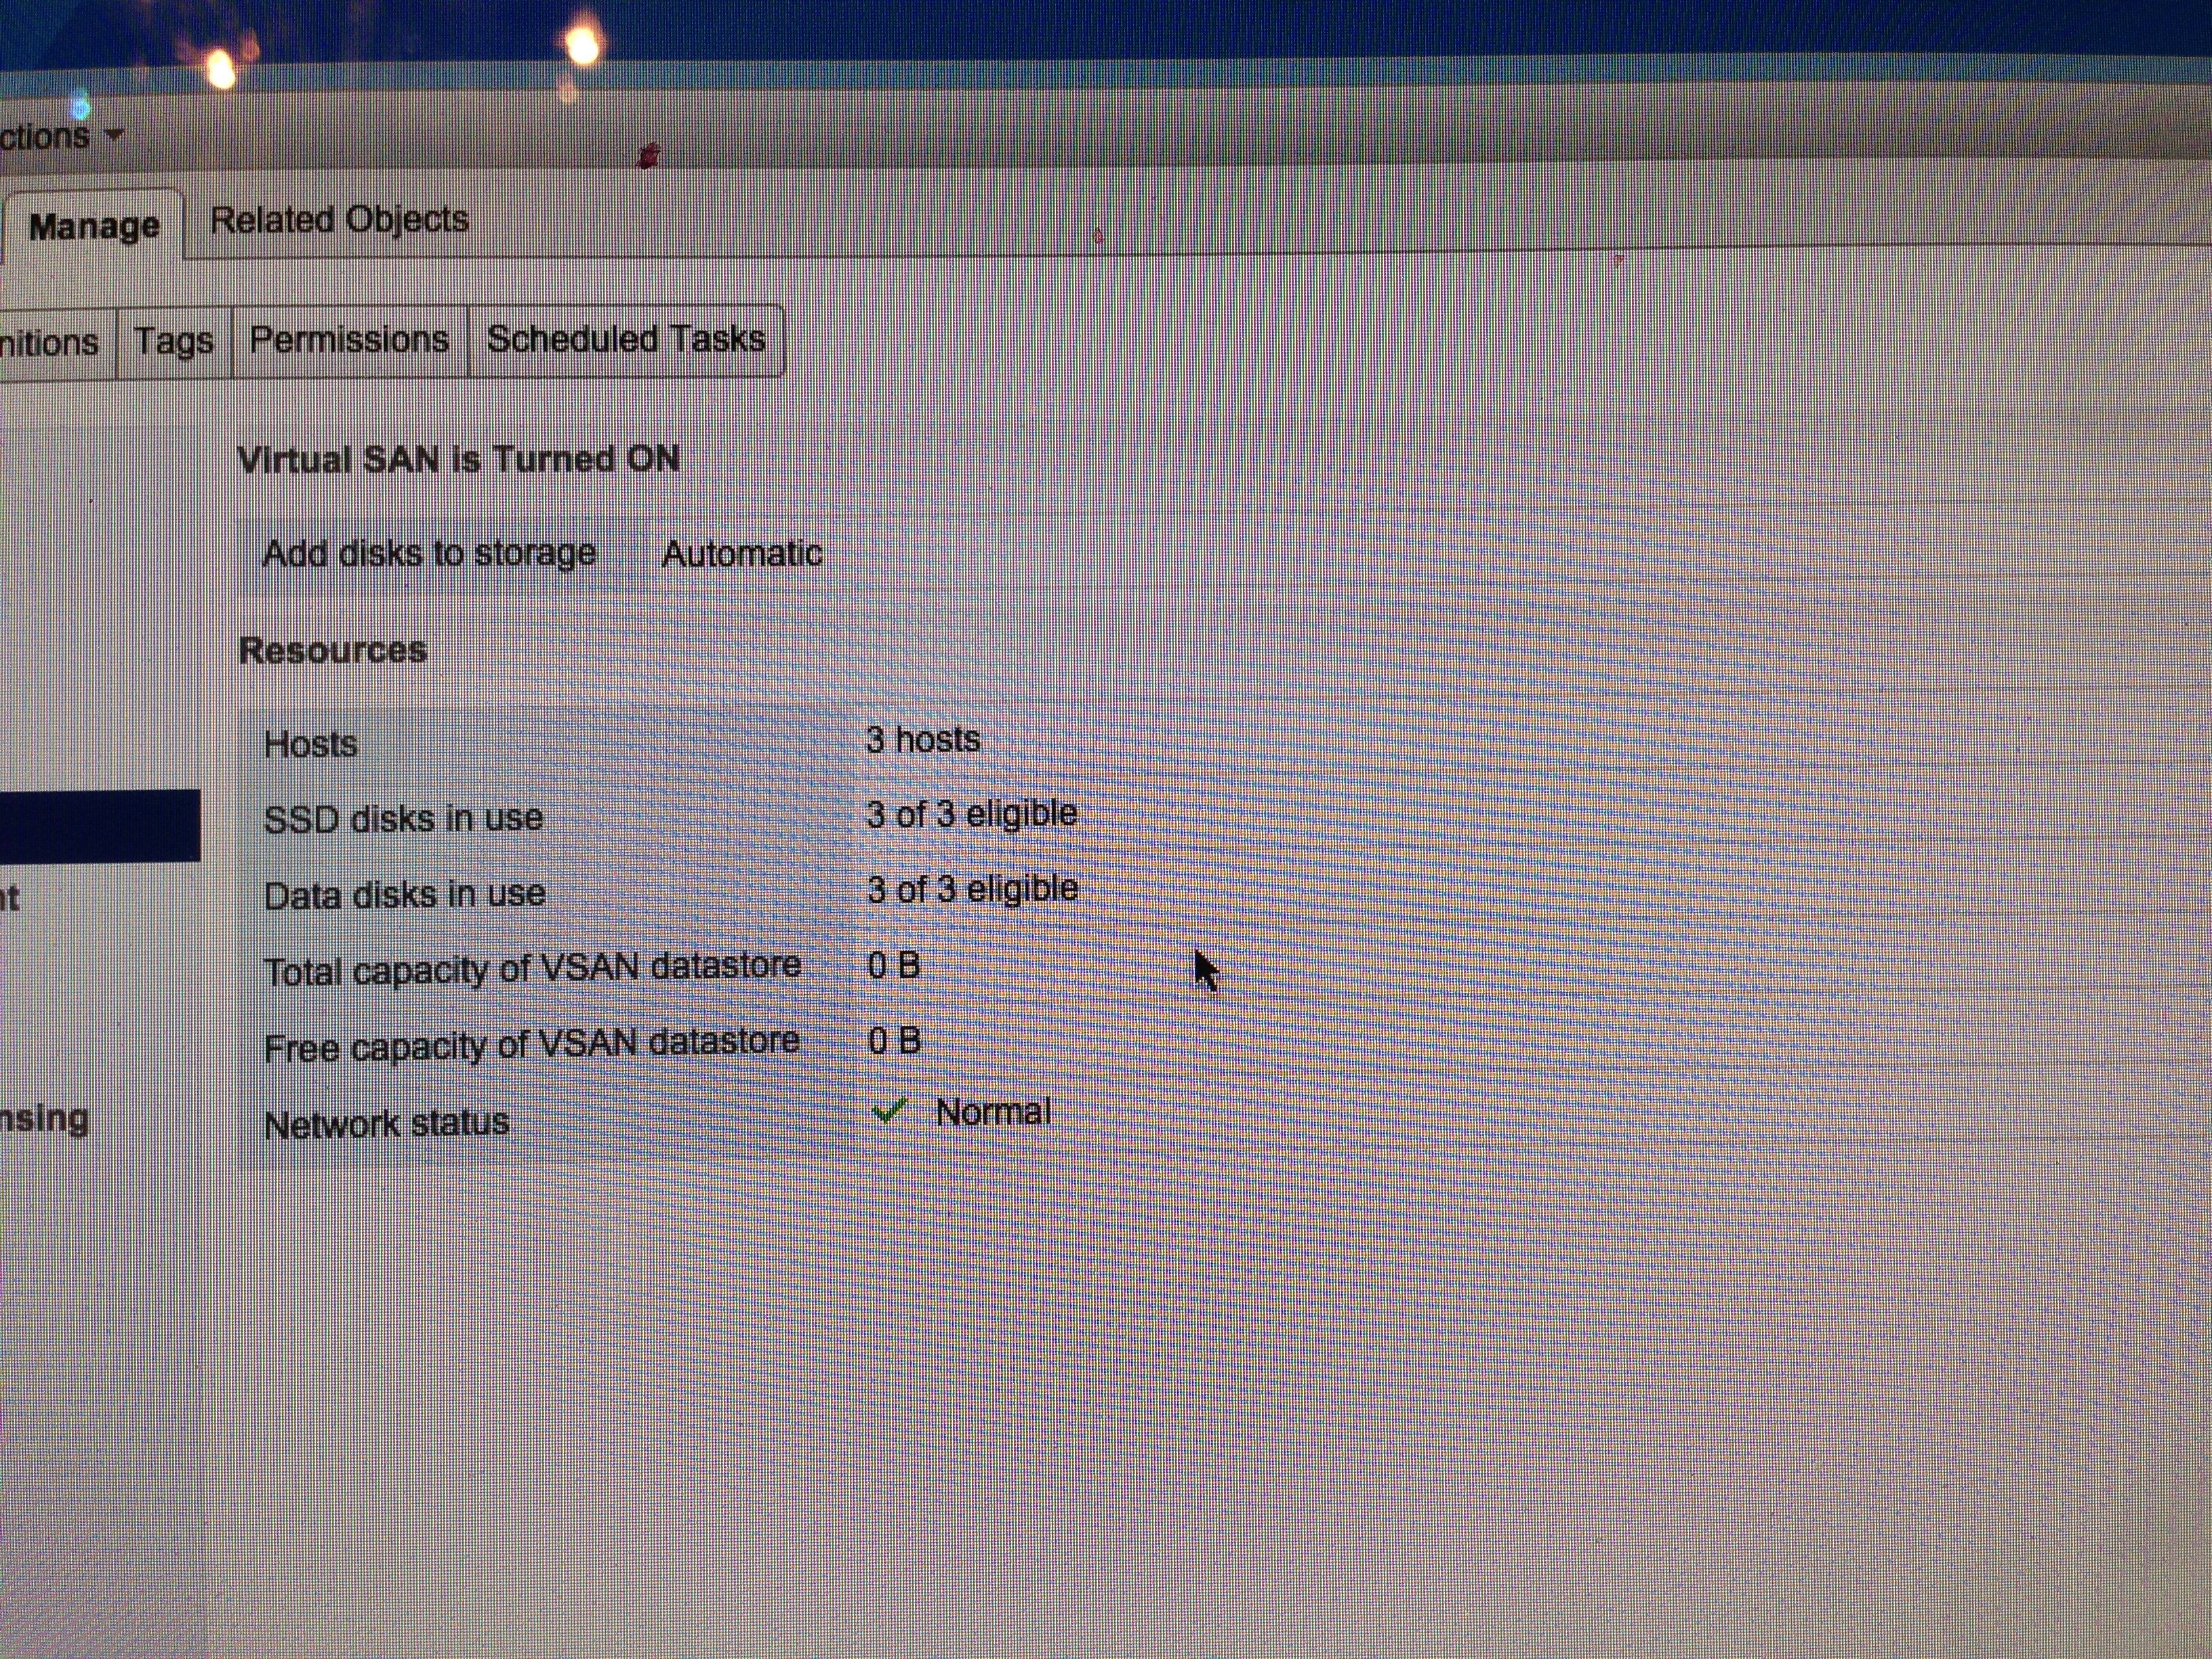
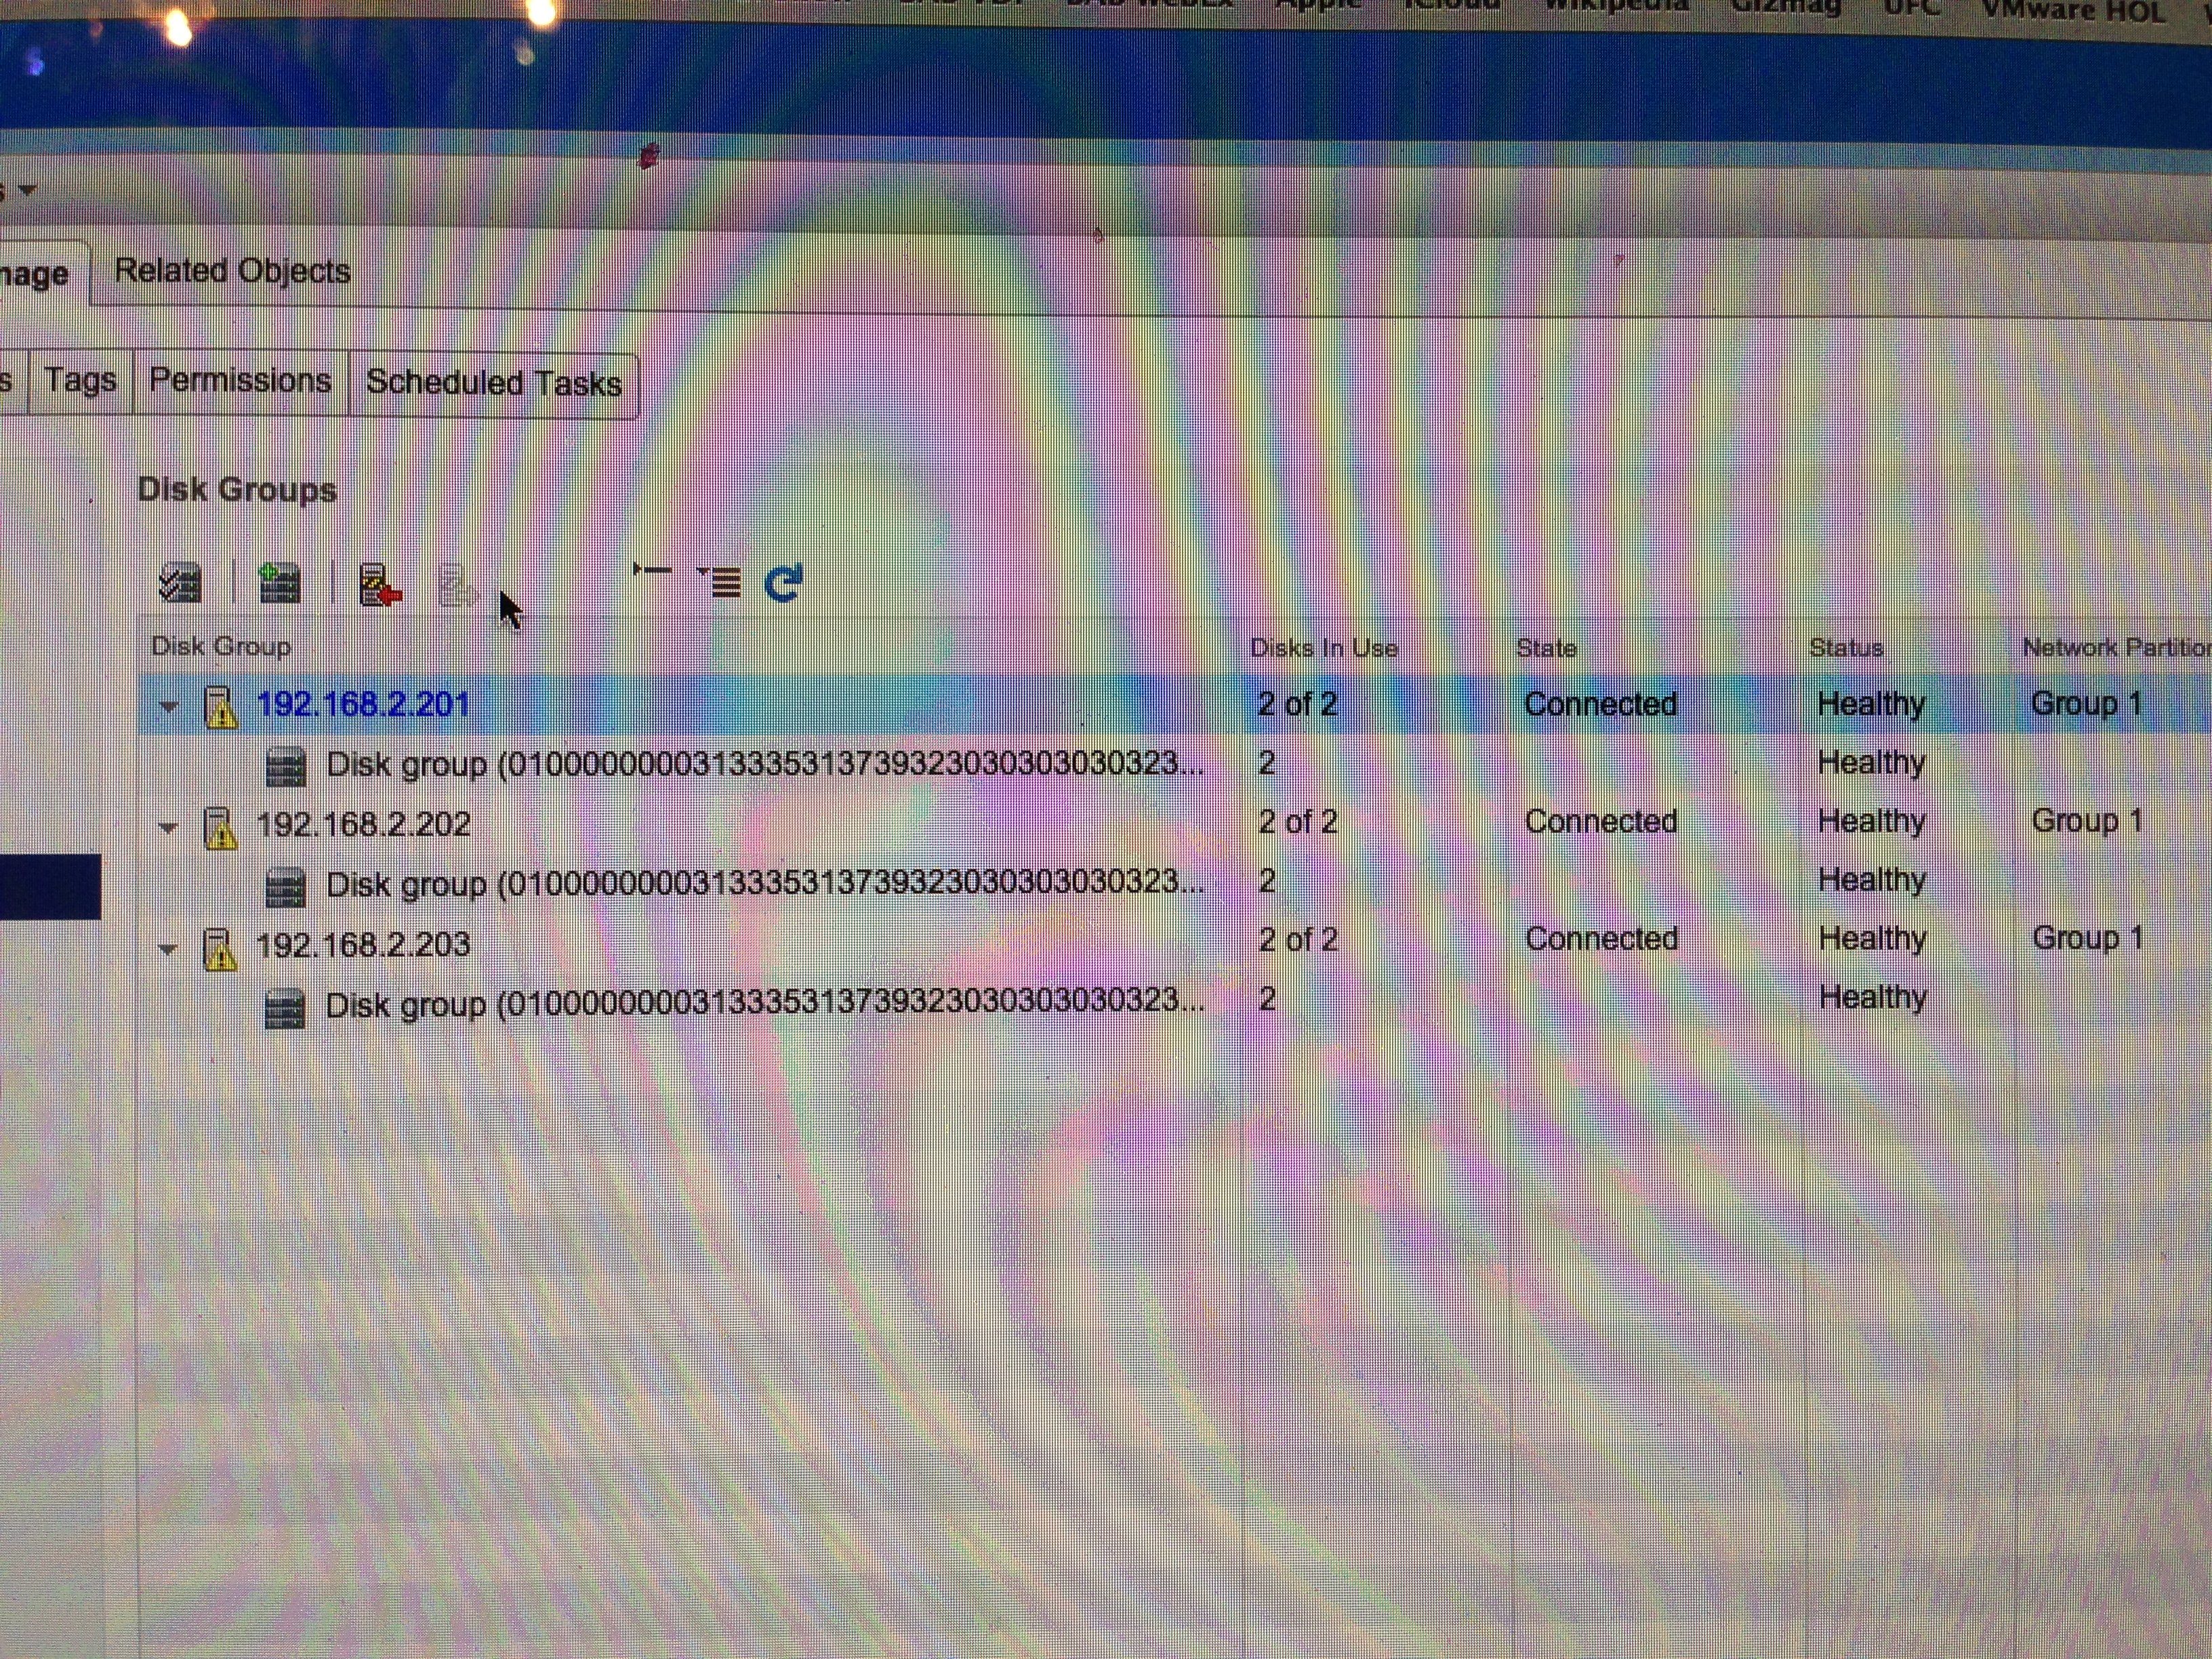
- Enable VSAN in the cluster and leave it in Automatic mode. After vCSA successfully configures VSAN, you should see the following screens.
- You can now use the VSAN storage, but you must configure the VM Storage Policies and apply them to VMs.
- If you reset everything to factory defaults, follow the Host Factory Default Procedure below.
BIOS Settings (ASUS Motherboard Z87-DELUXE/DUAL Version 1008):
- Connect KVM, Power On machine and press F2 to enter the BIOS configuration screen
- Press F7 for the Advanced Menu, Press F5 to reset the BIOS to factory defaults
- Go to “Advanced”, “CPU Configuration”, scroll down to “Intel Virtualization Technology” and Enable it.
- Go to “Advanced”, “SATA Configuration” and verify it is set to “AHCI”. Verify your SATA and SSD drives appear also.
- Go to “Advanced”, “System Agent Configuration” and set “VT-d” to Enabled.
- Go to “Advanced”, “System Agent Configuration”, “Memory Configuration” and verify that “Memory Remap” is Enabled.
- Go to “Advanced”, “USB Configuration” and verify that “Legacy USB Support” is Enabled. Some blogs recommend “EHCI Hand-off” is Enabled also, but I have never required it.
- Go to “Boot”, “CSM” and set the “Boot Device Control” to “Legacy OPR”.
- Go to “Boot”, “Secure Boot” and set the “OS Type” to “Other OS”.
- Go to “Boot”, “Hard Drive BBS Priorities” and Disable all boot options except for the ESXi Flash Drive.
Host Factory Default Procedure:
- Access the DCUI of the each host and select the “Reset System Configuration” option.
- Shutdown the Host
- Remove the ESXi USB flash drive and insert the GParted USB flash drive. Instructions here.
- Erase all partitions from the VSAN SSD and SATA drives. Recreate one GPT partition from the Devices menu.
- Shutdown the Host
- Insert the ESXi USB flash drive and power on the Host
- Access the DCUI and configure the management interface
- Redeploy vCSA, connect the hosts and configure VSAN
Future Additions
- Additional SSDs to test VMware vFRC and PernixData FVP with Shared Storage (iSCSI)
- QNAP TS-569 Pro NAS (iSCSI/NFS)
- Motherboard has 3 PCIe 3.0 slots, 4 PCIe 2.0 slots and room for 6 drives. So you can add additional Network and Storage hardware that supports PCIe and Serial ATA.
- The Motherboard, Power Supply and Tower Case have space for additional fans if you increase the cooling load of the Tower.
- NOTE: in the diagram I have 3 hosts connected in a 10Gb “ring”, which will never work since virtual switches are not MAC learning devices.

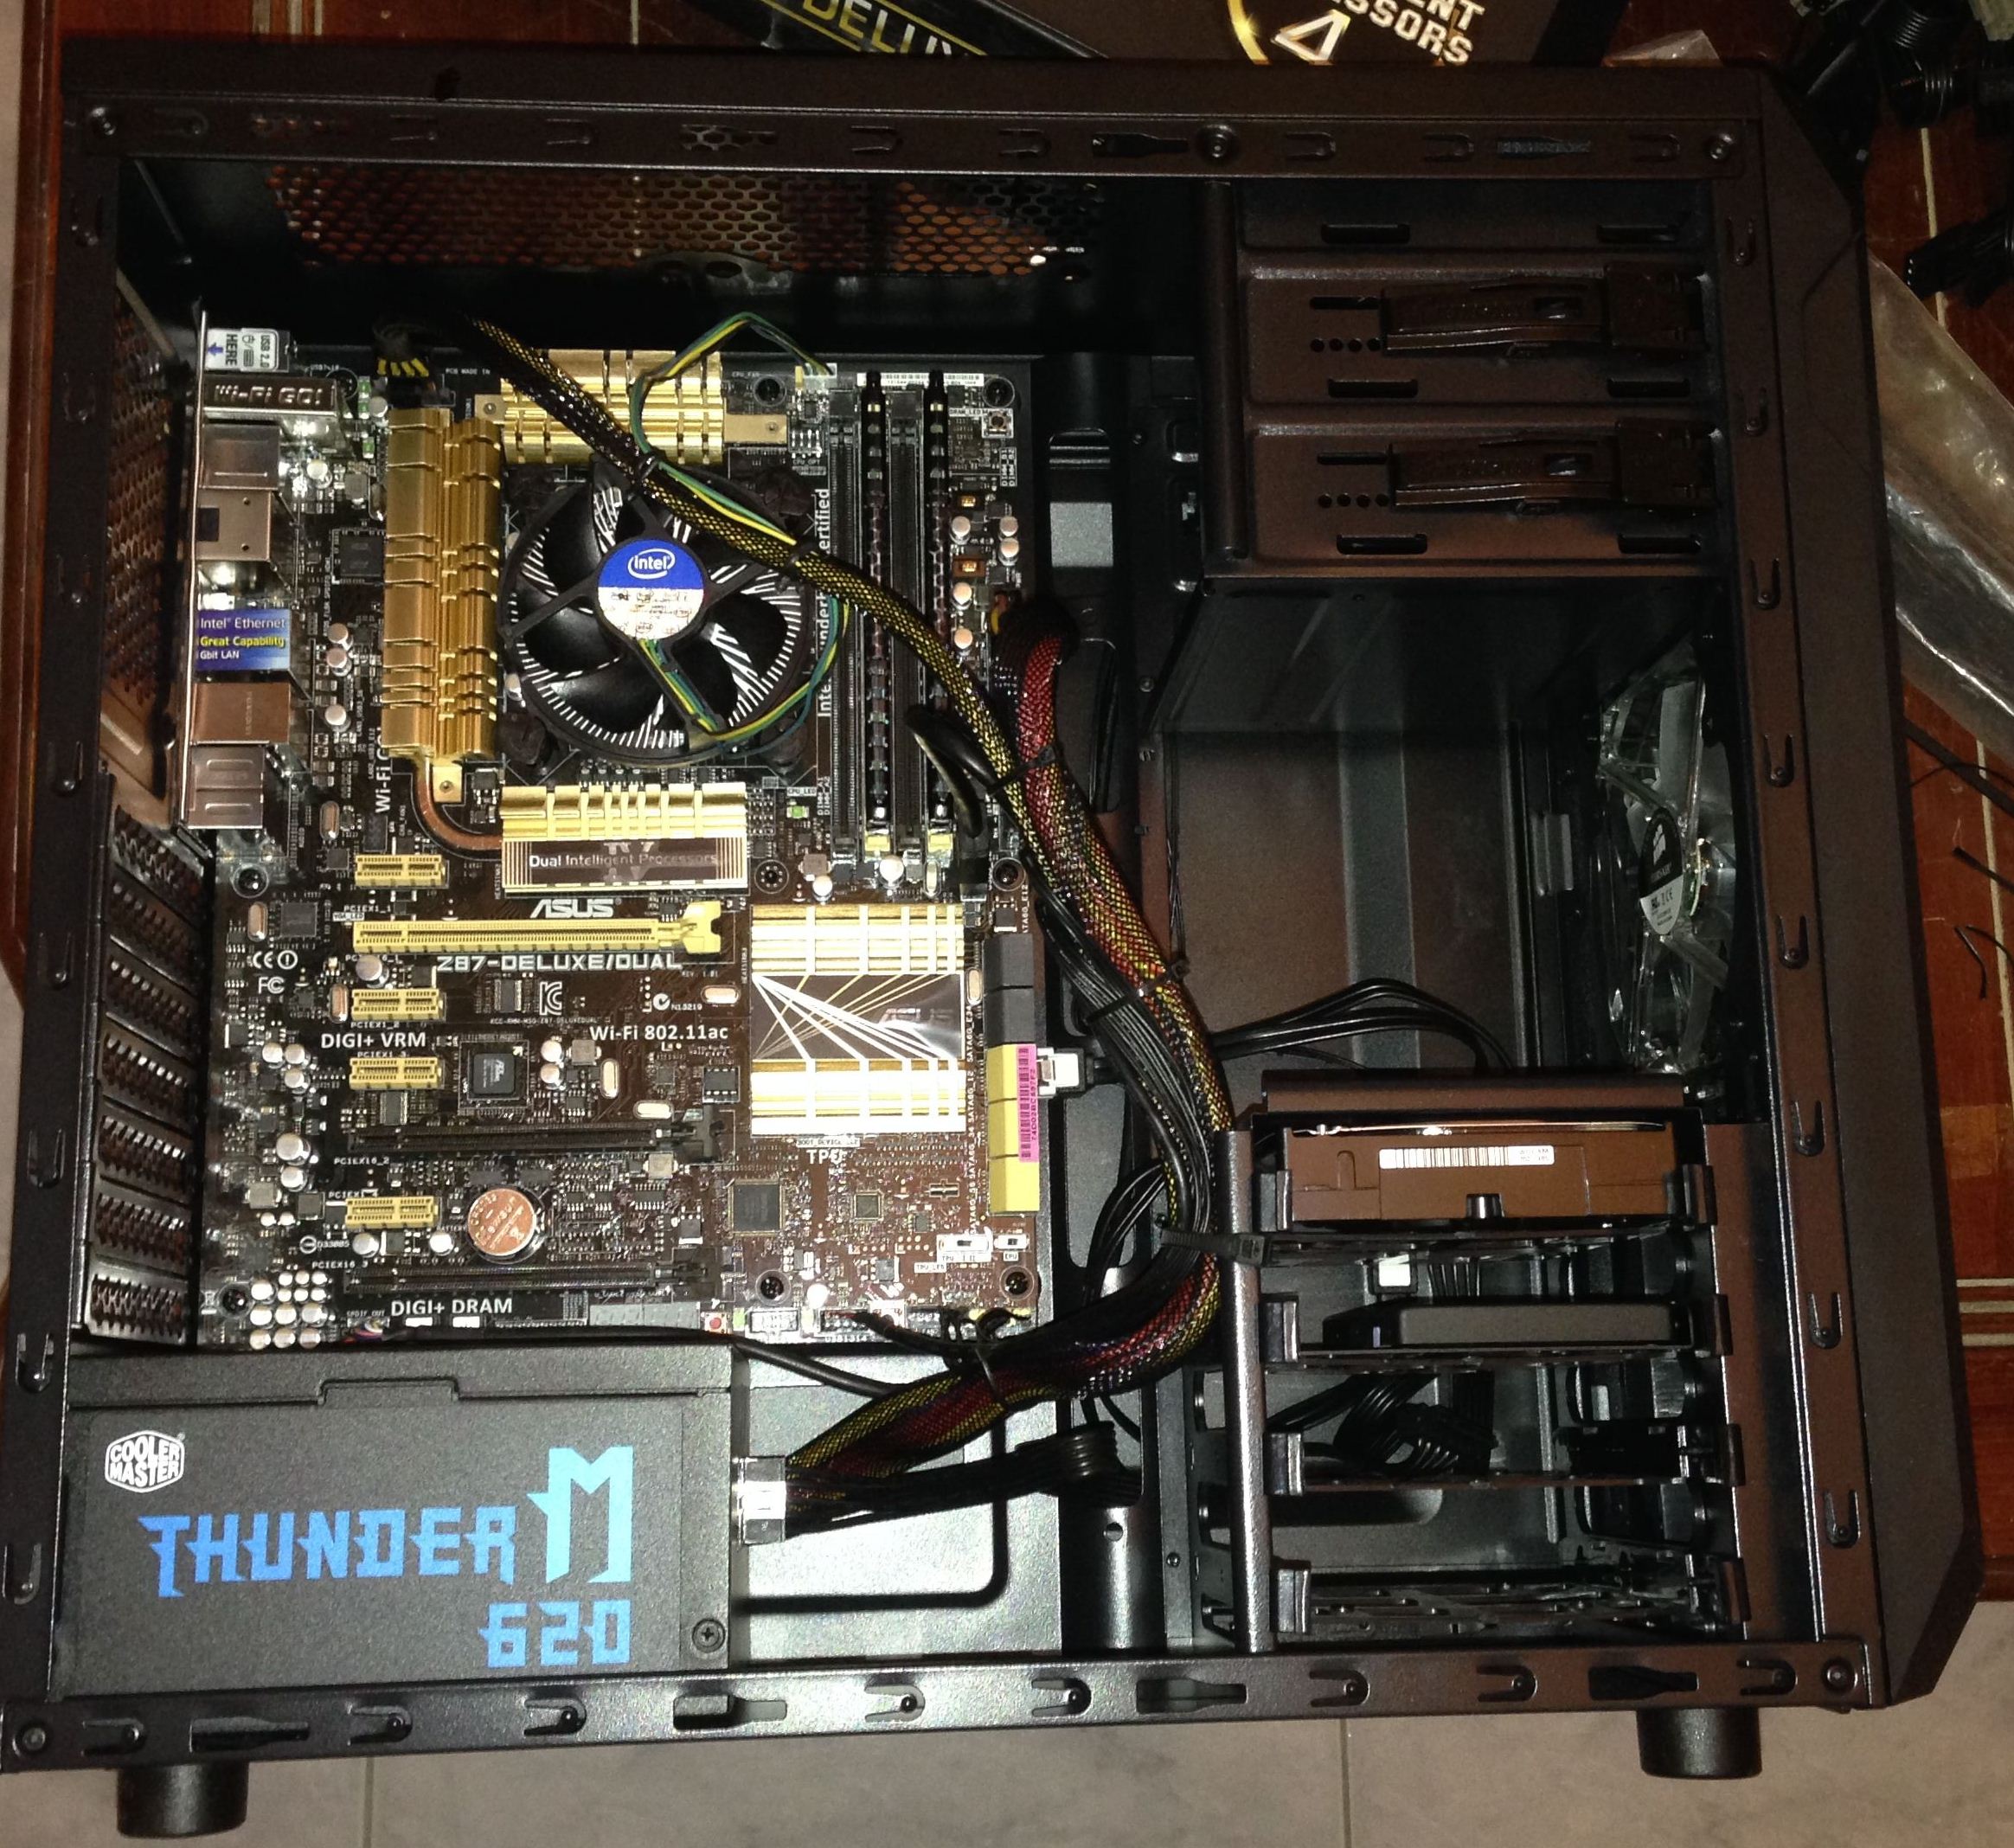
What does it look like?
Baby Dragons being born

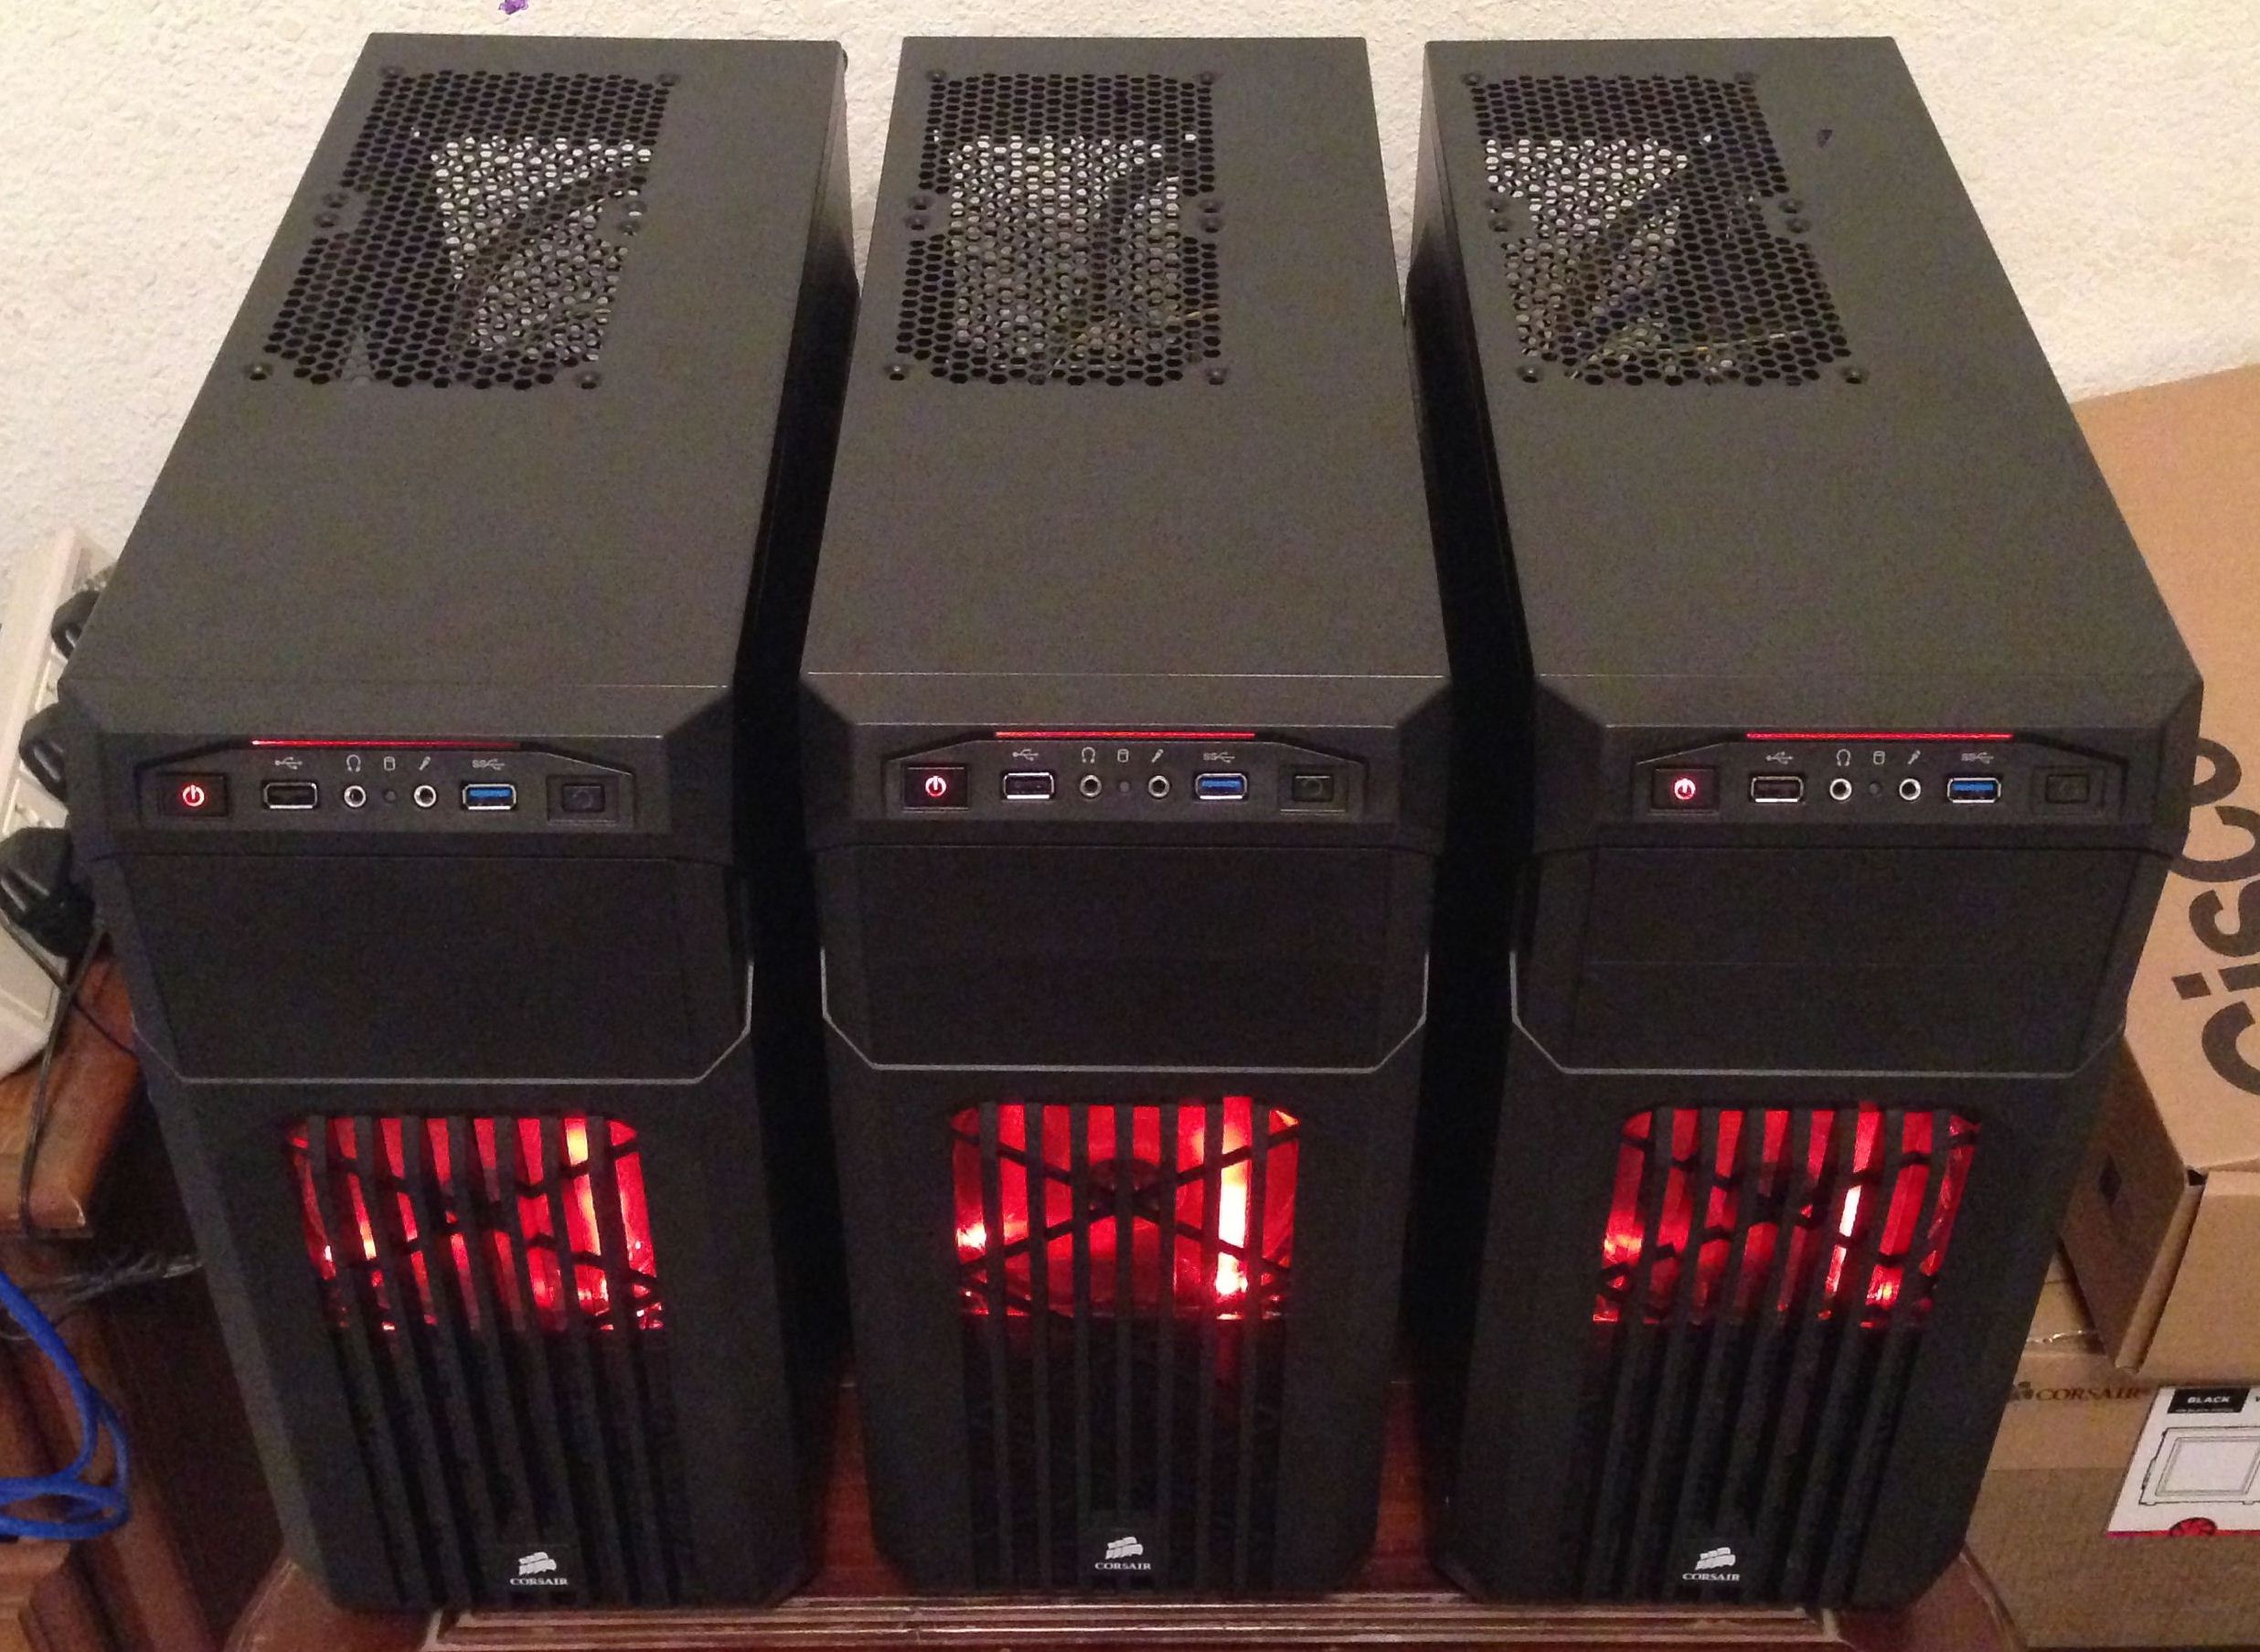
Baby Dragons ready to fly and hunt
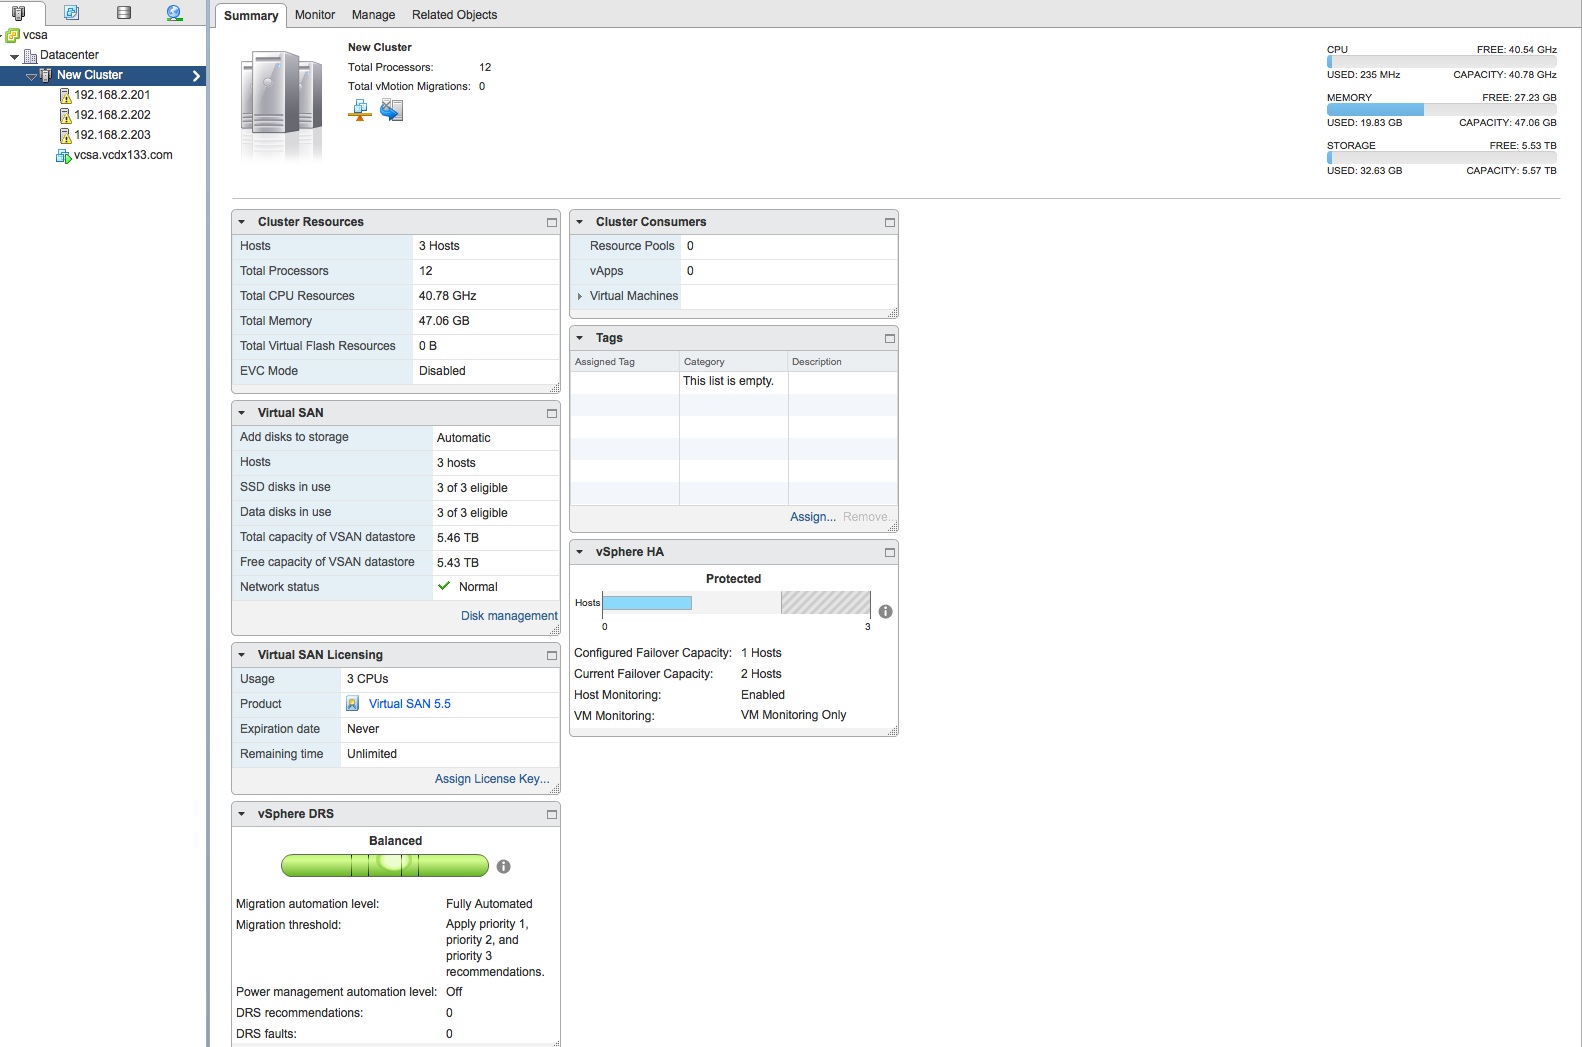
vSphere Web Client Cluster Summary (note the high RAM utilisation due to VSAN)
Other Home Lab resources
- Adult Dragon home labs: Michael Webster, David Klee, Jason Boche
- Junior Dragon home labs: Frank Denneman, Josh Odgers, Fabio Rapposelli, Craig Kilborn
- Baby Dragon home labs: Erik Bussink, Eric Shanks, Chris Wahl, Brian Suhr, Phillip Jaenke, William Lam, Derek Seaman
- Configuration Guides: Erik Bussink, Florian Grehl, Cormac Hogan, Duncan Epping, Rawlinson Rivera

One thought on “Baby Dragon Triplets – VSAN Home Lab”
Comments are closed.