 The NPX Design Review (NDR) has a 90 minute “Solution Design Presentation” where the NPX candidate presents their design submission to the examiners. This post is an enhancement of the presentation strategy I developed for VCDX and customised for NPX.
The NPX Link-O-Rama is a great resource for all things NPX, including this applicable list of articles in my VCDX Deep-Dive series (more than 70 posts).
You must deliver your presentation in such a way that demonstrates subject mastery with the Decision Reason and the Basic, Advanced and Expert details on each subject. Josh Odgers’ blog has a good write-up on this.
For example: “My vSphere HA configuration is with %-based Admission Control, I selected this because I have a small number of large VMs that would skew the slot size calculation of N+1 admission control. (Decision Reason & Basic) One of the operational risks with %-based is that the percentages for CPU and RAM must be manually reconfigured when new hosts are added to the cluster. (Advanced) The Master node election process takes 15 seconds and occurs using UDP traffic on port 8182. (Expert).”
The presentation slide deck is the gateway to your success, it will be used to complement and highlight the information that you deliver verbally. If you have to start drawing diagrams on the whiteboard, then you are wasting time, when you should have that slide in your Deep-Dive section. With that being said, you will be asked to whiteboard during the defence, so make sure those skills are well developed.
On the eve of my NPX defence, I spent 5 hours reorganising my presentation to sequentially follow the NPX blueprint. This is because the examiners have a scoring rubric that aligns with the blueprint, so it is helpful for everyone involved if you deliver information “in-sync” with the blueprint. If you do not follow this sequence, then you will be asked questions out of series and be forced to jump backwards and forwards through your presentation, breaking your flow and train of thought – not good.
A. Introduction
- Slide 1 – Title Slide – Who you are – What you are doing here
- Slide 2 – Project Overview – Who the customer is and a 15 second solution overview
- Slide 3 – Design process you followed
- Slide 4 – Project Implementation process you followed
- Slides 5 to 7 – Conceptual Model –> Requirements/Constraints/Assumptions/Risks (only the most important/unique that shaped your design)
B. Conceptual/Logical Design Elements
- Slide 8 – Scalability
- Slide 9 – Resiliency
- Slide 10 – Performance
- Slide 11 – Manageability and Control Plane Architecture
- Slide 12 – Data Protection and Recoverability
- Slide 13 – Compliance and Security
- Slide 14 – Virtual Machine Logical Design
- Slide 15 – Virtual Networking Design
- Slide 16 – Third-party Solution Integration
C. Physical Design Elements
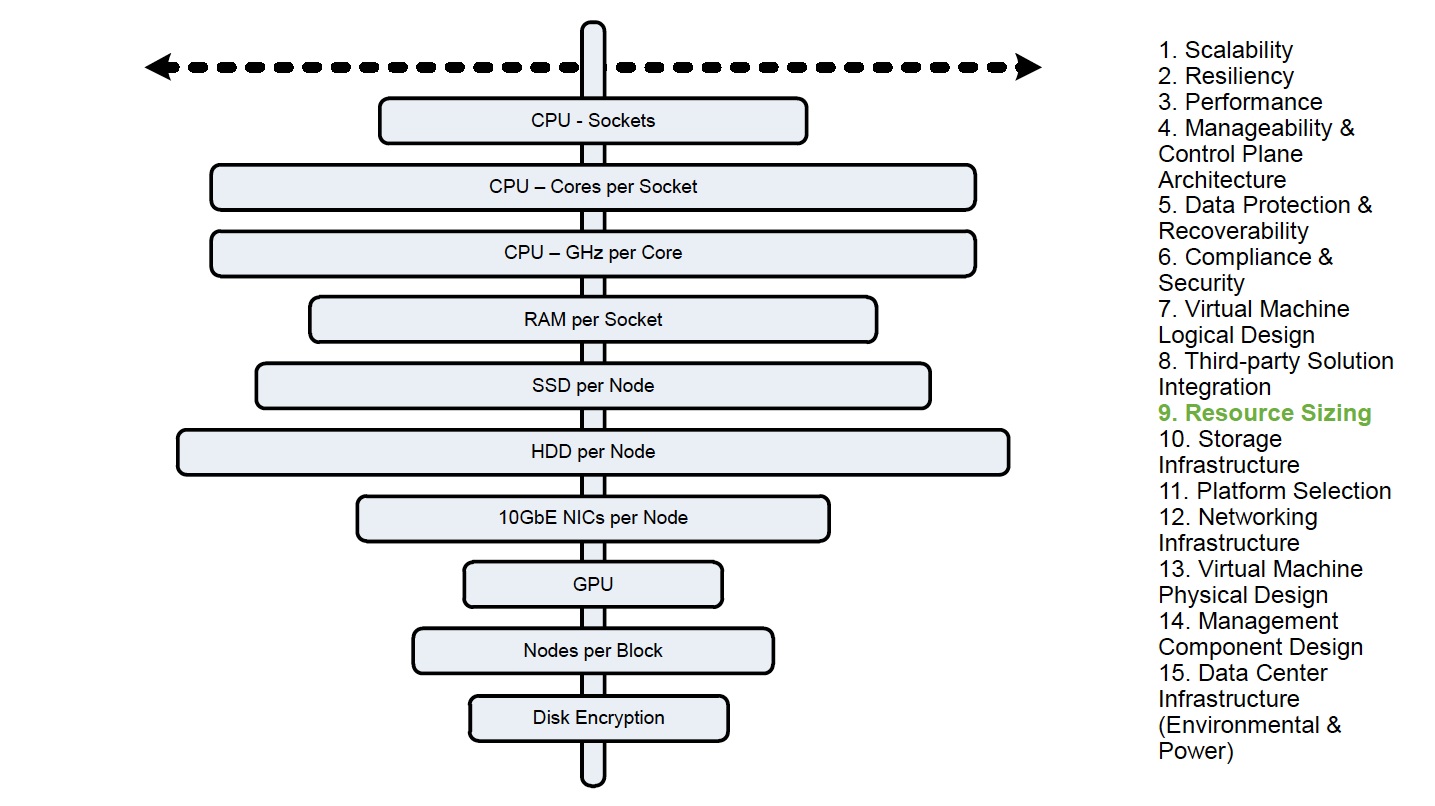
- Slide 17 – Resource Sizing
- Slide 18 – Storage Infrastructure
- Slide 19 – Platform Selection
- Slide 20 – Networking Infrastructure
- Slide 21 – Virtual Machine Physical Design
- Slide 22 – Management Component Design
- Slide 23 – Datacenter Infrastructure (Environmental and Power)
D. Consultation Skills
- Slide 24 – Web-Scale Migration Plan
- Slide 25 – Web-Scale Design
- Slide 26 – Web-Scale Operations
- Slide 27 – Future Improvements
E. Deep-Dive Slides
- Slides 28 to 60 – Any Deep-Dive slides that elaborate on the concepts presented
Here is an example slide with the blueprint sequence on the right-hand side acting as a “Table of Contents” to assist in tracking:
Slides 1 to 27 should take you around 30 minutes to complete whilst talking without interruption. You must practice this until you can present it without looking at the slide deck. You need to know this back-to-front, inside-and-out. Each Highlight slide should have 4 or 5 decision points with the justification and three levels of detail that you will deliver clearly and concisely.
Here is the kicker, you have a slide deck with a set of highlights that you can deliver within 30 minutes, however when you present to the examiners, they will ask questions that require deep dives and whiteboarding, so practice switching from the highlight section to the matching deep dive slides. Practice delivering the entire slide deck within 90 minutes. If you offer up information without the examiner having to prompt you, then your score will be higher because you had more time to talk.
During the 90 minute window, you need to ensure that you deliver your message quickly and clearly. If you do not know something, either make a guess, qualifying your statement with “I think it is X because of Y” or say “I do not know, but I would check resource Z to find out”. Do not waste time “blathering”; stay on point and continue scoring.
As soon as you have answered the question, continue delivering your presentation. Do not stand there waiting for approval or consent. You are an expert who has answered the examiner’s question fully; continue scoring.
Make sure you:
- Practice standing whilst presenting with the NPX timer running on a tablet
- Develop your presentation style; Eliminate any rocking, fidgeting, hand wringing, “umming”, “ahhing” or blathering
- Use a remote mouse with a laser pointer
- Get used to checking the timer to see how much time is remaining
- Record/Video yourself and critique your performance
- Present to a wall/study group/peers/mock panel – practice, practice and practice again
- Develop an air of confidence that clearly communicates to all who see and hear you – they should be thinking “This person knows what they are talking about, I am glad they designed my solution.”
- Respond to questions with assurance and authority
- Do not be meek and hesitant, like a child standing before the principal at primary school
- Do not get sucked into focusing completely on the presentation and reading every single item, verbatim
- Do not rush your speech, tripping or stuttering your words; speak with a measured, confident cadence, that delivers information in the most efficient manner
- Stick to your design decisions, believe in them, regardless of what an examiner says
- For your major design decisions, have alternate scenarios you considered but could not select due to conflicting requirements or constraints
Up until the day of the presentation, you will be tweaking and fine-tuning the slide deck. Every time you have a Mock Defence, with your Peers, Study Group or NPX Mentor, you will have feedback and suggested improvements to your slide deck. This is normal, do not stress about it.
Your PowerPoint presentation may crash on the Mac OS X Laptop provided, so also bring a PDF version. Practice using the PDF version, particularly if you are fond of PowerPoint “hot links” and “transitions”. Keep it Simple. Subject mastery will win you the NPX, not a “fancy” PowerPoint slide deck.
