 This post covers a 7 step process for troubleshooting your home Internet connection from a Desktop (Windows 7 or OS X). I wrote this for someone who was having ISP problems a few years ago. The failure scenario of each step has a canned “Technical Statement” that you can communicate to the Help Desk to assist in resolving the issue.
Preparation
- Need PC (Windows 7 or MacBook OS X) and Internet connection (Wireless HUB, SmartPhone with HotSpot enabled or Free WiFi in a Café).
- NOTE: Unless you have Jailbroken your Tablet or SmartPhone, you generally cannot open a Command Prompt or Terminal Window. Therefore a PC is required for Steps 1 to 5.
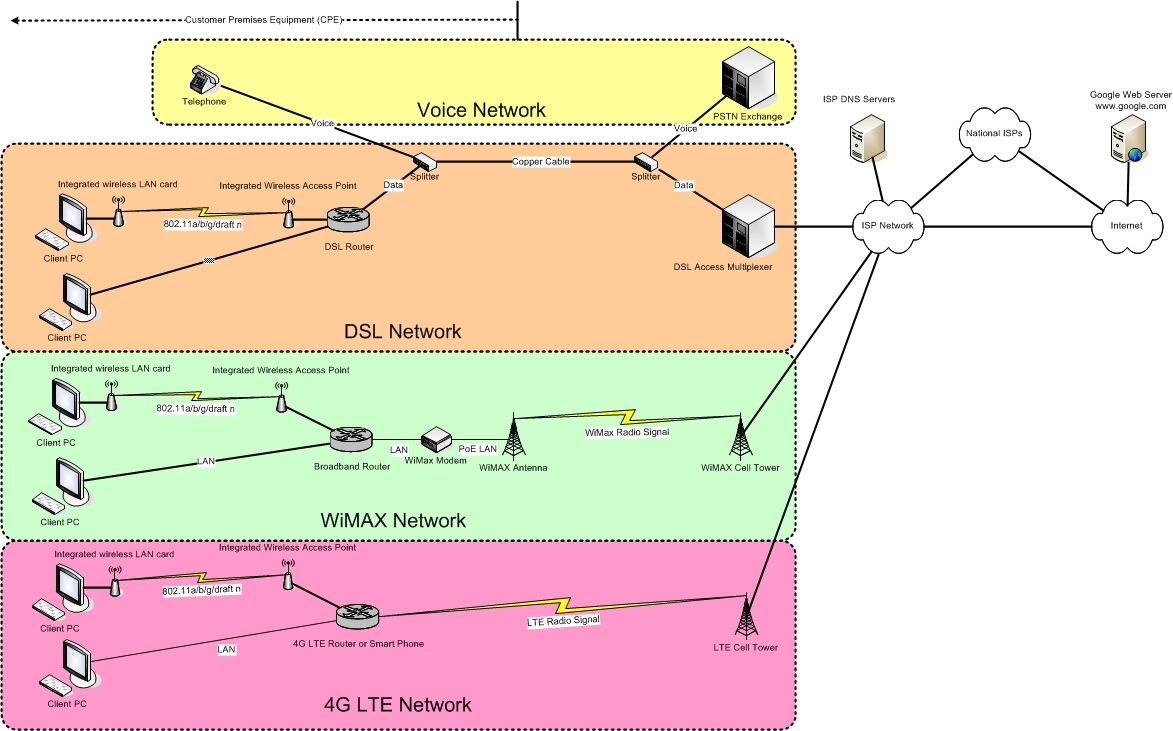
- This Flow Chart assumes WiFi connectivity is being used. It uses the end user client to perform a basic series of tests. It assumes the user has an ISP “Modem” that is powered on and appears to be functioning correctly (Power Light on, LTE Light on, Internet Light on, WiFi Light on, Data Light on, etc.).
- The output of each step is a basic action plan to fix the failure. It also includes the magic phrase to communicate to your Technical Support/Help Desk contact that describes your problem in technical terms for them to understand and resolve.
- This process is not really applicable for Corporate networks, since they are protected by firewalls, end-point protection agents, separate internal/external DNS servers and web proxy servers.
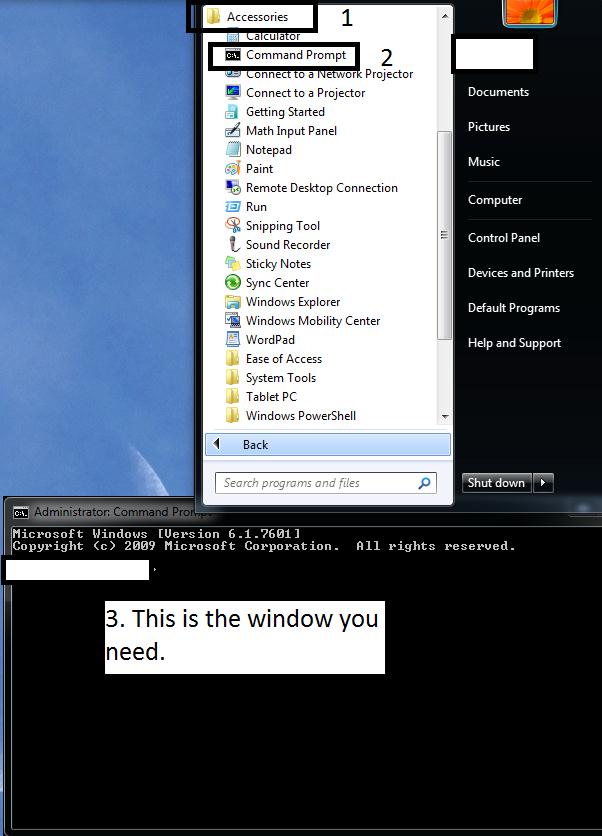
Windows 7 PC: Go to Start Button, All Programs, Accessories, Command Prompt. This screen should open:
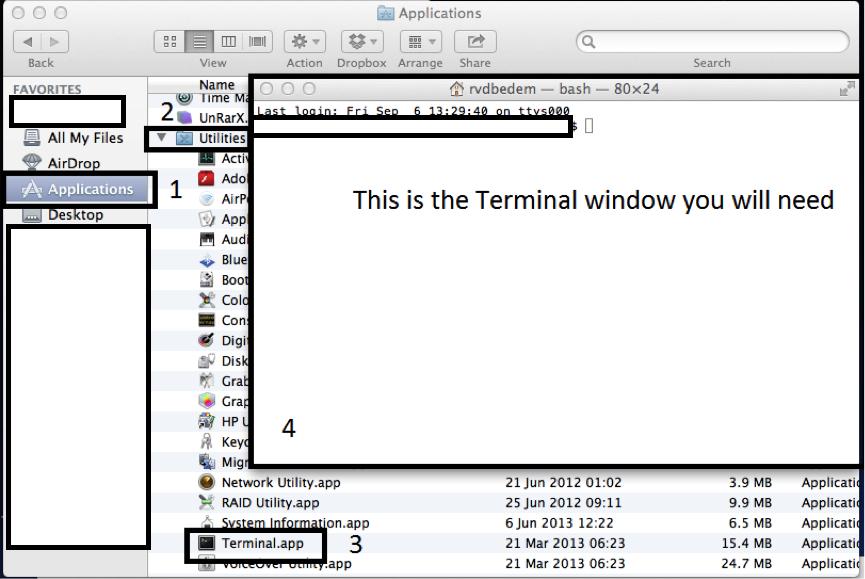
MacBook OS X: Go to Finder, Applications, Utilities, Terminal. This screen should open:
Step 1 – “Go-No-Go” Test
OBJECTIVE: This checks Internet connectivity (Steps 2 to 5) in one step. If it fails, then additional steps 2 to 5 are required to diagnose the exact problem.
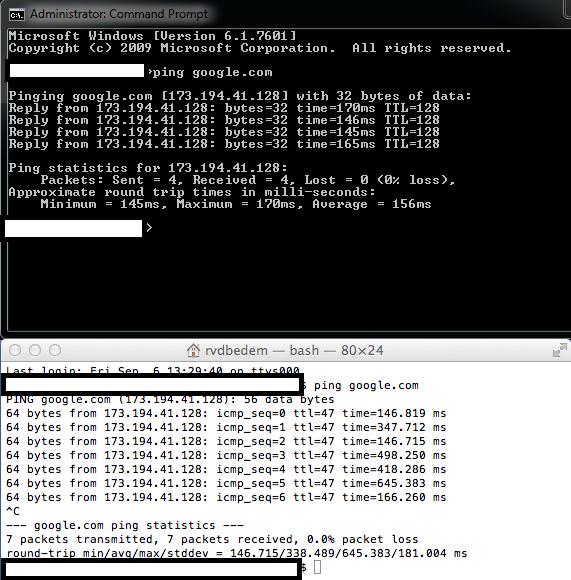
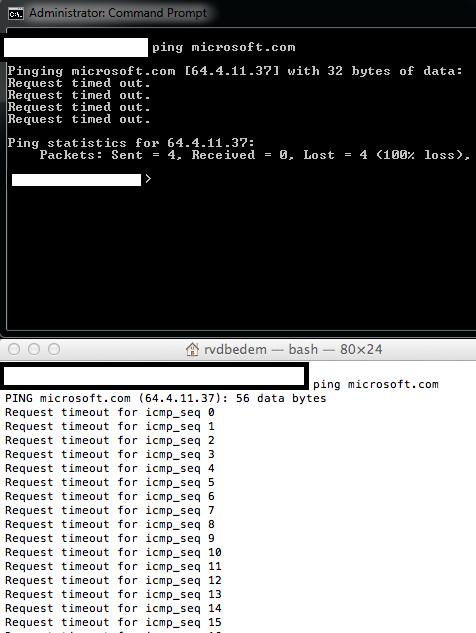
A. In your terminal window type the command “ping google.com”.
PASS: Reply responses are received. ACTION: Proceed to Step 6
FAIL: Request timeout messages appear. ACTION: Proceed to Step 2
PASS Screens:
FAIL Screens:
Step 2 – Check Wireless LAN Connectivity
OBJECTIVE: Each device you have connects to your Internet provider via a “Hub”, “Modem” or “SmartPhone”. You need to check that your end user device (PC, iPad) is actually connected to the Modem.
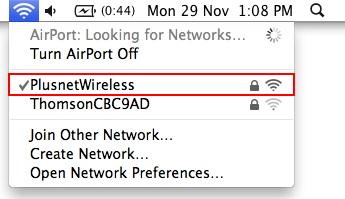
A. Check that the WiFi icon on your PC is connected to a working WiFi Access Point.
PASS: WiFi icon is active. Connected or Tick is visible. Signal strength is 80% to 100%. ACTION: Proceed to Step 3.
FAIL: WiFi icon is disabled, not connected or shows an error. You have a PC or Modem that is misconfigured or faulty. Until this is resolved you will not be able to proceed. ACTION: Check WiFi is enabled on PC and Modem, your WiFi SSID is displayed on the PC and the WiFi Passkey is entered correctly on PC. TECH SUPPORT: Tell them that you cannot connect to your Modem via WiFi.
PASS Screens:

Step 3 – Check DHCP is working
OBJECTIVE: DHCP is what allows your PC or iPad to automatically connect to the Internet without user configuration. Need to check that your end user device (PC, iPad) has a valid IP address, Gateway IP address and DNS IP address.
A. Type “ipconfig /all” on Windows 7. On OS X, go to Wireless icon on top right corner, Open Network Preferences, Advanced, TCP/IP tab. For Windows 7 you will see an IP address in the “Default Gateway” field. For OS X, you will see an IP address in the “Router” field. This is used in Part B.
The other things to verify are: IPv4 Address is present, DNS Server Address is present (need to click DNS tab for OS X) and DHCP Server address is present (“Using DHCP” is selected for OS X).
If DHCP is not configured/enabled, then Manual IP addressing may be configured, which will not work with all WiFi connections. You need to make sure your WiFi connection is set to DHCP.
PASS: DHCP is configured and you can see a Gateway IP. ACTION: Proceed to Part B.
FAIL: DHCP is not configured on your PC (DHCP Client) or Modem (DHCP server mode) and a Manual IP Address is set on PC. ACTION: Configure DHCP on your PC (DHCP Client) and Modem (DHCP Server). TECH SUPPORT: Tell them DHCP is not configured for your WiFi connection. Also mention that you have an active WiFi connection to your modem.

B. In the Terminal window type “ping <Default Gateway or Router IP Address>”. For example, “ping 192.168.2.1” or “ping 10.211.55.1” (from screenshots above).
PASS: Reply responses are received from your Modem. ACTION: Proceed to Step 4.
FAIL: Request timeout messages appear. Your Modem is not receiving the traffic from your PC, this means you cannot communicate with your Modem and therefore cannot access the Internet. ACTION: Get your Modem Gateway IP to respond to ping requests from your PC. TECH SUPPORT: Tell them your PC cannot ping the Default Gateway IP Address of your Modem/Router. Also mention that you have an active WiFi connection to your Modem and DHCP appears to be working.
Step 4 – Check Internet Protocol (IP) Connectivity
OBJECTIVE: The Internet functions with IP addresses. Checking end-to-end connectivity is measured in milliseconds.
Google web servers allow ping responses. Not all web sites allow this. The Google servers for this test are: 173.194.34.64, 173.194.34.65, 173.194.34.66, 173.194.34.67 and 173.194.34.68.
These IP addresses are current as of September 2013, however they can change. To find the latest, merely type “nslookup” and then “google.com” and the web servers for Google will be listed. You need a working Internet connection for this.
A. In the Terminal window type “ping <Google web server IP from the paragraph above>”. For example, “ping 173.194.34.68”
PASS: Reply responses are received from your Google IP. ACTION: Proceed to Step 5
FAIL: Request timeout messages appear. Your PC is not receiving the traffic from Google over the Internet, this means you have a problem from your Modem to the Internet and therefore cannot access the Internet. ACTION: Call your ISP Technical Support and get them to restore Internet connectivity to your Modem. TECH SUPPORT: Tell them you cannot ping Public IP Addresses (eg. Google web server) from your PC. Also mention that you have a working WiFi connection to your Modem, with functioning DHCP and the Gateway IP is pingable.
Step 5 – Check DNS is working
OBJECTIVE: DNS is what converts a web site address (google.com) to an IP address.
A. Type “ipconfig /flushdns” for Windows 7. Type “sudo killall -HUP mDNSResponder” for OS X. This clears the DNS cache. This is required to test that DNS is functioning.
B. Type “nslookup” in the Terminal window. Then type “google.com”.
PASS: nslookup will respond with “google.com” and IP Addresses. You have a fully functioning Internet connection. ACTION: Proceed to Step 6.
FAIL: DNS is not working. Until your ISP DNS server responds to DNS queries, you cannot access Internet services by name (eg. http://www.google.com and http://www.microsoft.com will not be accessible). ACTION: Call your ISP Technical Support and get them to fix their DNS service. TECH SUPPORT: Tell them you cannot resolve names with DNS. Also mention that you have a working WiFi connection to your Modem, with functioning DHCP, pingable Gateway IP and pingable Public IP Addresses.

Step 6 – Broadband Internet Speed Test
OBJECTIVE: Everything may be functioning, but a slow Internet connection will cause latency issues.
A. Open your web browser and go to http://www.speedtest.net. Select “Begin Test” and let the test run to completion.

B. The result page will report Ping time, Download speed and Upload speed. These should match the service that your have purchased from your ISP.
PASS: Ping time is under 100 ms. Download Speed matches your Data Plan. Upload Speed matches your Data Plan. ACTION: Proceed to Step 7.
FAIL: Ping time is over 100 ms. Download Speed does not match your Data Plan and is measured in Kbps. Upload Speed does not match your Data Plan and is measured in Kbps. ACTION: Try running the test a number of times and see if you get consistent results. You can also select new server and run the test with different test sites. Call your ISP Technical Support and get them to fix your Internet access speeds. TECH SUPPORT: Tell them your Internet connection speed is slower than your Data Plan. Also mention that you have a working WiFi connection to your Modem, with functioning DHCP, pingable Gateway IP, pingable Public IP Addresses and working DNS.

Step 7 – Reliability Test
OBJECTIVE: The most difficult connectivity problems to solve are intermittent issues within your network, the ISP network or the remote site you are trying to access. The service will “flap”, sometimes working, sometimes not, without any apparent rhyme or reason. Reliability testing isolates this type of behavior.
A. In your Terminal window type “ping –t <Name of site you are having trouble with>” for Windows 7, “ping <Name of site you are having trouble with>” for OS X.
B. Let this run for hours or days until the problem is fixed. When you are not able to access the resource, check this ping response time to see if it is reachable or not.
C. Open additional windows to continually ping your Gateway/Router IP and Google.com. This indicates if there are problems from PC to Modem, Modem to ISP or ISP to Internent.
NOTE: Some web sites do not allow ping responses and therefore this test cannot be used.
PASS: If pings are responding all the time, even when the web site/application issue is present, this means Internet connectivity to this site is OK. If your application is not working, then it may be your browser settings, security settings, firewall settings, Java version etc. ACTION: Do not call your ISP, call the owner of the Application/Web site for resolution. TECH SUPPORT: Tell them you have a fully functional Internet connection, but have problems with their web site or application.
FAIL: If pings are timing out at the same time your have connectivity problems with your web site or application, then there is an intermittent problem with your Internet connection (PC to Modem, Modem to ISP or ISP to Internet). ACTION: Call your ISP to ask for their assistance. TECH SUPPORT: Tell them your connection is timing out whilst you are accessing a particular web site/application. Also mention that you have a working WiFi connection to your Modem, with functioning DHCP, pingable Gateway IP, pingable Public IP Addresses, working DNS and Broadband speeds that match your Data Plan.
If your problem is in the “ISP to Internet” area, then there are no guarantees that your ISP can resolve these issues, since they are outside of their control.
Other troubleshooting actions are to try the same thing from a different PC, different ISP connection. Only change one thing at a time and this will allow you to isolate the problem. That is, is it my PC, is it my ISP, etc.?

One thought on “Tech101 – Home Internet Troubleshooting”
Comments are closed.