 This is part 5 of the vCenter 5.1 to 5.5 Update 1c upgrade, detailing the installation of vSphere Update Manager and vSphere Syslog Collector for vCenter 5.5.
This is an eleven part series, describing how to upgrade from vCenter 5.1 to vCenter 5.5:
- vCenter 5.5 Upgrade with Windows Server 2012 R2 – Part 1 – Preparation
- vCenter 5.5 Upgrade with Windows Server 2012 R2 – Part 2 – OS Build
- vCenter 5.5 Upgrade with Windows Server 2012 R2 – Part 3 – vCenter Install
- vCenter 5.5 Upgrade with Windows Server 2012 R2 – Part 4 – Cleanup
- vCenter 5.5 Upgrade with Windows Server 2012 R2 – Part 5 – Integrating vUM and Syslog
- vCenter 5.5 Upgrade with Windows Server 2012 R2 – Part 6 – Integrating vC Ops
- vCenter 5.5 Upgrade with Windows Server 2012 R2 – Part 7 – Integrating vIN
- vCenter 5.5 Upgrade with Windows Server 2012 R2 – Part 8 – Upgrading and Integrating vCM
- vCenter 5.5 Upgrade with Windows Server 2012 R2 – Part 9 – Upgrading and Integrating vCO Appliance
- vCenter 5.5 Upgrade with Windows Server 2012 R2 – Part 10 – Upgrading and Integrating CBM
- vCenter 5.5 Upgrade with Windows Server 2012 R2 – Part 11 – Upgrading ESXi
Prerequisites
- You have completed steps 1 to 4.
- You have administrator access to vCenter and the vCenter Database server.
- You have mounted the vCenter installation ISO image to the vCenter server.
- Extend E: of the vCenter server to handle the Patch repository (120GB).
- Add F: to the vCenter server to be the Syslog repository (40GB).
Prepare the vCenter Update Manager Database on the existing vCenter Database Server
- RDP or open the console to the vCenter SQL Server and run the Microsoft SQL Server Management Studio.
- Login as “sa”.
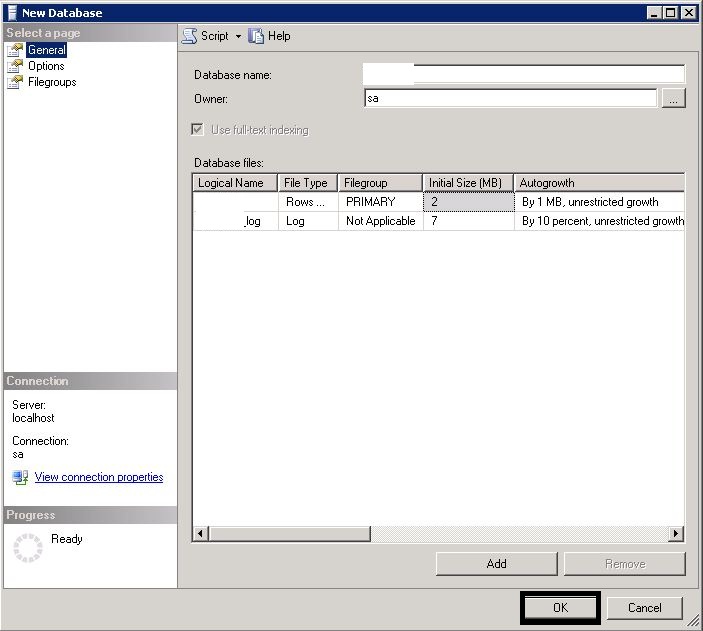
- Select the “Databases” folder and right mouse click. Select “New Database”.
- Enter the “Database name” and make sure the owner is “sa”.
- Select the “Options” tab and set the “Recovery Model” to “Simple”. Then press “OK”.
- Select the “Security” folder and then the “Logins” sub-folder and select “vpxuser”. Right mouse click and press the “Properties” option.
- Select the “User Mapping” object and tick the new vUM database you just created.
- Then tick the “db_owner” role in the “Database role membership” window and make sure the “Default Schema” is set to “dbo”.
- Press “OK”.
- Then access the “Database Properties” of the vUM database and select the “Permissions” object. Make sure that the “vpxuser” is listed as a “User”. Press “OK”.


Install and Configure the 32bit DSN for the vUM Database
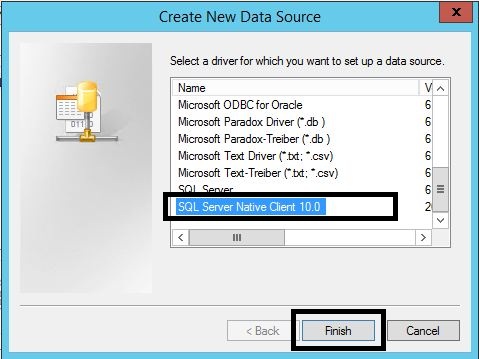
- Press the Windows “Start” button and run the “ODBC Data Sources (32-bit)” program.
- Select the “System DSN” tab and then press “Add”. Note the existing 64bit DSN for the vCenter DB already configured in Part 2.
- Scroll down to the bottom and select the “SQL Server Native Client 10.0” driver and then press “Finish”.
- Enter the name “VUMDB”, the description “VUMDB” and then select the name of the vCenter Database server (SQL Server 2008 R2) configured earlier from the “Server” list. Press “Next”.
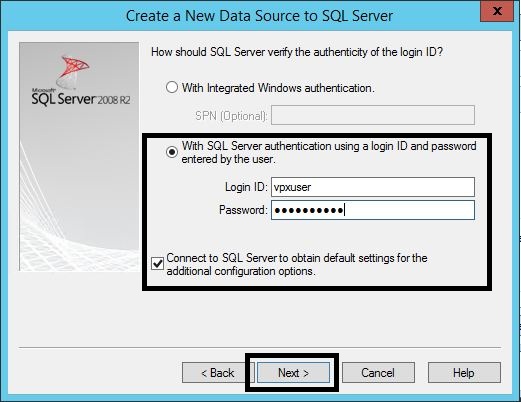
- Select “With SQL Server authentication using a login ID and password assigned by the user”, use the “vpxuser” and password and press “Next”.
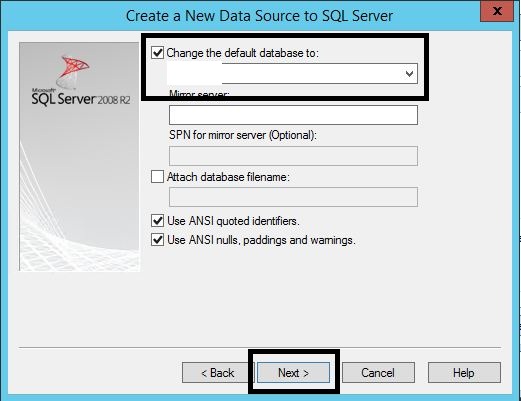
- Tick “Change the default database to” the vCenter Database name recorded earlier.
- Select “Finish”.
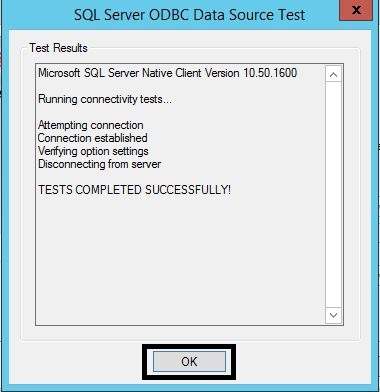
- Select “Test Data Source”. Verify “TESTS COMPLETED SUCCESSFULLY!” appears and select “OK”. Then select “OK” again.
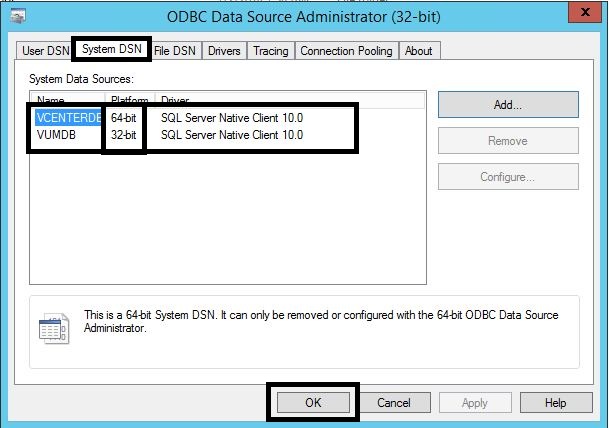
- Verify that the “System DSN” tab now has a 32bit “VUMDB” System Data Source with a “SQL Server Native Client 10.0” driver. Then select “OK”.


Install vSphere Update Manager
- Make sure the vCenter 5.5 Update 1 ISO image has been mounted to the CDROM of the Windows Server 2012 R2 Virtual Machine.
- Open the console of the new vCenter VM running Windows Server 2012 R2 and login with the AD “vCenter” service account.
- Browse to the CDROM and select the “autorun.exe” file and “Run as Administrator”.
- In the VMware vSphere 5.5 vCenter Installer window, select “vSphere Update Manager” from the “VMware vCenter Support Tools” and press “Install”.
- Select “OK”.
- Press “Next”.
- Select “I accept the terms in the license agreement” and press “Next”.
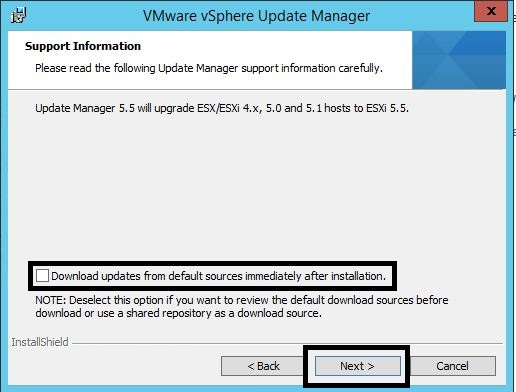
- Deselect “Download updates from default sources immediately after installation” and press “Next”.
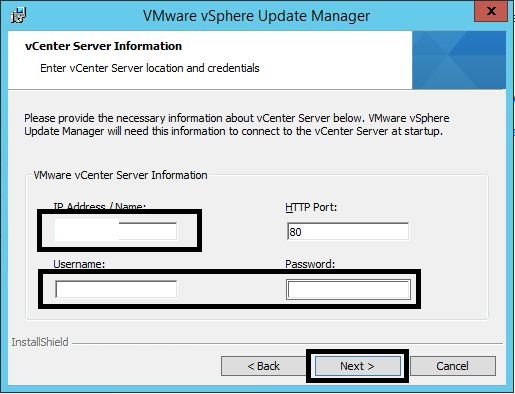
- Enter the vCenter “IP Address”, “Username” (service account) and “Password” and press “Next”.
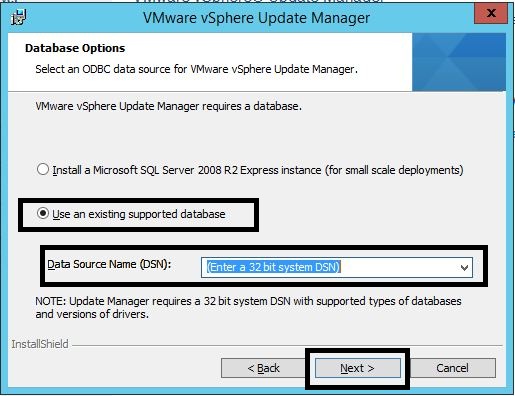
- Select “Use an existing supported database” and select “VUMDB” from the “DSN” drop down menu. Press “Next”.
- Enter the “vpxuser” as the “Database Username” and the “Database Password” and then press “Next”.
- Select the vCenter IP Address from the drop down menu and select “Yes, I have Internet connection and I want to configure proxy settings now” if you have a proxy. Then press “Next”.
- Enter the proxy settings and then press “Next”.
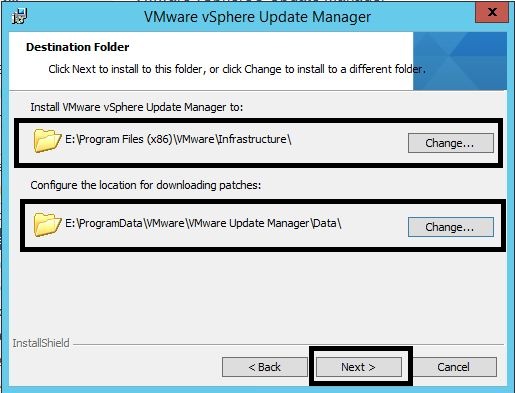
- Change the Install and Patch locations to “E:” and press “Next”. Make sure E: has enough capacity for storing patches (120GB).
- Press “Install”.
- After the installation has completed, press “Finish”.
- You now have to enable the vUM plugin from your vSphere C# client and configure the baselines, then attach them to hosts and VMs for scanning and remediation. An example of this is detailed in Part 10.


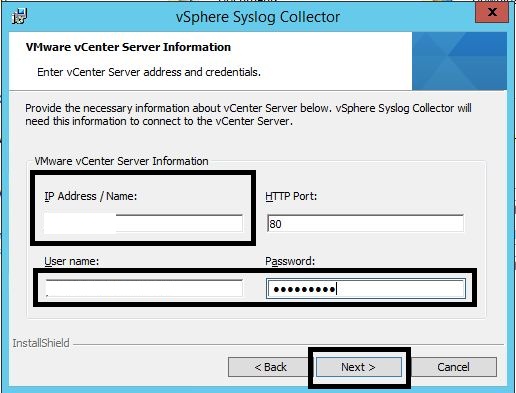
Install vSphere Syslog Collector
- In the VMware vSphere 5.5 vCenter Installer window, select “vSphere Syslog Collector” from the “VMware vCenter Support Tools” and press “Install”.
- Select “OK”.
- Press “Next”.
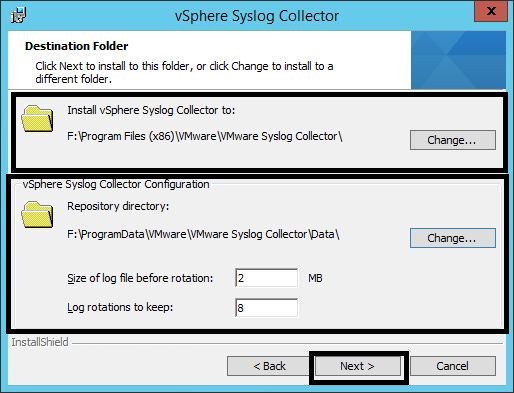
- Change the Install and Repository locations to “F:” and press “Next”. Make sure F: has enough capacity for storing logs (40GB). This will vary based upon the size of the log rotation and number of log rotations to keep.
- Press “Next”.
- Select “VMware vCenter Server installation” and then press “Next”.
- Enter the vCenter “IP Address”, “Username” (service account) and “Password” and press “Next”.
- Press “Yes” to accept the vCenter Server SSL Certificate.
- Press “Next”.
- Select the vCenter IP Address from the drop down menu and press “Next”.
- Press “Install”.
- After the installation has completed, press “Finish”.


Update the Syslog configuration on each ESXi Host
- Open the Web Client of vCenter 5.5 and login as an administrator.
- Select each host and press the “Manage” object. Then “Settings” and the “Advanced System Settings”.
- Scroll down to the “Syslog” area.
- Set “Syslog.global.logDirUnique” to “True”.
- Set “Syslog.global.logHost” to “tcp://<IP Address of vCenter Server>:514”
- Once you have configured each host, browse to the vCenter Repository Directory configured earlier and verify each host has a directory with log files in it.

