 This is part 3 of the vCD Installation guide, describing the installation of the vCloud Director Database: SQL Server 2012 running on Windows Server 2012.
This is a five part series describing the steps to install and configure the components of vCloud Director 5.1:
- vCD Installation Guide – Part 1 – Preparation
- vCD Installation Guide – Part 2 – vCNS
- vCD Installation Guide – Part 3 – SQL Server 2012
- vCD Installation Guide – Part 4 – RHELS 6.3
- vCD Installation Guide – Part 5 – Application
Installing Windows Server 2012 R2 Data Center Edition with GUI
- Check that the Windows Server 2012 R2 ISO image is connected to the CDROM of the vCenter Virtual Machine.
- Power-On the VM and wait for the Windows Server 2012 R2 installation screen to appear. Select “Next”.
- Select “Install Now”.
- Select “Windows Server 2012 R2 Data Center (Server with a GUI) x64” and select “Next”.
- Accept the licence and select “Next”.
- Select “Custom: Install Windows only (advanced)”.
- Select “Drive 0 Unallocated Space” (100GB) and select “Next”.
- Wait for the “Installing Windows” screen to complete and then the VM will reboot.
- In the “Settings Window”, set the “Administrator Password”.
- When the “Press Ctrl+Alt+Delete to sign-in” message appears you can login.


Customise the Windows Server 2012 R2 Operating System for vCenter
- Install VMware tools. This is especially required for the vNIC “vmxnet3” driver.
- Access the “Server Manager” interface (it should start automatically after login) and configure the following OS settings.
- Set the Time-Zone.
- Disable the Windows Firewall for the Domain, Private and Public profiles.
- Configure the vNIC: IP Address, Netmask, Gateway and DNS servers.
- Disable Internet Explorer Enhanced Security.
- Change the computer name and add to Active Directory.
- Move the Computer object to the “vCD” OU in AD (Domain Admin task).
- Install Anti-Virus and set the “vCD” AV policy (Information Security task).
- Check that the server licence is activated from the KMS server.
- Check that the server has been updated with the latest patches from the WSUS server.
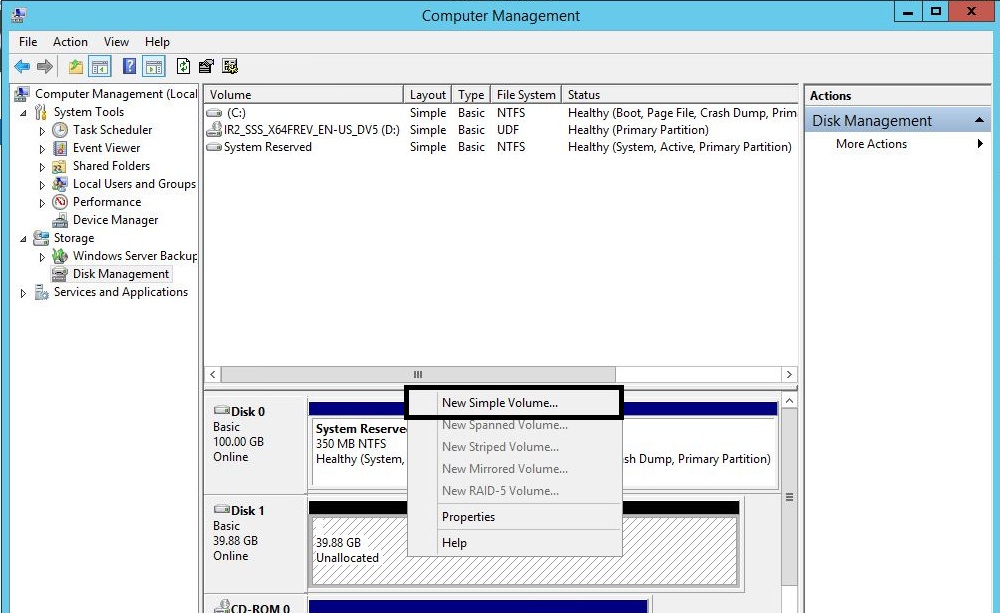
- From “Server Manager”, select “Tools” and then “Computer Management”.
- Within the “Computer Management” window, select the “Disk Management” object. Browse to the “Unknown” 40GB Disk and place it “Online”, then “Initialise” with “GPT” and finally create a “Simple Volume” that will map to E:.
- Within the “Computer Management” window, select the “Local Users & Groups” object. Browse to the “Administrator” Group and add the administrator groups and users that will manage this vCenter. In particular, your service account for vCenter must be added.


Install SQL Server 2012
- Check that the SQL Server 2012 ISO image is connected to the CDROM of the vCD DB Virtual Machine.
- Open the DVD Drive and run “Setup.exe” with the “Run as administrator” option.
- In the “Installation” window, select the “New SQL Server stand-alone installation or add features to an existing installation”.
- In the “Setup Support Rules”, verify all operations have completed with “Passes” and then press the “OK” button.
- In the “Product Key” window, select the valid licencing option and press the “Next” button.
- In the “Licence Terms” window, accept the licence terms and press the “Next” button.
- In the “Product Updates” window, press the “Next” button.
- In the “Setup Support Rules” window, verify all operations have completed with “Passes” and then press the “Next” button.
- In the “Setup Role” window, select “SQL Server Feature Installation” and press “Next”.
- In the “Feature Selection” window, select “Database Engine Services”, “Client Tools Connectivity”, “Integration Services” and “Management Tools Complete” and then press “Next”.
- In the “Installation Rules” window, verify all operations have completed with “Passes” and then press the “Next” button.
- In the “Instance Configuration” window, select “Default Instance” and then press the “Next” button.
- In the “Disk Space Requirements” window, press the “Next” button.
- In the “Server Configuration” window, select the “Service Accounts” tab and set the “SQL Server Agent”, “SQL Server Database Engine” and “SQL Server Integration Services 11.0” to “Automatic. Then press “Next”.
- In the “Database Engine Configuration” window, select the “Server Configuration” tab and select “Mixed Mode” and set the “sa” account password. Then “Add Current User” and press the “Next” button.
- In the “Error Reporting” window, press the “Next” button.
- In the “Installation Configuration Rules” window, verify all operations have completed with “Passes” and then press the “Next” button.
- In the “Ready to Install” window, press the “Install” button.
- In the “Complete” window, verify the message “Your SQL Server 2012 installation completed successfully with product updates” is present and then press the “Close” button.


Configure SQL Server 2012 for vCloud Director 5.1
- Press the Start button of Windows Server and select the “SQL Server Management Studio” icon.
- Access the Database server with “SQL Server Authentication” and the “sa” login by pressing “Connect”.
- Press the “New Query” button.
- Access the following “Configure a Microsoft SQL Server Database” page of the VMware vCD documentation site and paste the defined queries into the “SQL Query” window and press “Execute”. Check the following settings before executing the query: vCloud Database and Log Filenames and the vCloud user Password.


You are now ready to begin with the vCD Application RHEL Server build in Part 4.
Other Resources
