 Recently we consolidated our labs at RoundTower and I re-purposed an XtremIO X-Brick into the Cincinnati Demonstration Lab. I figured it was going to be very easy, execute the “reset to factory defaults” command and off I go. You will not be surprised to hear, it was a little more complicated than that.
This post explains how to recover/re-purpose the X-Brick to a point where it is ready to provide storage services.
Objective
- You have been asked to re-purpose an XtremIO X-Brick without any history or information on how it was configured previously.
- You want to use the X-Brick in your environment with vSphere 6.5.
- The XMS management platform will be the XMS virtual appliance (need OVA) and not the physical XMS.
Prerequisites
- Valid support contract with Dell-EMC, you will need to access documentation and downloads that require a valid login to Dell-EMC support.
- X-Brick is racked and stacked in the correct order (see below).
- X-Brick system cabling is in place (see below).
- FC or iSCSI interfaces are connected to SAN/LAN switch(es).
- Management interfaces are connected to LAN switch(es).
- Have a copy of the default passwords for XtremIO, I cannot list them here due to the Dell-EMC partner agreement. The accounts you will be using are: xinstall, tech, xmsadmin and admin. You have to access Dell-EMC support and search for Article number “332100”.
- Have the XtremIO Management System (XMS) OVA. You have to access Dell-EMC support and search for “XMS OVA”.
- Laptop (with Putty and WinSCP installed) and ethernet cable to connect directly to the “Tech” LAN interface of each Storage Controller to discover the current firmware version and IP schema (see below).
- vSphere Management cluster that has the resources and network connectivity to deploy and use the XMS virtual appliance.
Prerequisite – X-Brick Overview
- The X-Brick is comprised of System Controllers (SC – 2 per Brick), Disk Array Enclosure (DAE – 1 per Brick), Battery Backup Units (BBU – 2 per Brick) and an XMS (virtual or physical).
- The XMS is a basic Linux OS, it requires the XtremIO software to be installed for it to function. XMS is the management plane of XtremIO.
- The XtremIO software loaded into the XMS, should match the Storage Controllers for the recovery process to work correctly.
Prerequisite – X-Brick Rack Configuration

Prerequisite – X-Brick Cabling
There is quite a list of cables that need to be connected for the X-Brick to function. The “XtremIO Storage Array Hardware Installation and Upgrade Guide” from Dell-EMC support covers this in detail.
In summary, you have to make sure the following are connected:
- RS232 Serial from BBU1/2 to SC1/SC2
- Power Cables from BBU1/2 to SC1/SC2
- Power Cables from DAE and BBU1/2 to Rack PDUs
- IB Cables from SC1 to SC2
- SAS Infiniband Cables from SC1/SC2 to DAE
- IPMI Ethernet Cables from SC1 to SC2
- iSCSI 10GbE connections to ToR LAN Switches
- FC connections to SAN Fabrics
- For Multi-X-Brick solutions, separate Infiniband switches also need to be connected
Prerequisite – X-Brick IP Schema
The IP Schema of the X-Brick solution is not very well documented. The closest I could find is the “Storage Array Operations Guide” from Dell-EMC support. So here it is for version 4.0.2-80 at the time of writing:
- Tech Interface: 169.254.254.1/24 (automatically configured – this is the interface you use to recover a Storage Controller)
- Management Interface: Configured by user
- IB Interfaces: 169.254.0.0/24 subnet (SC1 .1/.2 and SC2 .17/.18 – automatically configured)
- IPMI Interfaces: Not shown (automatically configured)
- iSCSI Interfaces: Configured by user
Step 1 – Discover the Storage Controller Management IP Schema and the Storage Controller Firmware version
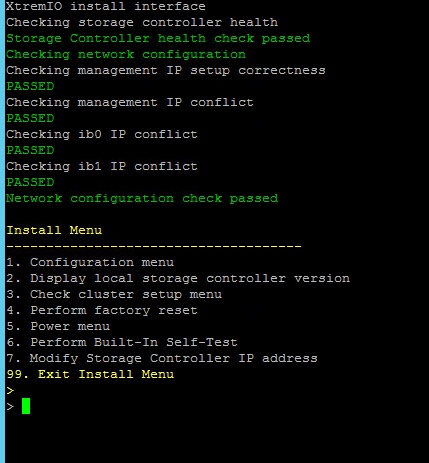
- WARNING – you will be tempted to run the “4. Perform factory reset” option, thinking it will reset the entire solution to factory defaults. It does not do this, all it does is wipe the Linux OS network config on the Storage Controllers and makes your life more complicated.
- Connect your Laptop directly to the Tech Interface (check diagram above), make sure your Laptop Ethernet interface is configured with 169.254.254.2/24. Ping 169.254.254.1 to ensure you are connected.
- Open Putty and SSH to 169.254.254.1 and login with “xinstall” (get default password from Dell-EMC support).
- You will be presented with the “Install Menu”.
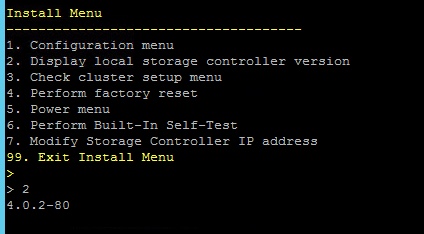
- From the root menu, select “2. Display local storage controller version” and record the value (for this example, it is 4.0.2-80).
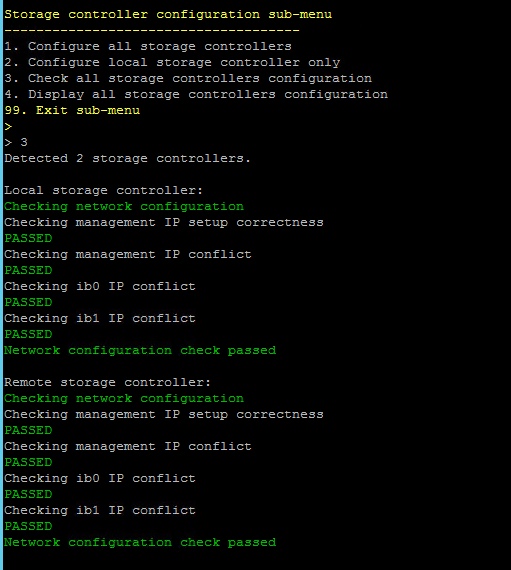
- From the root menu, select “1. Configuration menu” and then select “4. Display all storage controllers configuration” from the sub-menu. Record the management IP addresses for both storage controllers.
- Select “99” to return to the root menu.
- As an option, you can execute the series of tests available in “3. Check cluster setup menu” and “6. Perform Built-In Self-Test” to ensure your X-Brick has been cabled and powered-on correctly.
- Now connect your Laptop to the second Storage Controller and get the local storage version. Hopefully they are the same, since both were in the same cluster previously. If not, you will have to open a ticket with Dell-EMC.


Step 2 – Deploy the XMS virtual appliance and install the XMS software
- You need to visit Dell-EMC support and download the XMS Virtual Appliance OVA file and the matching XtremIO software from the previous section (4.0.2-80 in this example).
- Deploy the XMS OVA file to your vSphere Cluster and place it in the VLAN-backed Portgroup that the XtremIO management plane will live in. Make sure that the Storage Controller Management ports (check diagram above) are in this VLAN as well.
- Open the console of the XMS Virtual Appliance and login as “xinstall” (get default password from Dell-EMC support).
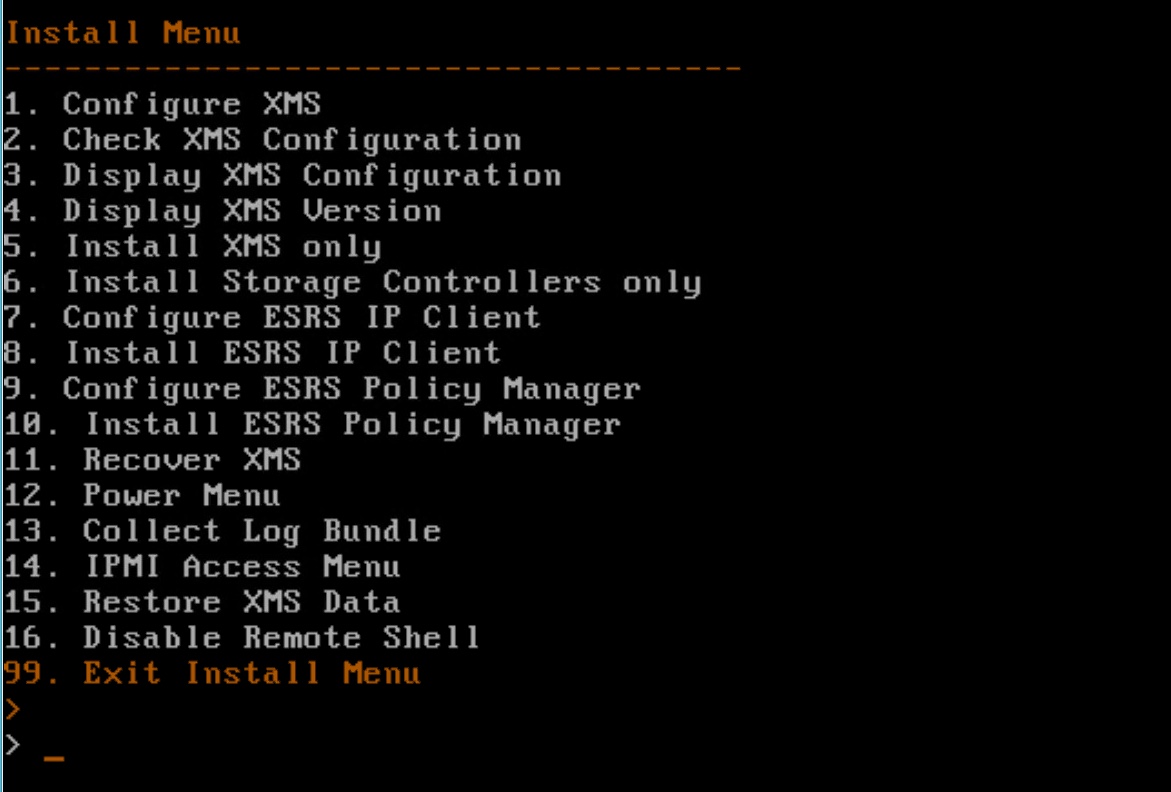
- You will be presented with the “Install Menu”, which is similar to that in the previous section.
- From the root menu, select “1. Configure XMS” and configure an IP address that is within the same subnet as the current Storage Controller configuration. For example, if SC1 and SC2 where configured with 192.168.0.11/24 and 192.168.0.12/24, you will want to configure XMS with 192.168.0.20/24 so that they can communicate. This is a temporary step, later you will make changes to modify this to the final configuration that you require.
- Yes, you will need a JumpBox or Laptop with Putty, WinSCP and the XtremIO software loaded and since you are using a non-routed network, you will not have Internet access during this step.
- Use WinSCP to connect to the XMS IP Address and browse to the “/var/lib/xms/images” directory and drag the XMS software file to that directory (“upgrade-to-4.2.0-80.tar” in this example).
- Now you are ready to install the XMS software on the XMS Virtual Appliance, from the root menu, select “5. Install XMS only” and follow the prompts, you will have to manually enter the filename. The Virtual Appliance will reset as part of the process.
Step 3 – Login to the XMS management interface and discover the X-Brick cluster
- Once the XMS software install process has completed, you can access the XMS UI by opening a browser and entering https://<XMS IP address> from your JumpBox/Laptop. Download the Java applet and launch it. Accept any Java warnings and login as “admin” (get default password from Dell-EMC support). This is an unconfigured XMS instance, there are no clusters added to it yet.
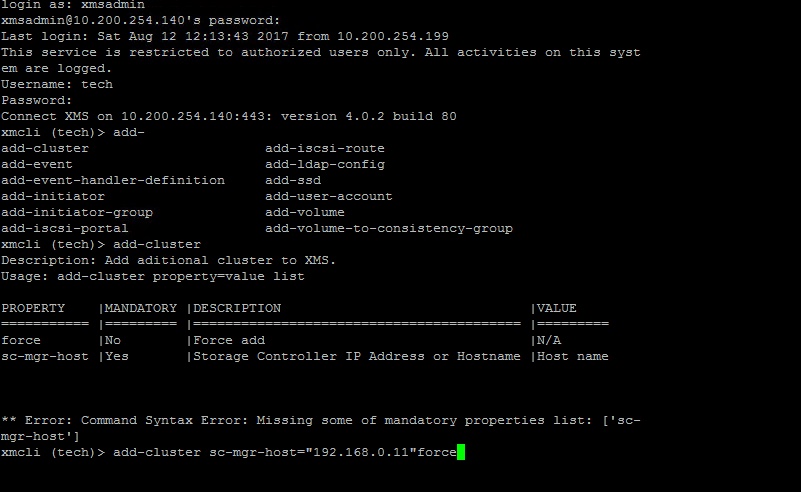
- Open Putty and SSH to the XMS IP address and login with “xmsadmin” and then with username “tech” (get default password from Dell-EMC support).
- Use the command “add-cluster sc-mgr-host=”<either SC IP Address>” force” and your X-Brick cluster will be discovered and added to the XMS Management UI.
- Another option is to use the “11. Recover XMS” option from the previous section.
- Access the XMS Management UI (Java) and verify the cluster is available and alarm free. You may have to start the cluster by executing the command “start-cluster cluster-id=<cluster-name> force”.


Step 4 – Use the XMS management interface to reconfigure the X-Brick to match your environment
- Open Putty and SSH to the XMS IP address and login with “xmsadmin” and then with username “tech” (get default password from Dell-EMC support).
- Use the command “modify-ip-addresses sc-ip-list=[sc-id=1 sc-ip-sn=”<new SC1 IP/24>”,sc-id=2 sc-ip-sn=”<new SC2 IP/24>”]” to set the Storage Controller Management interface to the desired schema. For example, you have the XtremIO with the 192.168.0.0/24 schema and now I want to change it to 10.10.1.0/24, which is my production storage management network.
- The storage controllers will not be available to the XMS. The next step is to modify the IP address of the XMS to match.
- I had problems with using the same command (with xms-ip-sn) to change the XMS ip address. So I had to use the console menu from step 3.
- Open the console of the XMS Virtual Appliance and login as “xinstall” (get default password from Dell-EMC support).
- You will be presented with the “Install Menu”.
- From the root menu, select “1. Configure XMS” and follow the prompts to set the IP address to the desired setting.
- You should now be able to access the XMS UI from the new IP address and the X-Brick cluster should be available as well.
- You should also change the Gateway IP addresses of the Storage Controllers to match as well (with modify-ip-addresses sc-gw-addr).
- You should also change the Timezone and NTP servers to match your environment (with modify-datetime timezone and modify-datetime ntp-servers).
- You can also change the Cluster Name (with rename cluster-id).
- Your XtremIO X-Brick solution is now ready to provide storage services: EMC XtremIO – Provisioning a LUN.
- Do not forget to read the “XtremIO Host Configuration Guide” from Dell-EMC support. This is to ensure you hosts are correctly configured for optimum XtremIO performance.

Additional Resources

One thought on “Repurposing used XtremIO X-Brick”
Comments are closed.