 This is part 3 of the NSX Manager Installation guide, describing the initial configuration of NSX Manager version 6.1.0 with vCenter Server 5.5.
This is the third post of a three part series describing the steps to install and configure VMware NSX Manager:
- NSX Manager – Part 1 – Deploy OVA
- NSX Manager – Part 2 – Upgrade to 6.1
- NSX Manager – Part 3 – Configure
Then you can move onto this five part series describing the steps to deploy DLR and ESG with OSPF:
- NSX DLR and ESG with OSPF – Part 1 – IP Pools, Host and Logical Network Prep
- NSX DLR and ESG with OSPF – Part 2 – Deploy Controller
- NSX DLR and ESG with OSPF – Part 3 – Deploy Logical Switches & DLR
- NSX DLR and ESG with OSPF – Part 4 – Deploy ESG
- NSX DLR and ESG with OSPF – Part 5 – Configure OSPF
Configure the NSX Manager Virtual Appliance to Integrate with vCenter Server 5.5
- Access the NSX Manager Web Interface with the URL: https://<NSX Manager DNS or IP Address/
- Login as “admin” and the password configured in Part 1.
- In the “NSX Manager Virtual Appliance Management” window, select the “Manage Appliance Settings” icon.
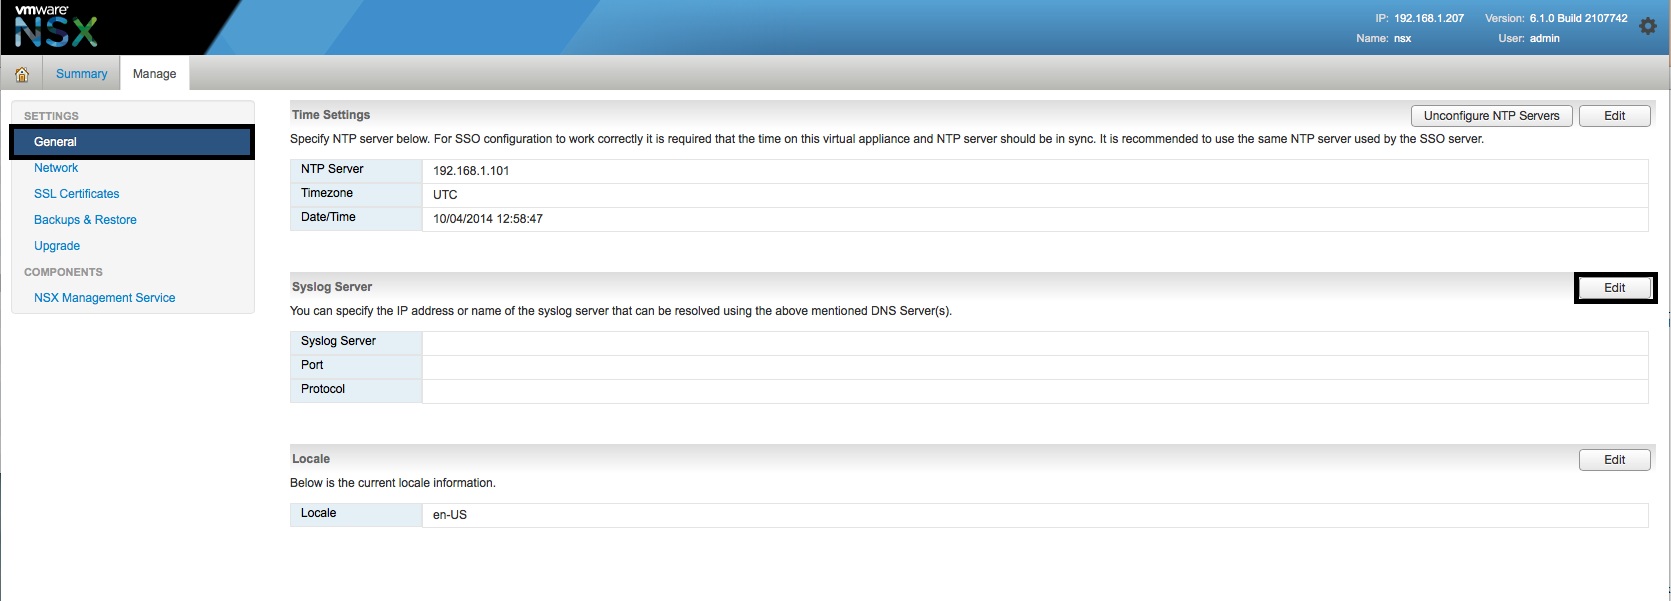
- In the “Manage” window, select the “General” object and press the “Syslog Server” “Edit” button.
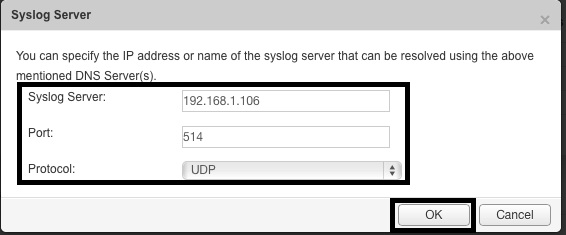
- In the “Syslog Server” window, enter the “Syslog Server” IP Address, “Port” number, select the “Protocol” from the drop-down list and then press “OK”.
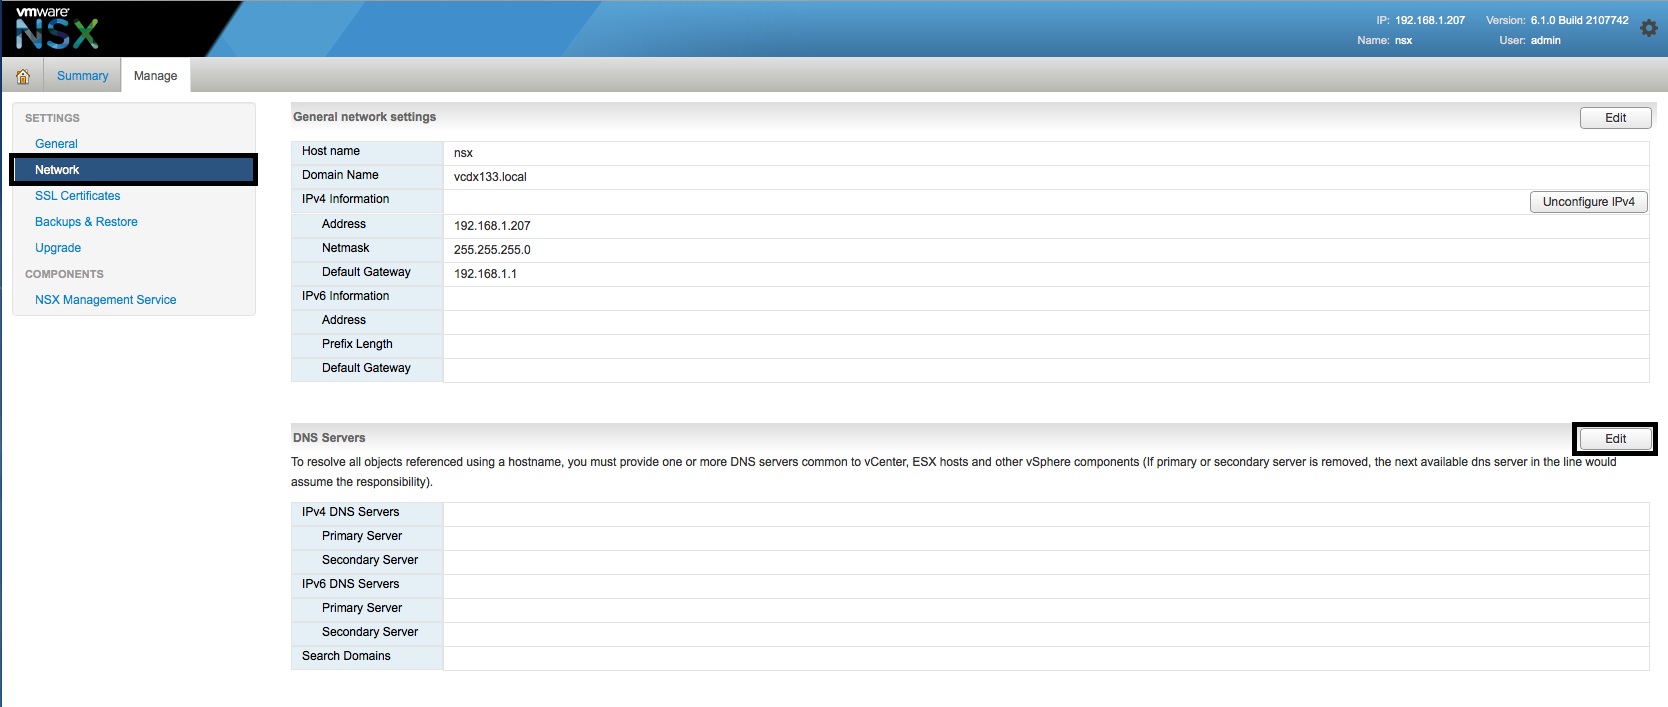
- In the “Manage” window, select the “Network” object and press the “DNS Servers” “Edit” button. It appears that the DNS settings are lost when you upgrade from 6.0.4 to 6.1.0.
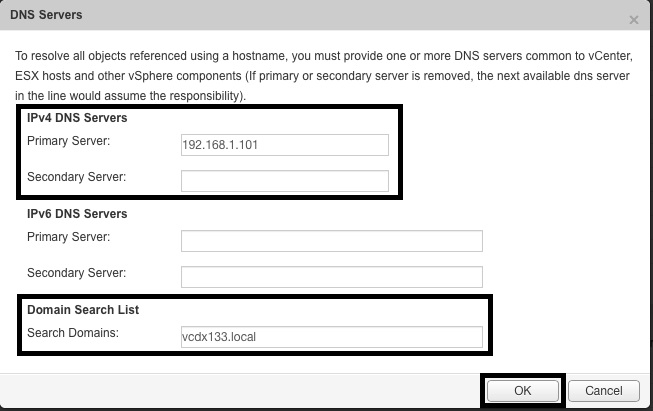
- In the “DNS Servers” window, enter the “IPv4 Primary Server” IP Address, “Search Domains” and then press “OK”.
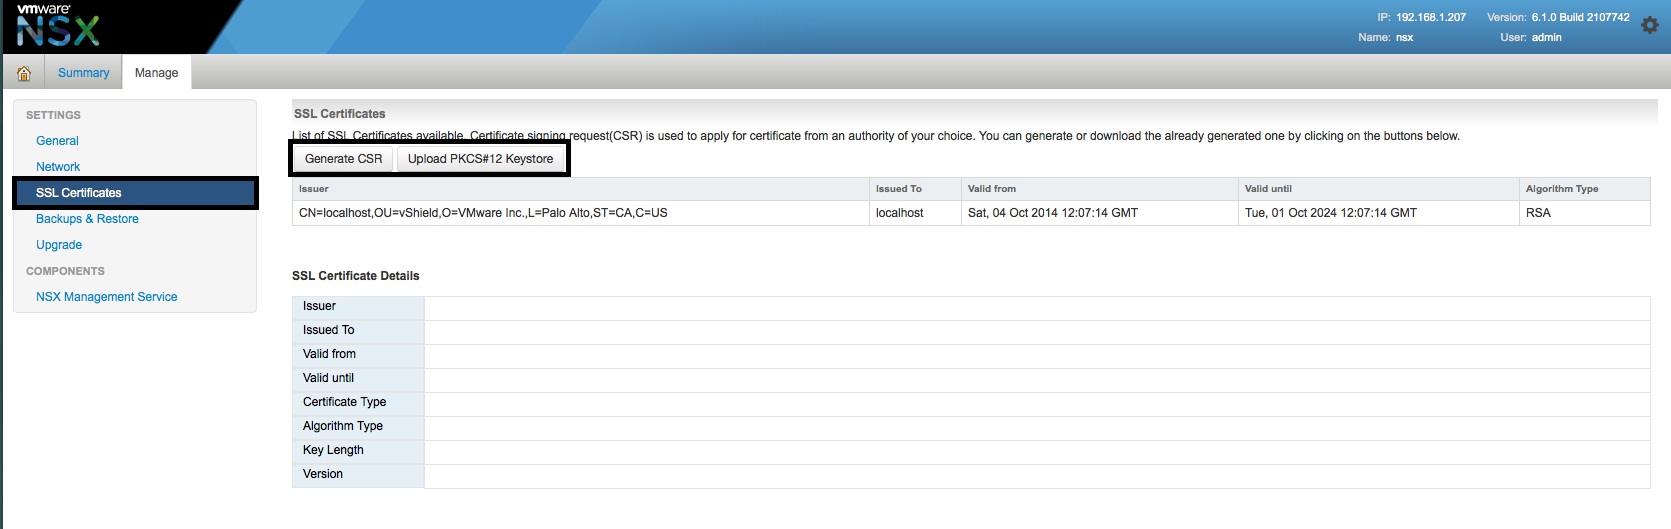
- If you want to add your own SSL certificates, select the “SSL Certificates” object in the “Manage” window.
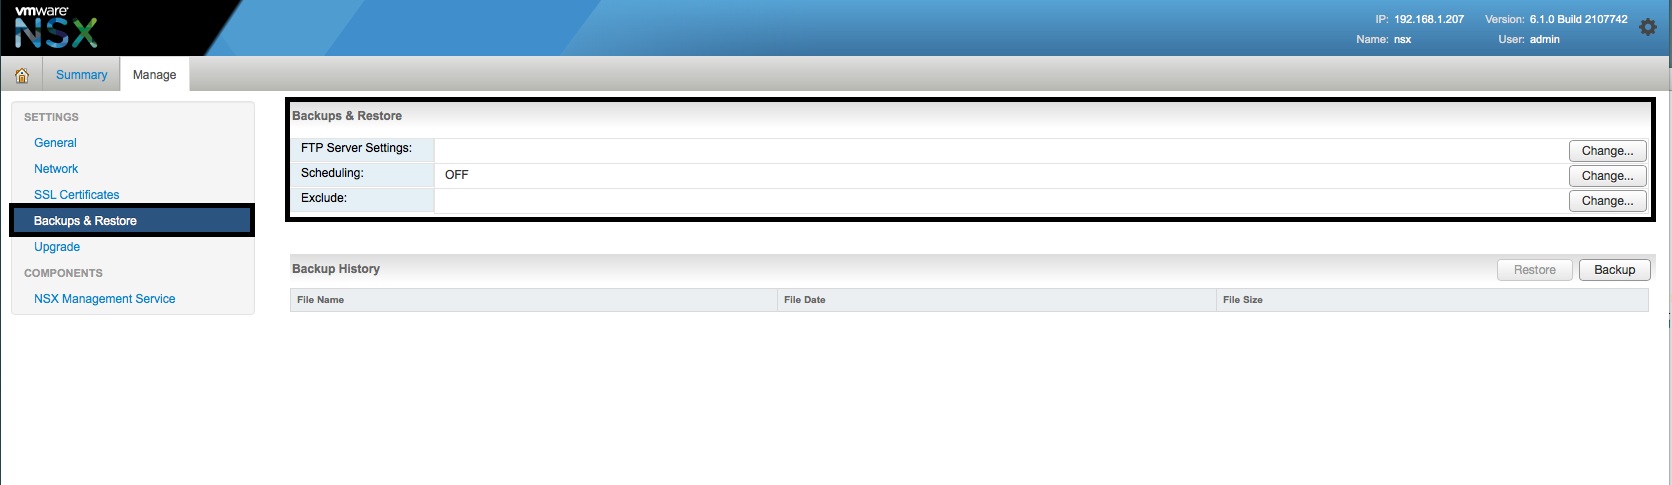
- If you want to configure a regular backup schedule via FTP, select the “Backups & Restore” object in the “Manage” window.
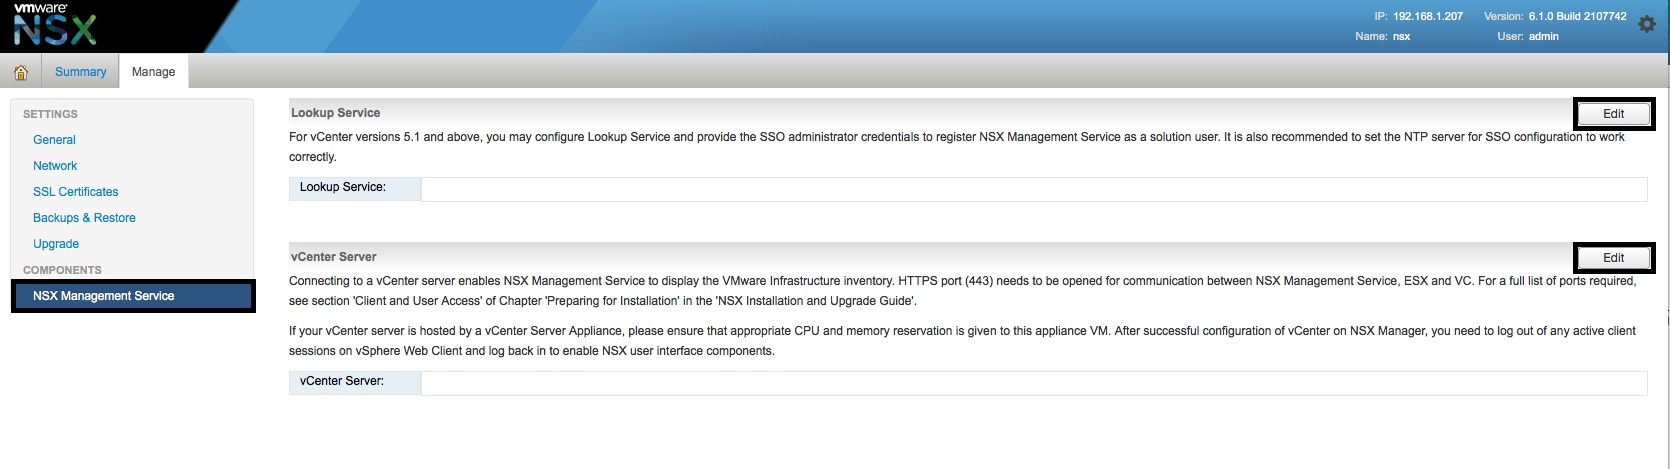
- In the “Manage” window, select the “NSX Management Service” object and press the “Lookup Service” “Edit” button.
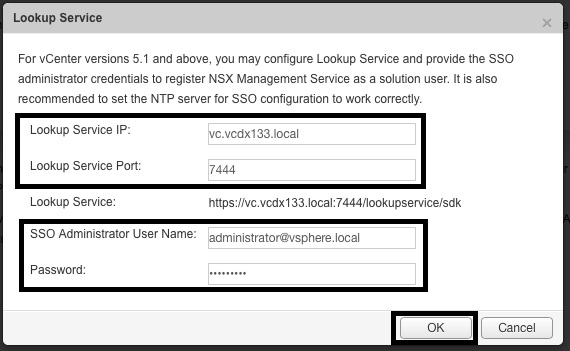
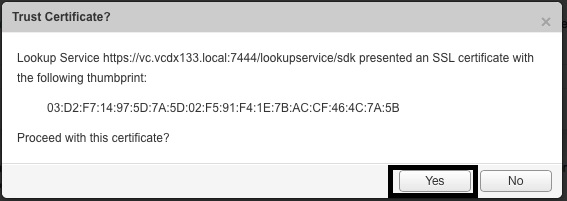
- In the “Lookup Service” window, enter the “Lookup Service IP”, “Lookup Service Port”, “SSO Administrator” credentials and press “OK”.
- Press the “Yes” button when the “Trust Certificate?” message appears.
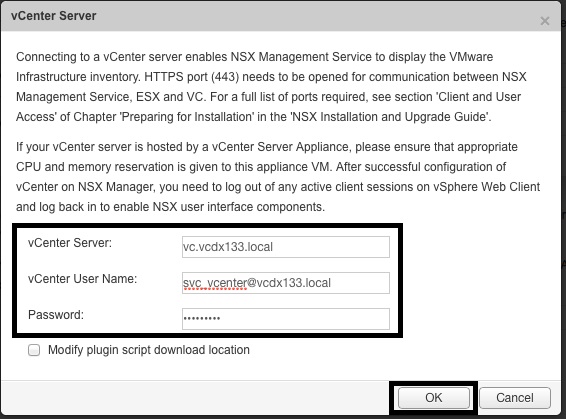
- In the “Manage” window, select the “NSX Management Service” object and press the “vCenter Server” “Edit” button.
- In the “vCenter Server” window, enter the “vCenter Server”, “vCenter User” credentials and press “OK”.
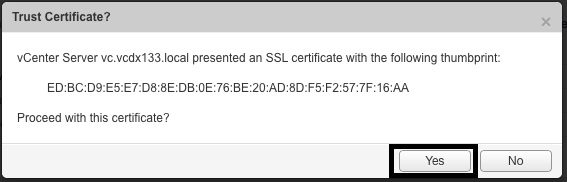
- Press the “Yes” button when the “Trust Certificate?” message appears.
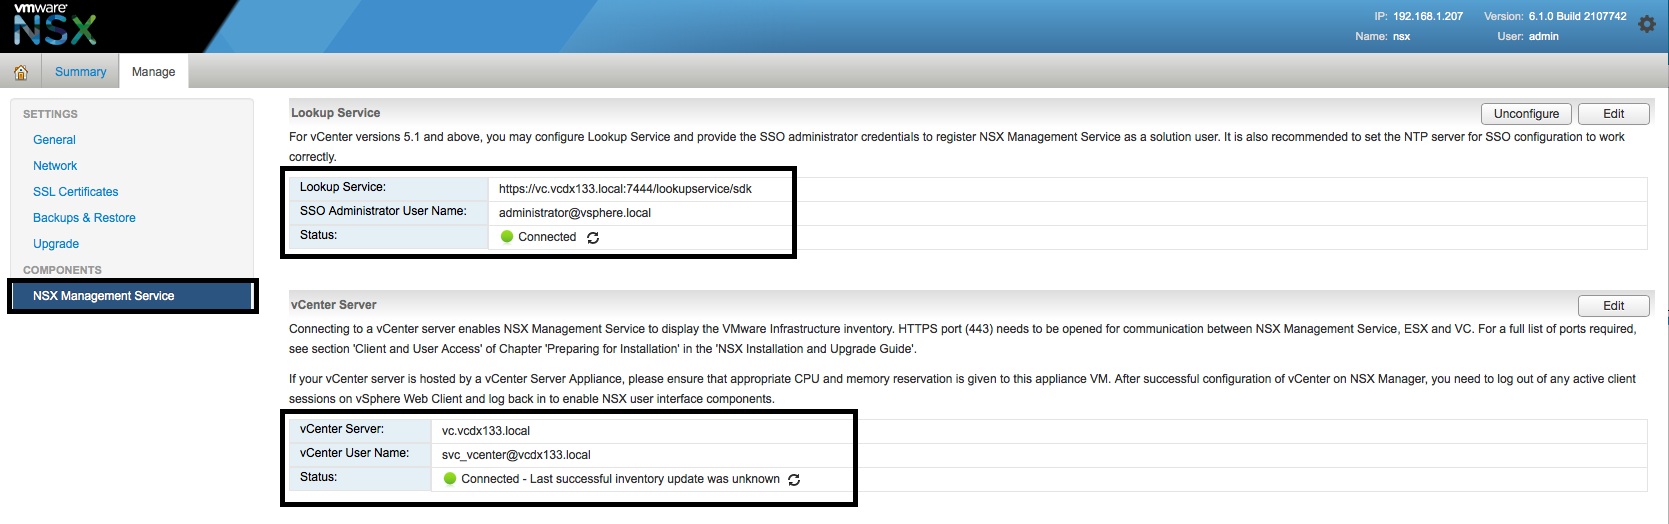
- In the “Manage” window, select the “NSX Management Service” object and verify that the “Lookup Service” and “vCenter Server” have “Status” “Connected”.
- Logout of the NSX Manager Virtual Appliance. Wait for 5 minutes while the “Networking & Security” objects are installed to the vSphere Web Client. You will have to logout of the vSphere WebClient if you have an active session.
- Login to the vSphere Web Client with the “vCenter User” credentials specified in step 14.
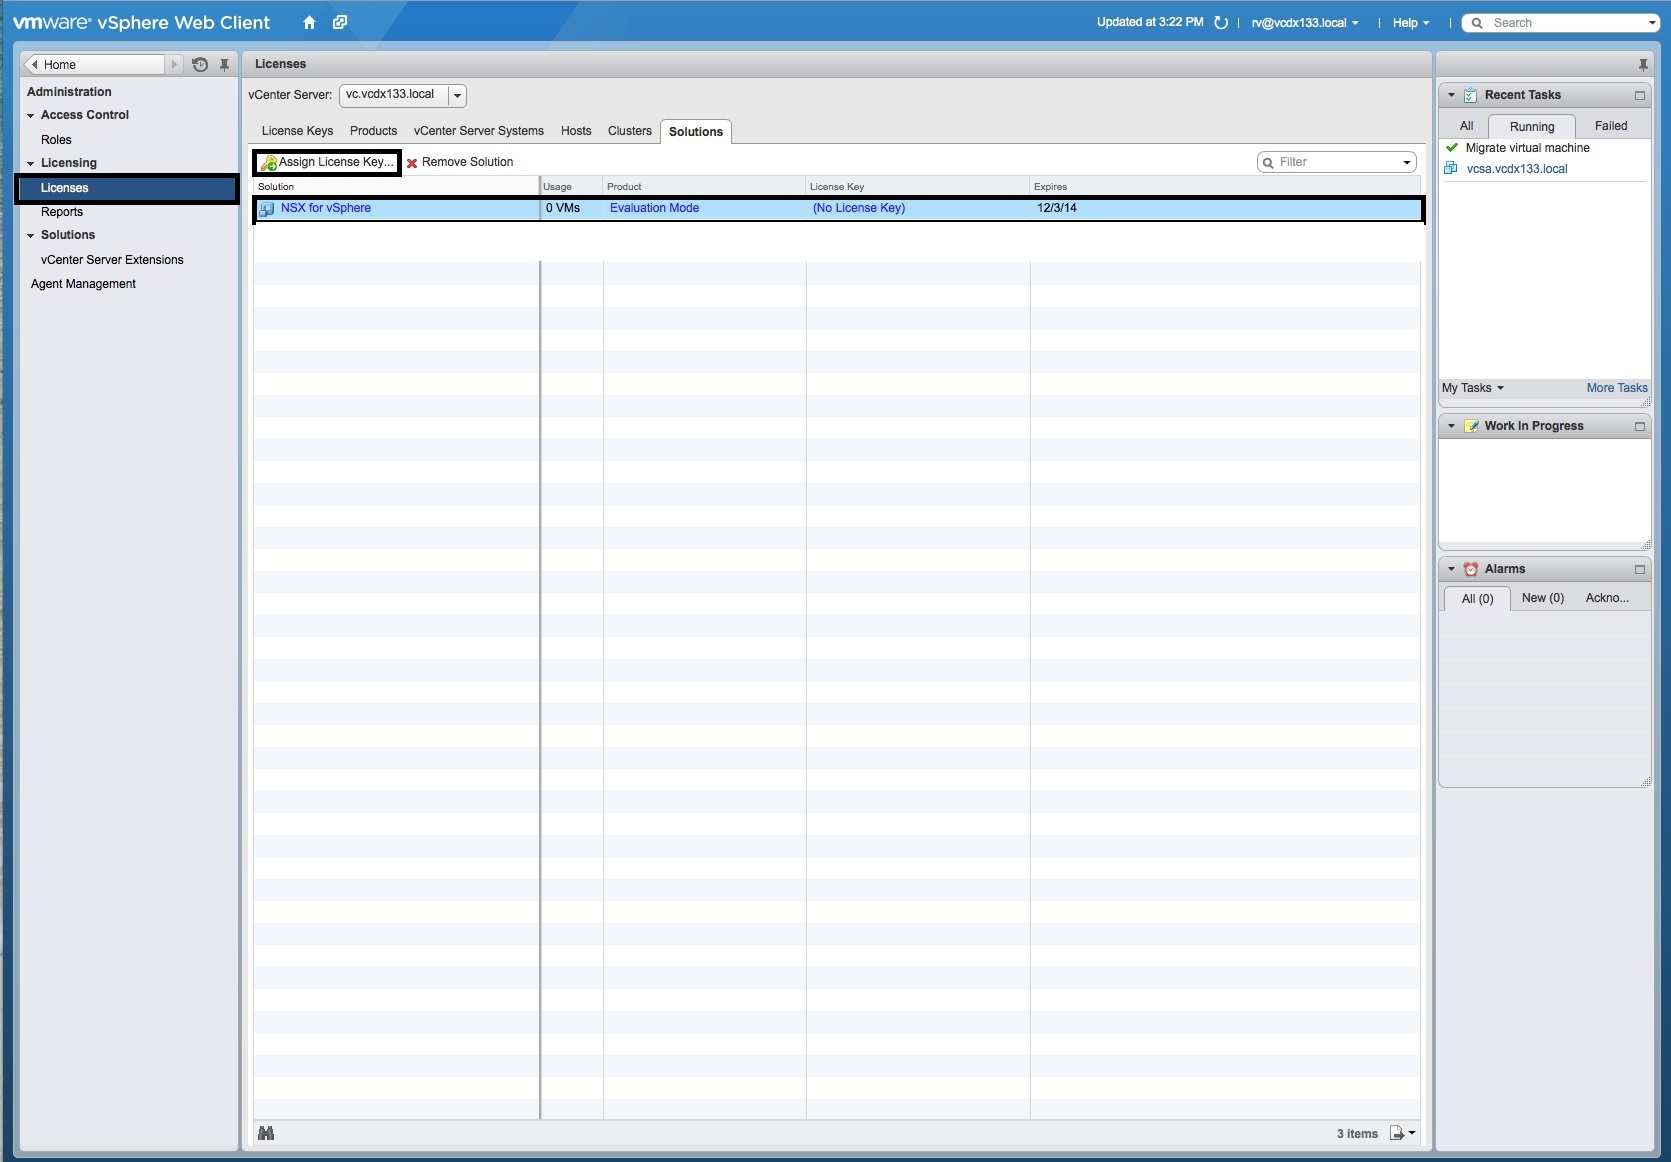
- Select “Home”, the “Licencing” icon and then the “Solutions” tab and “Assign Licence Key” to the “NSX for vSphere” solution object if you have a perpetual licence. Otherwise you will use the 60-day evaluation licence.
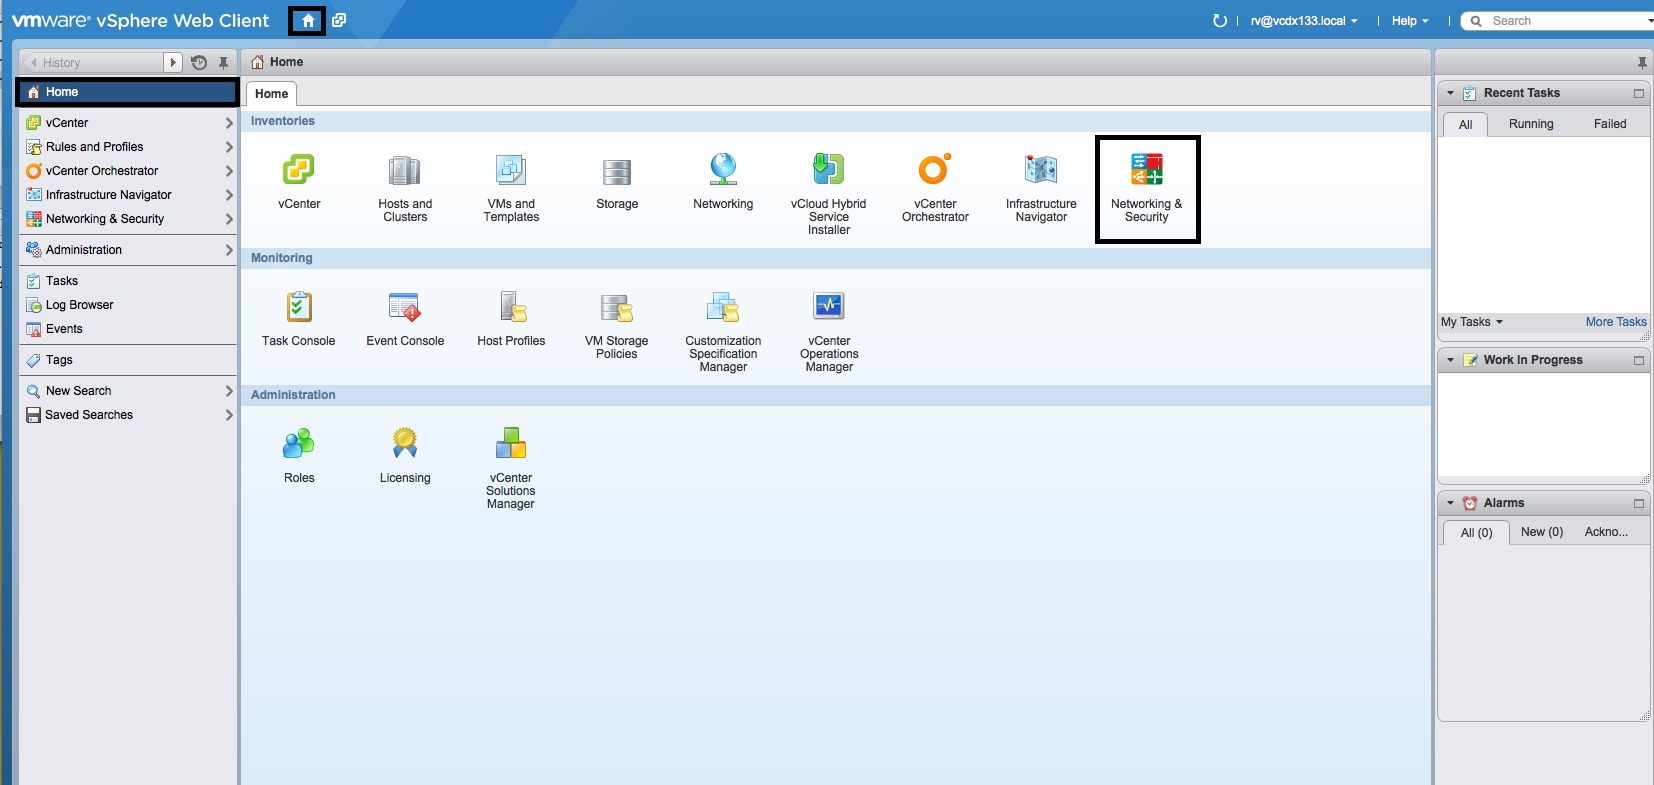
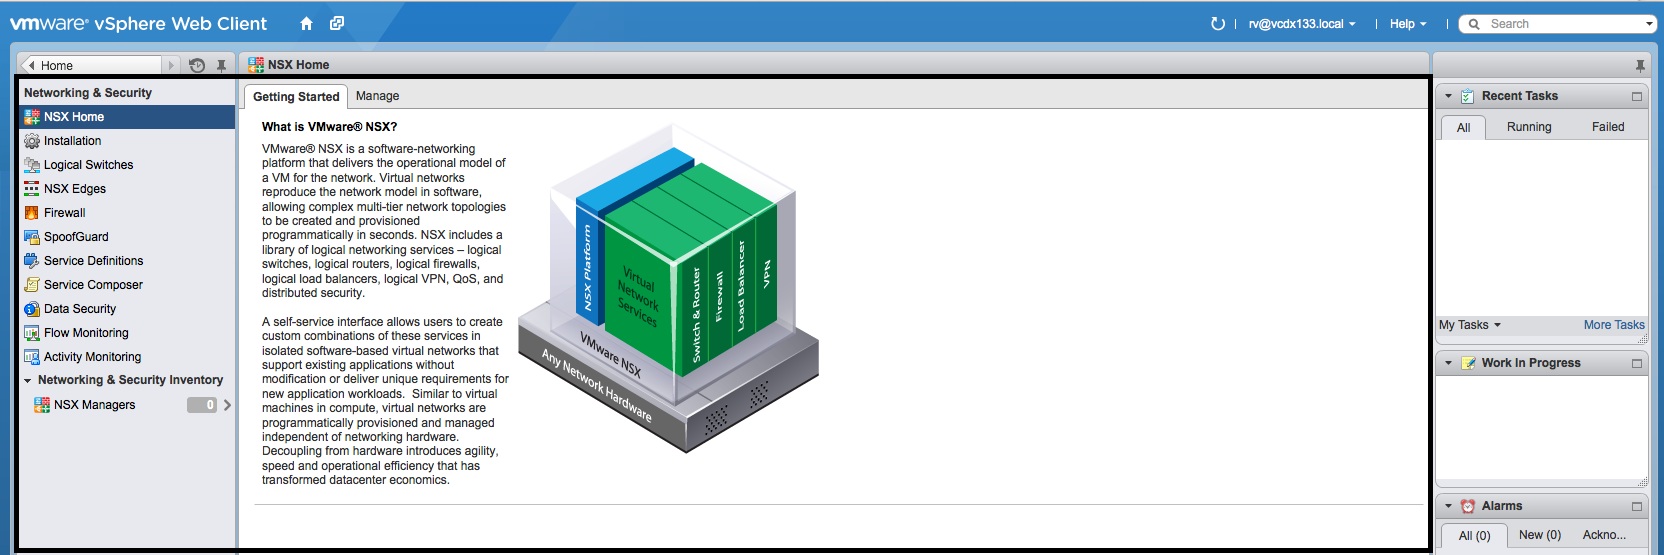
- Select “Home” and then the “Networking & Security” icon to access “NSX Home”.
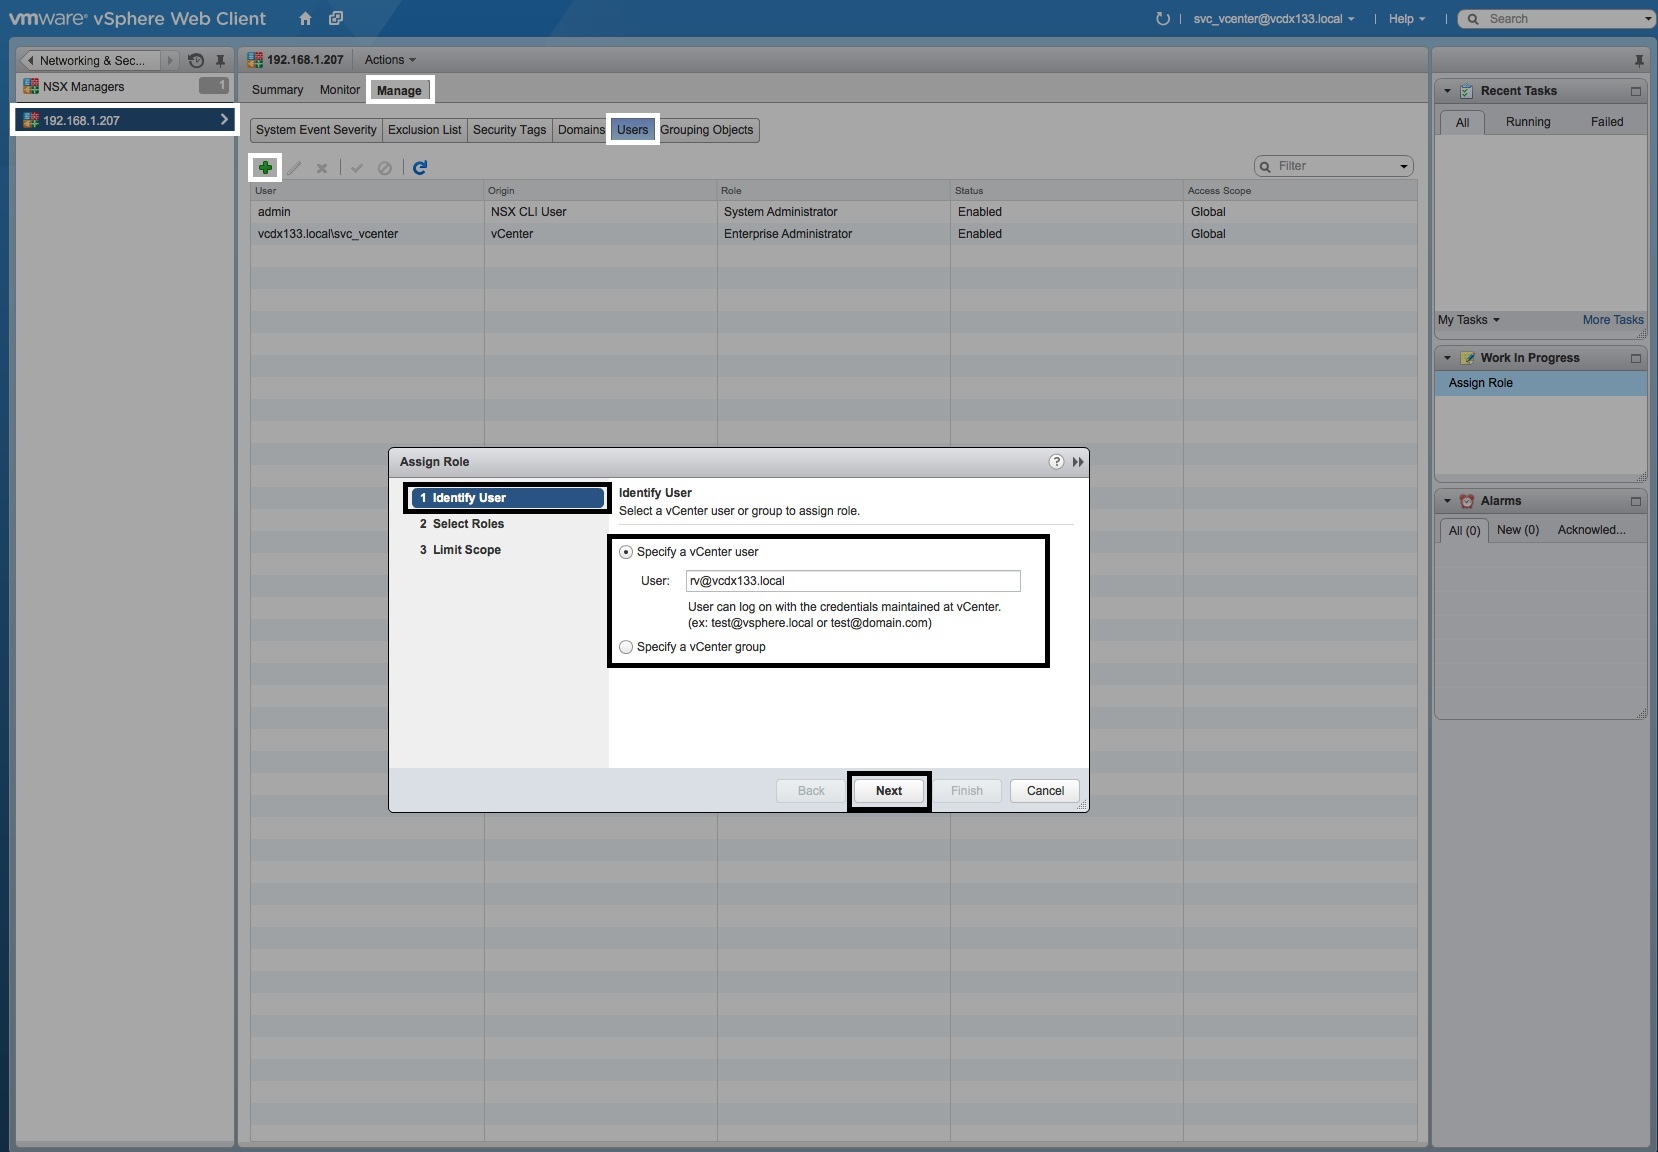
- Select the “NSX Manager”, the “Manage” tab and the “Users” object.
- Press the green “+” button to add another user (aside from the user specified in step 14).
- In the “Assign Role” window, either “Specify a vCenter User” or “Specify a vCenter group” and press “Next”.
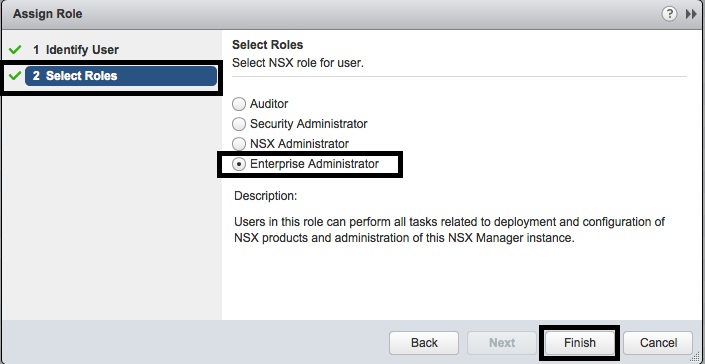
- In the “Select Roles” window, select “Enterprise Administrator” and press the “Finish” button.
- You can now login as this user and have full control of “NSX Home”.
- You are now ready to start deploying the components of NSX (NSX Controllers, NSX Logical Distributed Routers, NSX Edge Services Gateways, NSX Logical Switches, etc.)


Other Resources

5 thoughts on “NSX Manager – Part 3 – Configure”
Comments are closed.