 This is Part 17 of the Nutanix XCP Deep-Dive, covering Nutanix Cluster Autopathing with ESXi.
This will be a multi-part series, describing how to design, install, configure and troubleshoot an advanced Nutanix XCP solution from start to finish for vSphere, AHV and Hyper-V deployments:
- Nutanix XCP Deep-Dive – Part 1 – Overview
- Nutanix XCP Deep-Dive – Part 2 – Hardware Architecture
- Nutanix XCP Deep-Dive – Part 3 – Platform Installation
- Nutanix XCP Deep-Dive – Part 4 – Building a Nutanix SE Toolkit
- Nutanix XCP Deep-Dive – Part 5 – Installing ESXi Manually with Phoenix
- Nutanix XCP Deep-Dive – Part 6 – Installing ESXi with Foundation
- Nutanix XCP Deep-Dive – Part 7 – Installing AHV Manually
- Nutanix XCP Deep-Dive – Part 8 – Installing AHV with Foundation
- Nutanix XCP Deep-Dive – Part 9 – Installing Hyper-V Manually with Phoenix
- Nutanix XCP Deep-Dive – Part 10 – Installing Hyper-V with Foundation
- Nutanix XCP Deep-Dive – Part 11 – Benchmark Performance Testing
- Nutanix XCP Deep-Dive – Part 12 – ESXi Design Considerations
- Nutanix XCP Deep-Dive – Part 13 – AHV Design Considerations
- Nutanix XCP Deep-Dive – Part 14 – Hyper-V Design Considerations
- Nutanix XCP Deep-Dive – Part 15 – Data Center Facility Design Considerations
- Nutanix XCP Deep-Dive – Part 16 – The Risks
- Nutanix XCP Deep-Dive – Part 17 – CVM Autopathing with ESXi
- Nutanix XCP Deep-Dive – Part 18 – more to come as the series evolves (Cloud Connect to AWS and Azure, Prism Central, APIs, Metro, DR, etc.)
You may have heard about the Nutanix Controller VM Autopathing feature, which redirects the NFS traffic of an ESXi host with a failed local CVM to a remote CVM. The CVM Genesis process monitors this via the “ha_service.py” process/script and modifies the ESXi routing table via the “hypervisor_ha.py” process/script.
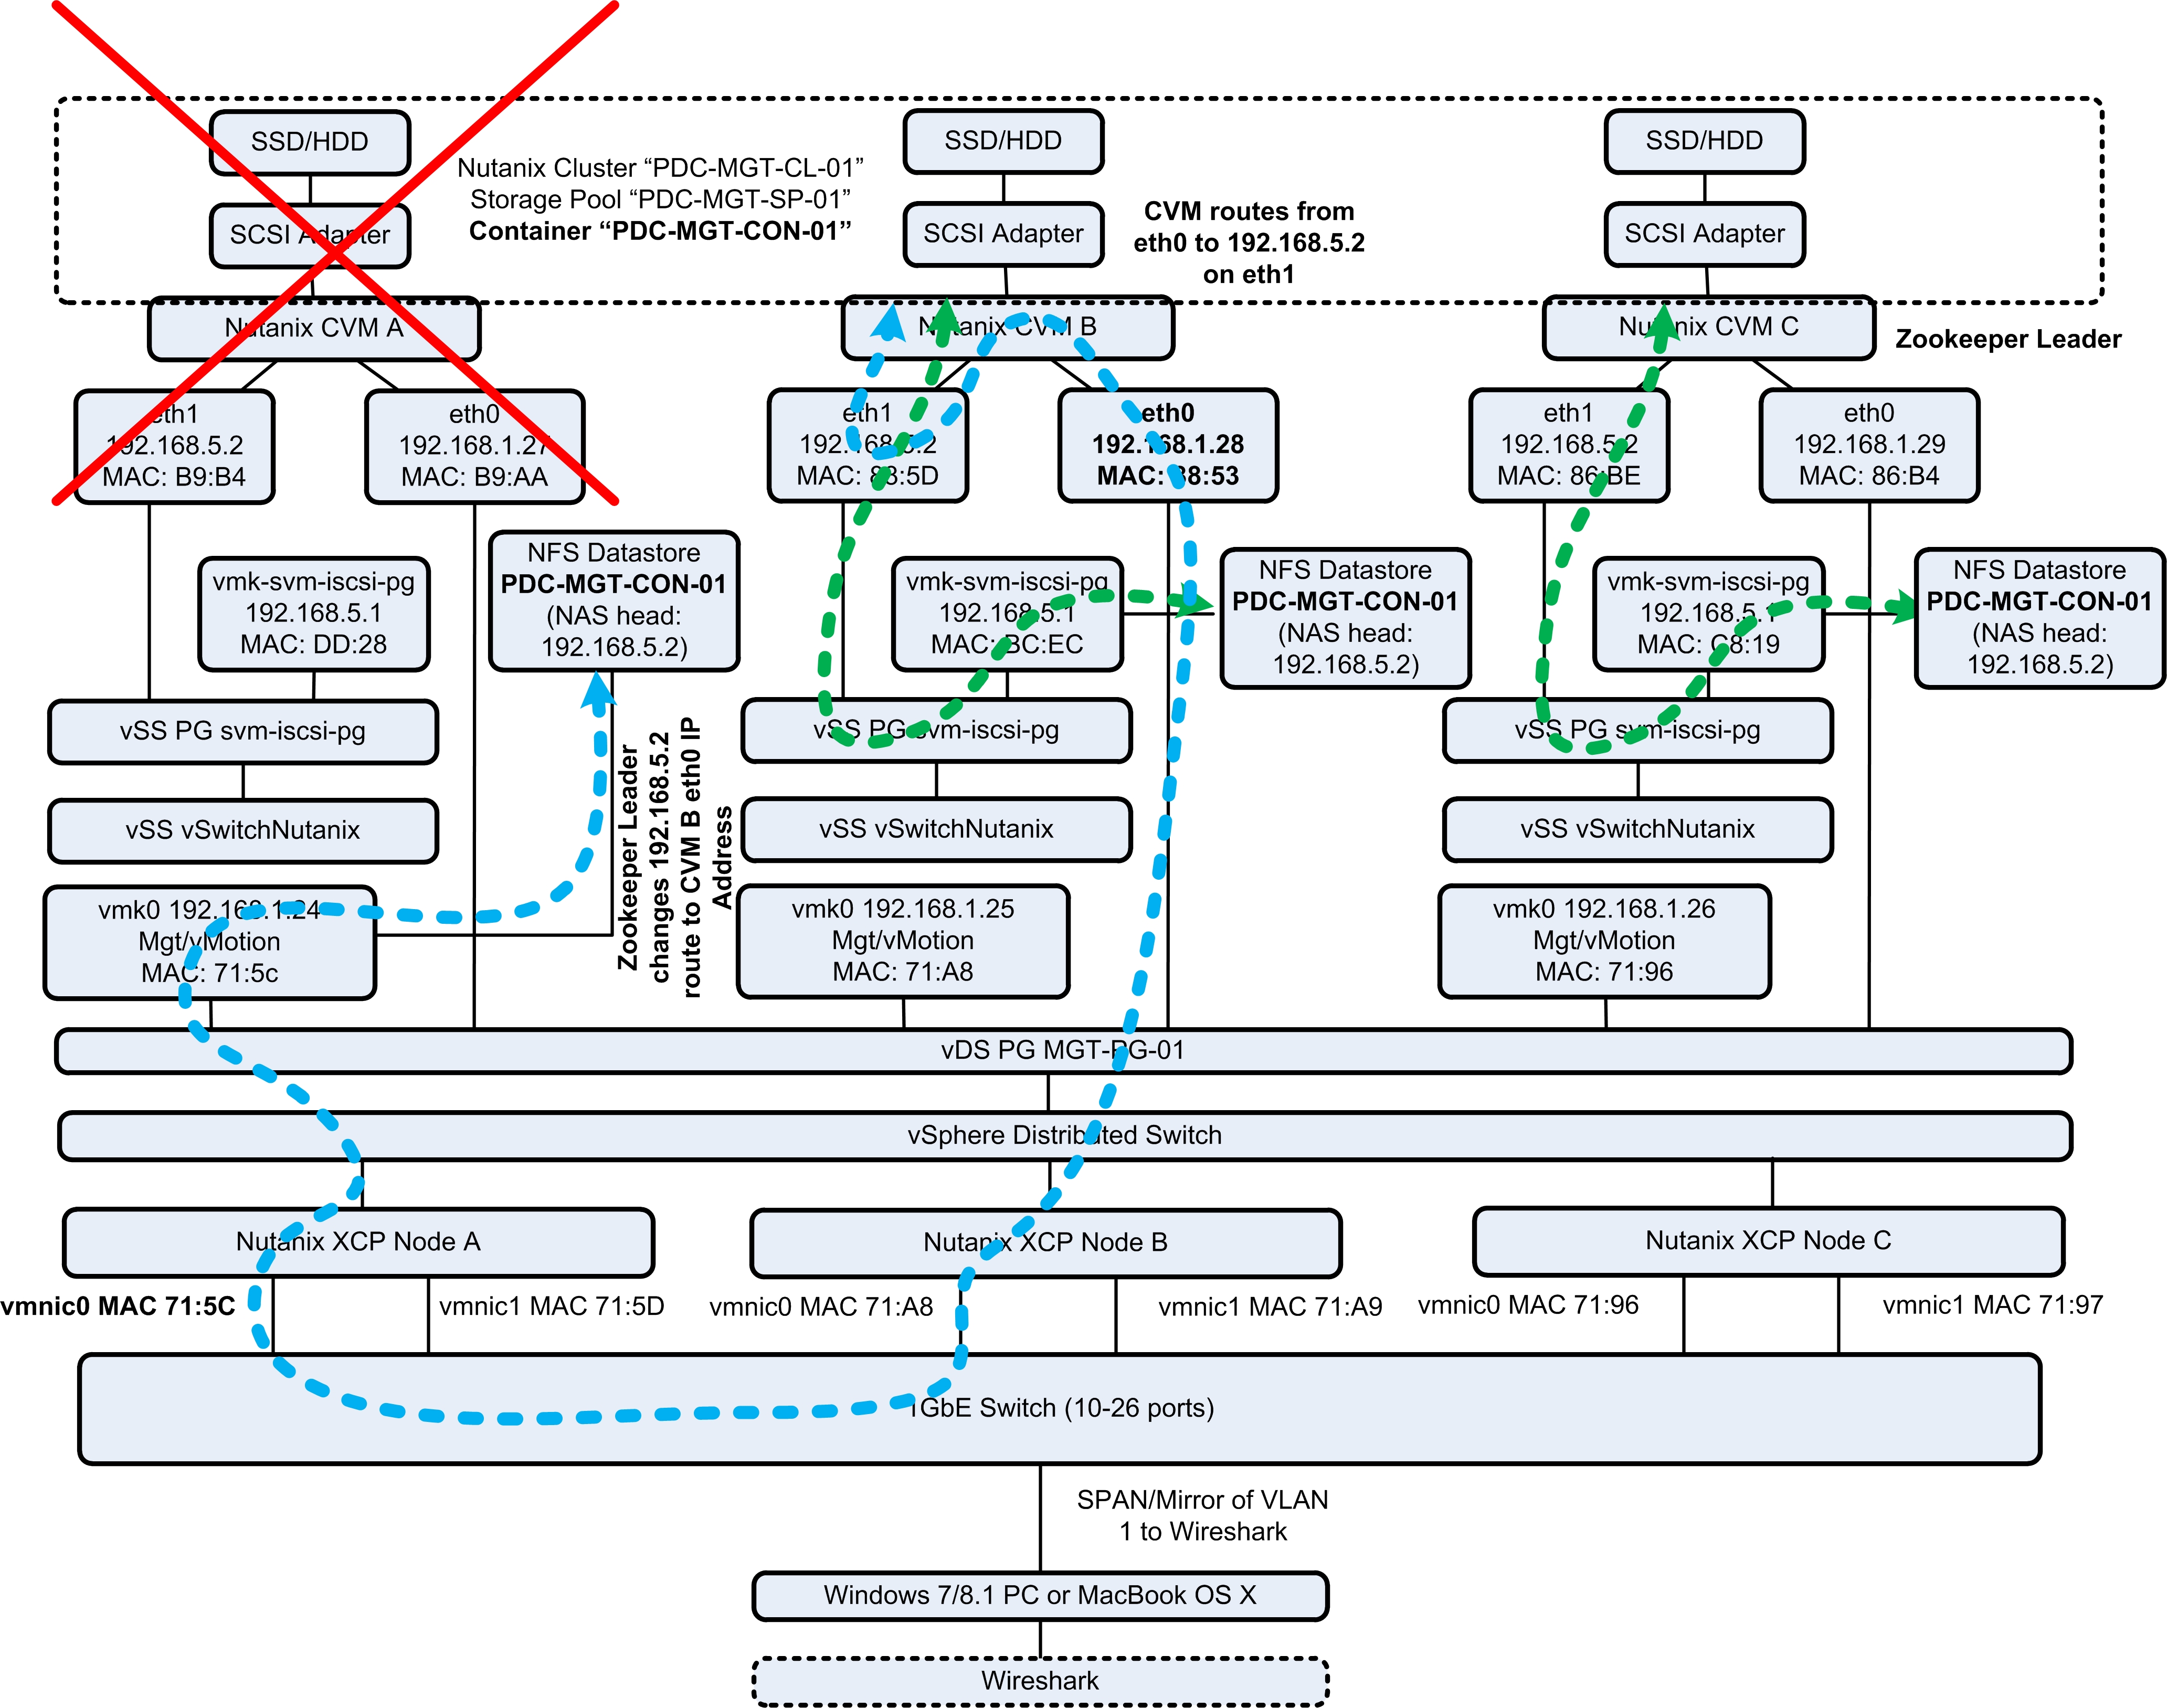
This diagram shows the Nutanix cluster configuration:

Normally functioning Nutanix Cluster
- The vSS “vSwitchNutanix” on each ESXi host is used for “local hypervisor to local CVM” communications using the 192.168.5.0/24 network.
- You will note the naming of the vSS portgroup “svm-iscsi-pg” and VMkernel port “vmk-svm-iscsi-pg” having “iscsi” in the name and not “nfs”. This is a hangover from the early days when Nutanix was experimenting with iSCSI instead of NFS. They should probably correct this and also remove the defunct iSCSI software adapter.
- The Datastore is mounted in the ESXi storage stack via NFSv3 with the Local CVM eth1 IP address, 192.168.5.2, as the NAS target and the NDFS Container name as the folder. The Container name is also the Datastore name.
- During normal operations, you will never see 192.168.5.2 traffic on the public interface of the CVM.
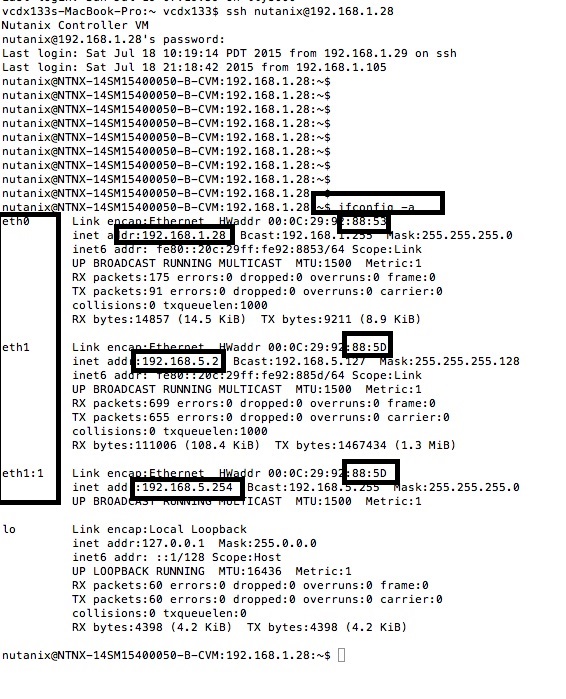
- Note that eth1 also has a sub-interface eth1:1, 192.168.5.254, which is used as an internal management interface. Not shown in the diagram, since it does not receive NFS traffic.
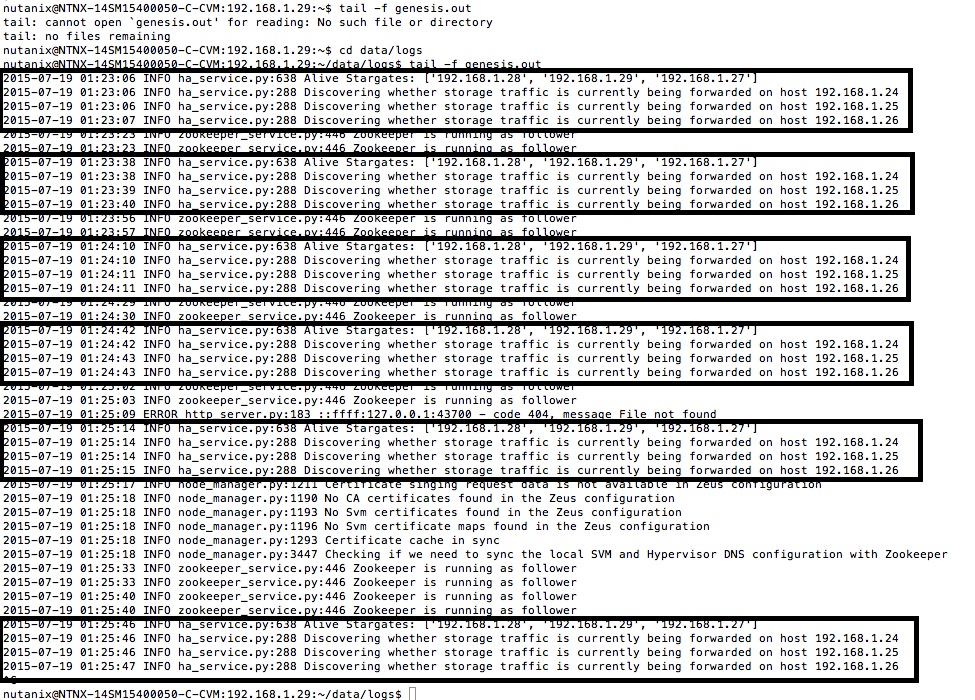
- Every 30 seconds, Genesis runs the ha_service.py process/script from one CVM to check that all Stargate instances are functioning and ESXi forwarding tables are configured correctly and if necessary, uses the hypervisor_ha.py process/script to correct the ESXi routing table.
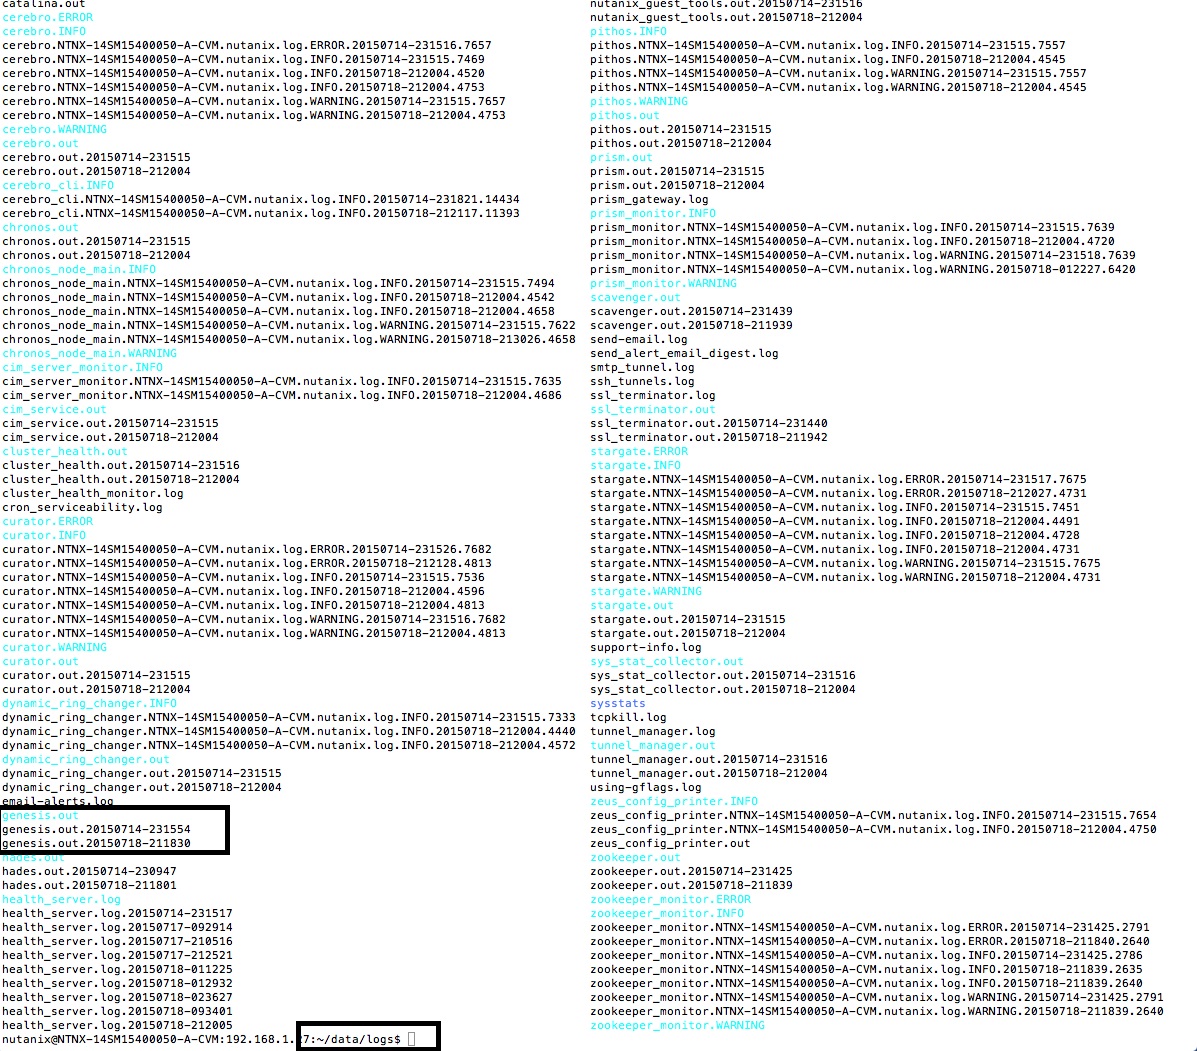
- You can see this mechanism in action via “tail -f /home/nutanix/data/logs/genesis.out”.

Screenshots of Wireshark, CVM and ESXi:
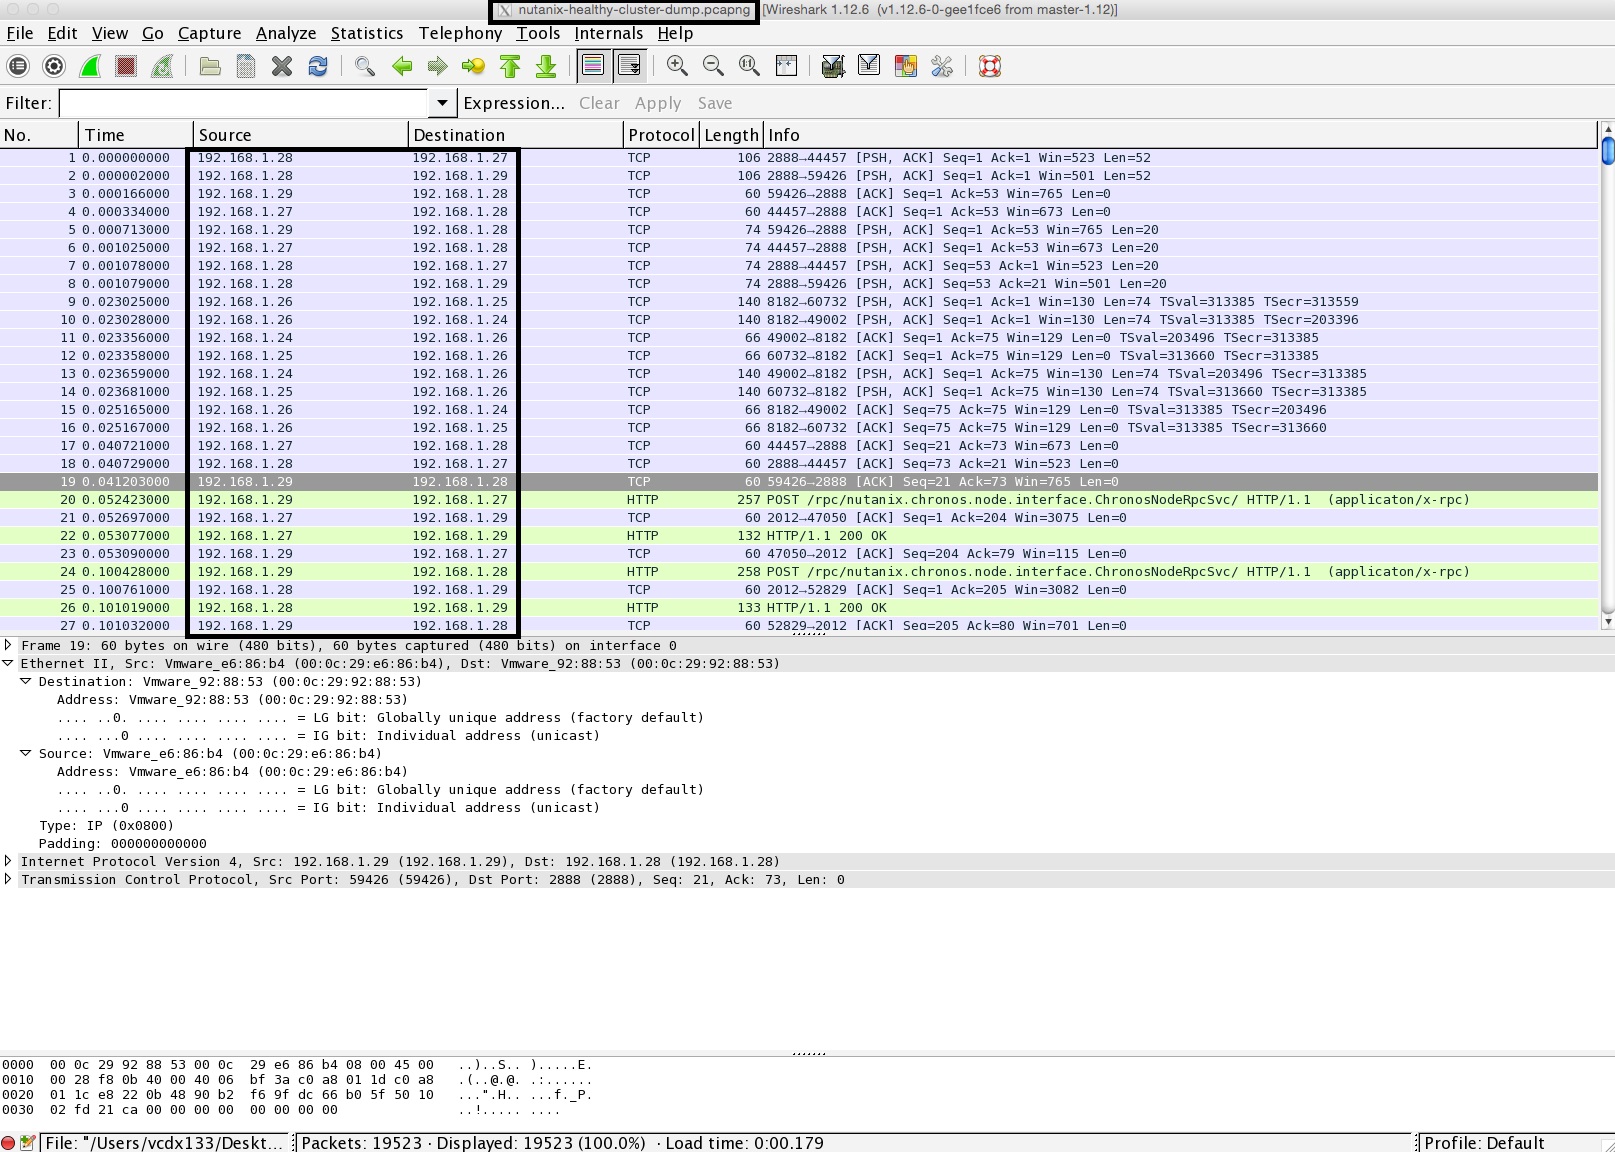


Untrained Administrator Injects Route into Healthy Cluster
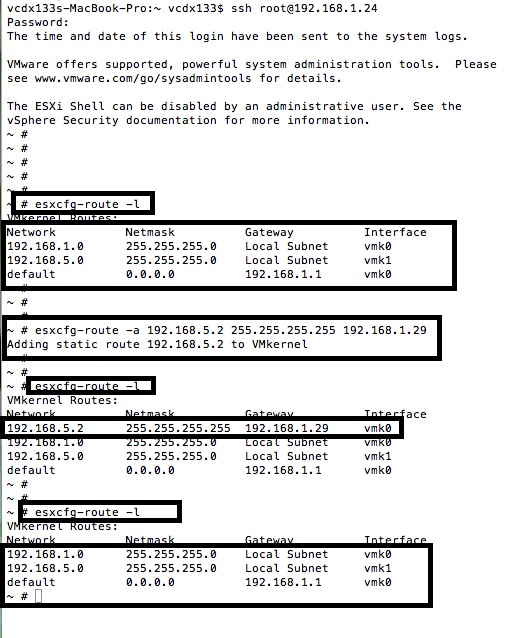
- SSH to ESXi Host 192.168.1.24 and enter the command “esxcfg-route -a 192.168.5.2 255.255.255.255 192.168.1.28” to add the route
- All NFS traffic for the Nutanix Container mounted as a Datastore is being sent to a remote CVM.
- Takes 35 seconds for Nutanix cluster to detect and delete route
- The screenshots below show a valid route being injected (with valid CVM IP) and an invalid route (non-existent IP address)
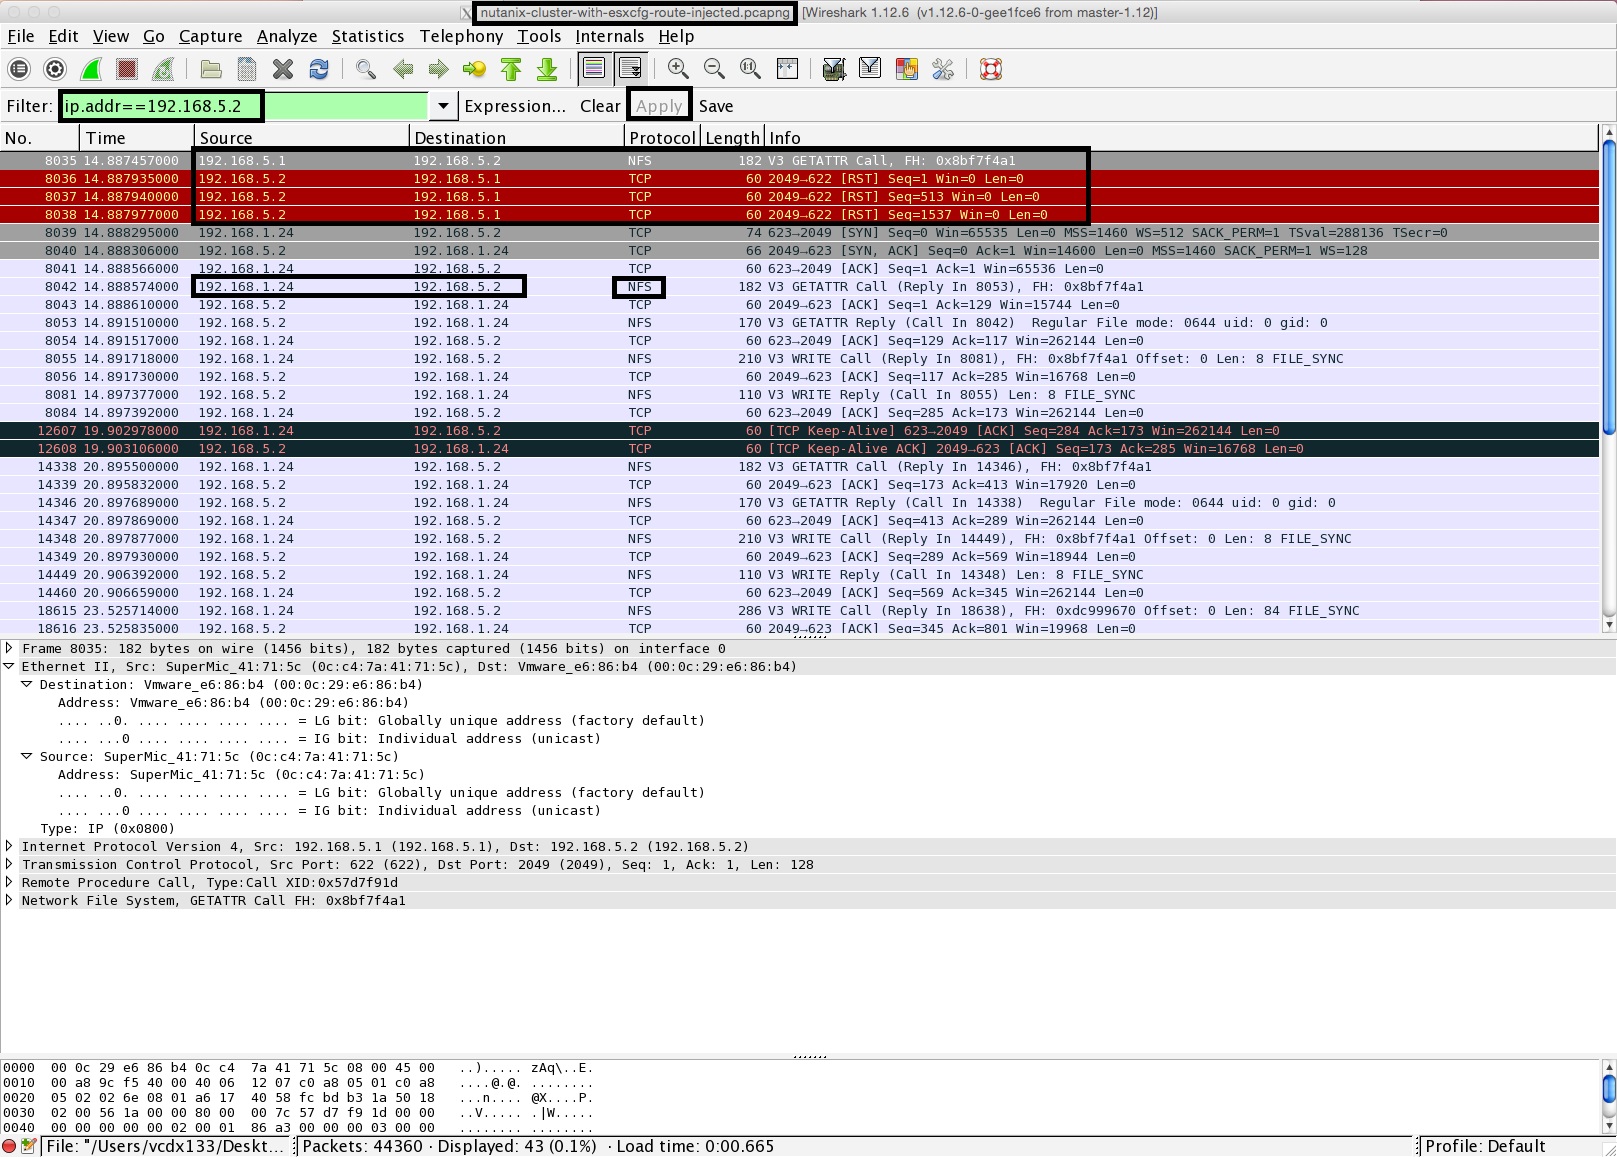
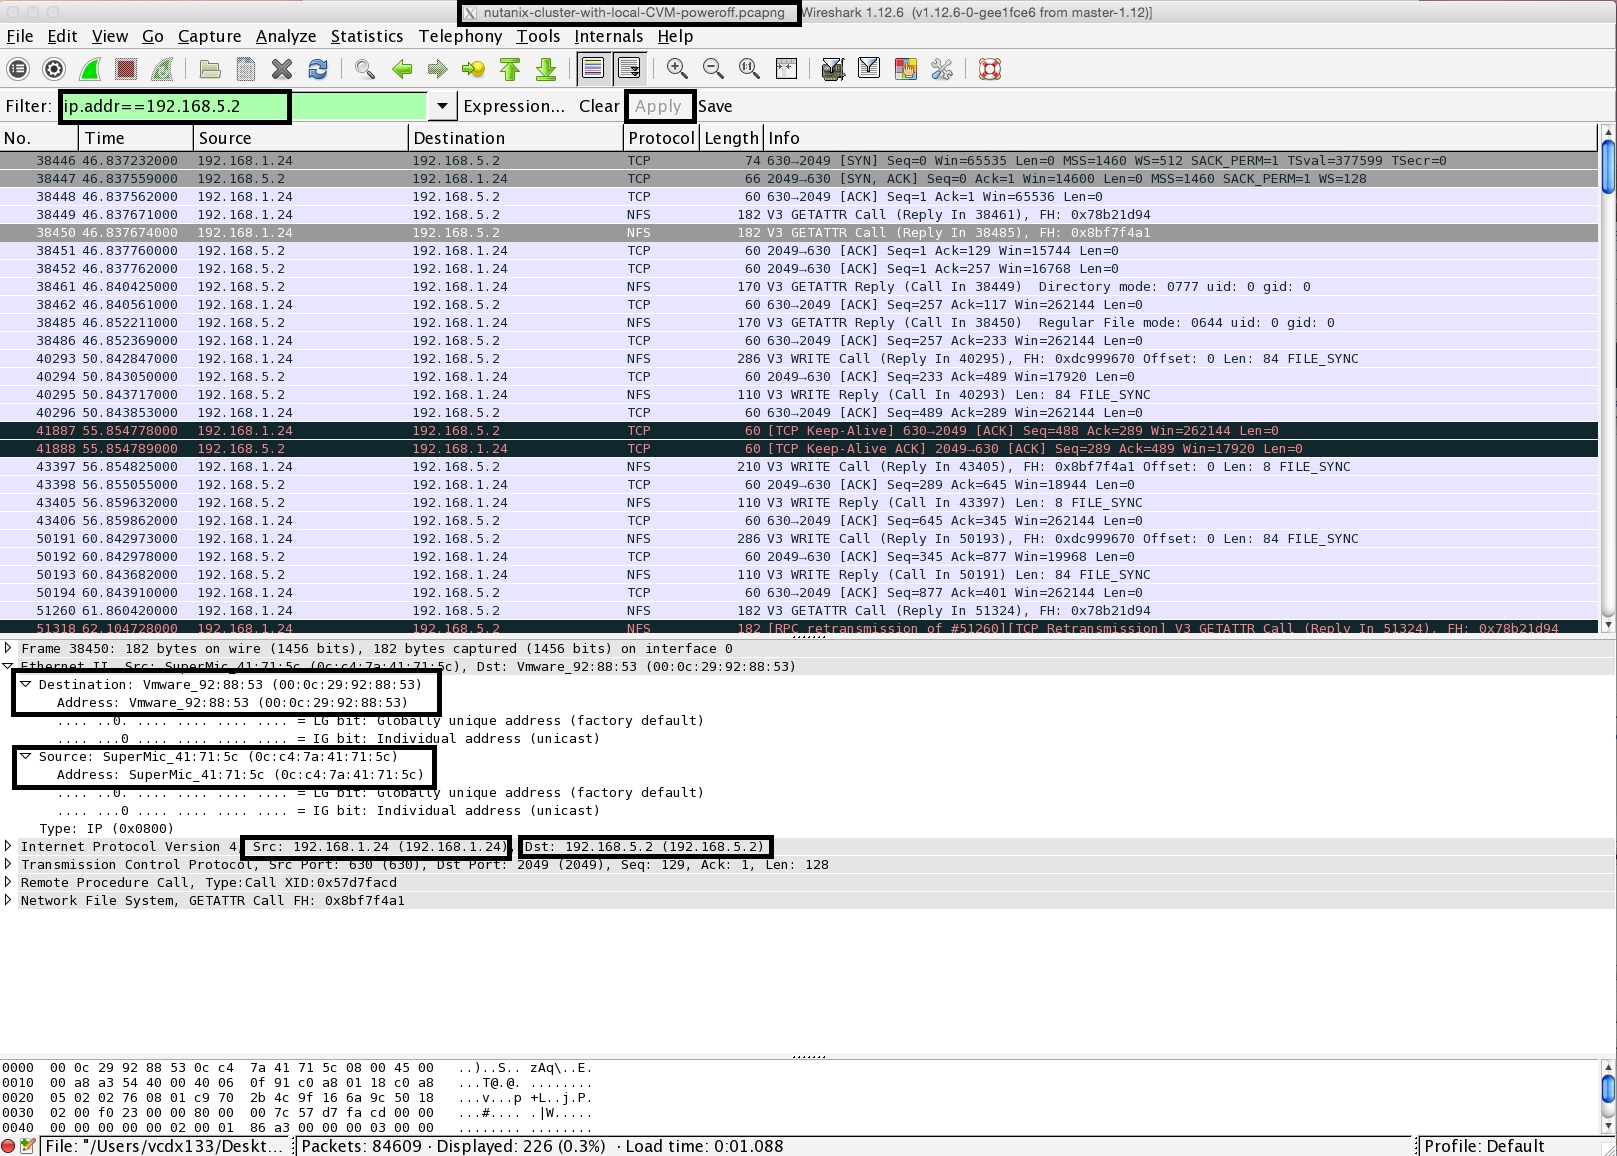
- In the Wireshark screenshot, you can see the first three packets are from the active TCP connection between 192.168.5.1 and 192.168.5.2, which is then reset by the remote CVM due to the routing table modification.
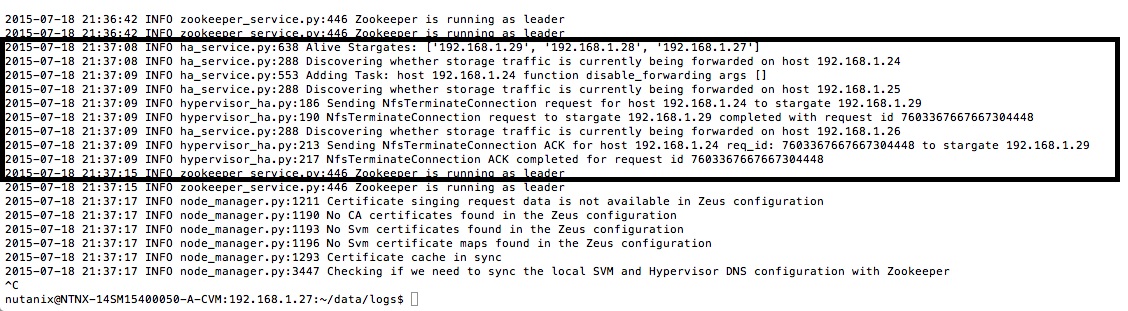
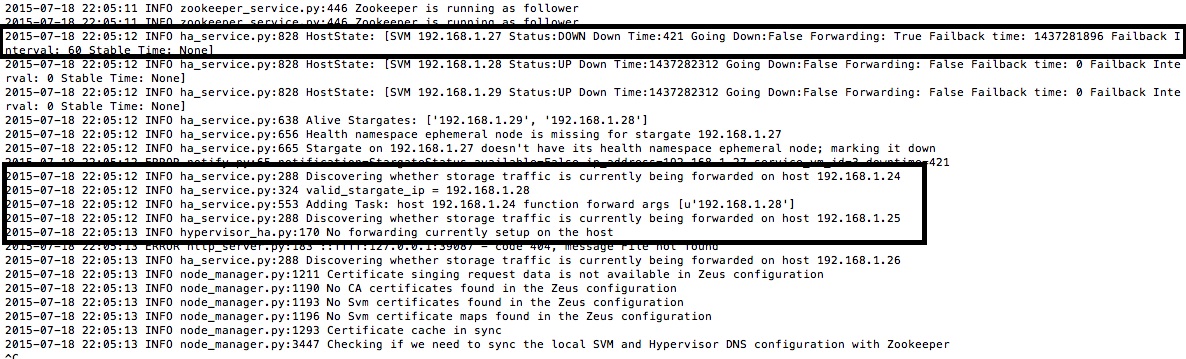
- In the genesis.out file, you can see the ha_service.py process/script detecting illegal forwarding and then creating a task to delete that route from the ESXi host. Which is then executed by the hypervisor_ha.py process/script.
- With the valid route, you can see that Genesis gracefully terminates the connection via the NfsTerminateConnection request before deleting the route.
Screenshot of Wireshark and ESXi:

Nutanix CVM A Fails (powered off)
- Each ESXi host is configured to connect to each NFS Container using the 192.168.5.2 target IP address. This is not changed during failure conditions.
- Each ESXi host connects to the eth1 interface, 192.168.5.2, of the local CVM to mount the NFS Datastore, which is the NFS Container configured within NDFS.
- It takes 23 seconds for the Nutanix Cluster to detect the CVM failure on a functioning ESXi host
- Genesis detects the failure via the ha_service.py process/script and then runs the hypervisor_ha.py process/script on the ESXi host via the permanent SSH connection it maintains with each ESXi host.
- The hypervisor_ha.py process/script effectively executes the ESXi SSH command “esxcfg-route -a 192.168.5.2 255.255.255.255 192.168.1.28” (in this case).
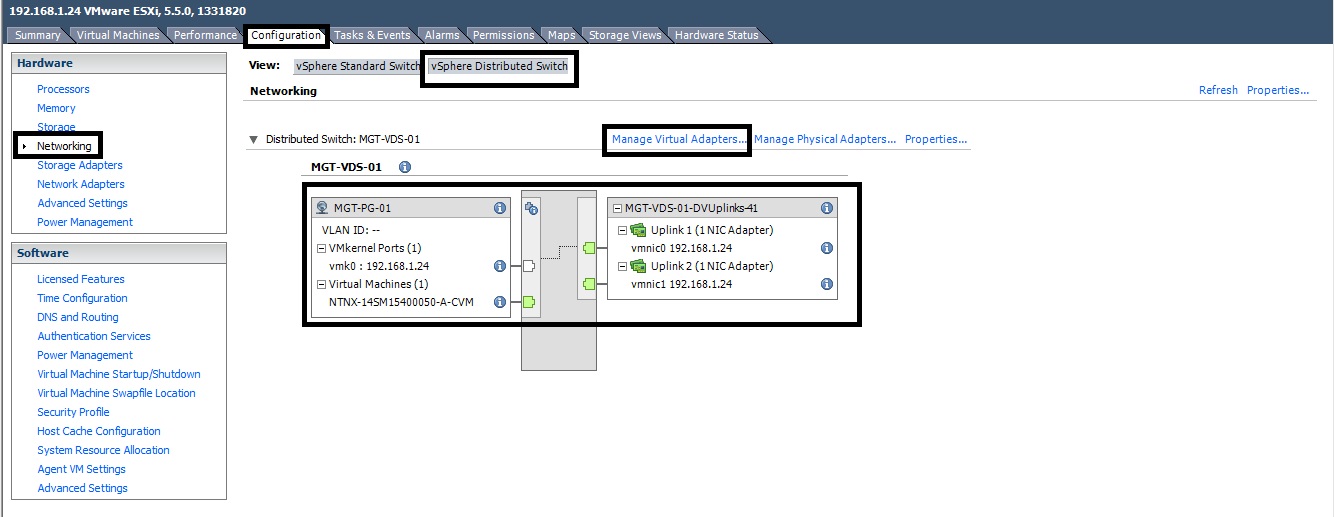
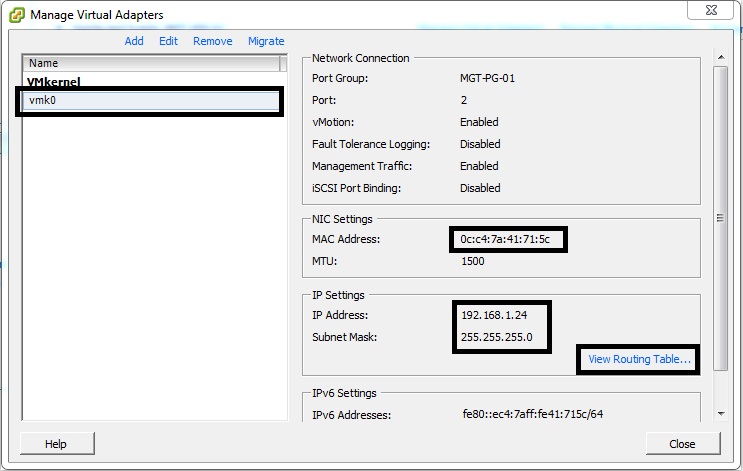
- The VMkernel NFS TCP traffic (from 192.168.5.1) is sent from the ESXi storage stack via the vmk0 interface (source IP address 192.168.1.24) with the vmnic0 source MAC address to the destination IP address 192.168.5.2 with the destination MAC address of the public interface of the remote CVM (192.168.1.28 in this case).
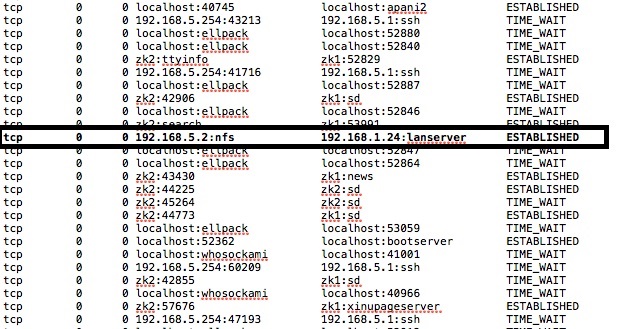
- The remote CVM terminates the TCP tunnel and NFS traffic beings to flow again. You can see this by running the command “netstat -a | grep 192.168.5.2” on the remote CVM.
- You can see the SSH connection a CVM maintains with a ESXi host by running the command “netstat -a | grep ssh”. Note: this will be using the public and private interfaces of CVM, depending upon the state of the cluster.
- The ESXi host and the remote CVM continue to use the same source MAC/IP address and destination MAC/IP address combination during the CVM failure condition.
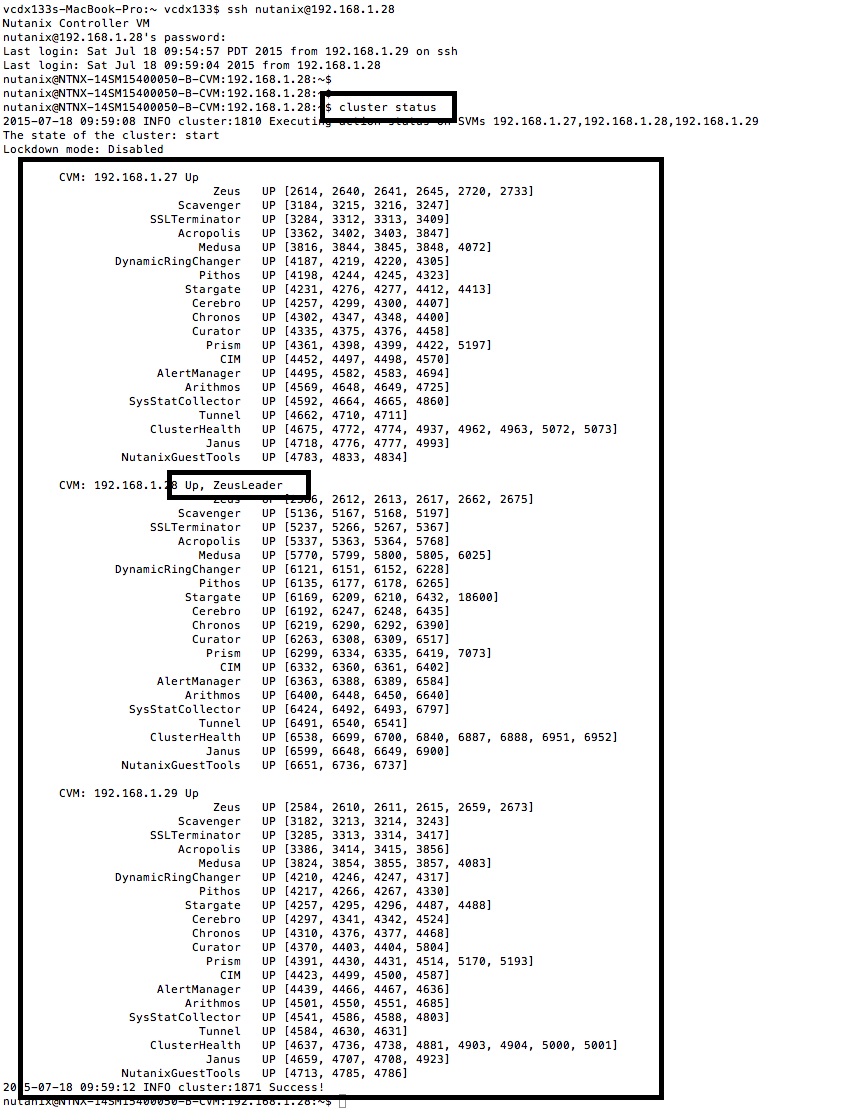
Screenshots of Wireshark, CVM (cluster status, tail -f genesis.out & netstat -a) and ESXi:


Untrained Administrator Deletes Valid Route during CVM failure condition
- SSH to the ESXi Host and enter the command “esxcfg-route -d 192.168.5.2 255.255.255.255 192.168.1.28” to delete the route
- It takes 19 seconds for Nutanix cluster to detect and add the route again
- Check for the route repeatedly using “esxcfg-route -l”
- In the genesis.out file, you can see the ha_service.py process/script detecting the absence of forwarding and then creating a task to add the route to the ESXi host. Which is then executed by the hypervisor_ha.py process/script.
Screenshot of ESXi and CVM:

Failed CVM Recovers (powered on)
- It takes a few minutes for the CVM to boot and join the Nutanix cluster again.
- In the genesis.out file, you can see the ha_service.py process/script detecting all Stargates are alive, but the powered on CVM is not fully initialised yet. After 30 seconds, it detects all three Stargates are alive and functioning then creates a task to delete the forwarding route from the ESXi host. Which is then gracefully executed by the hypervisor_ha.py process/script by running the NfsTerminateConnection request.
Screenshot of CVM:

The Low-Down
Those of you with a networking background may see the pitfall of what appears to be multiple identical private networks (192.168.5.0/24) with identical IP addresses (192.168.5.1/2/254) trying to cross communicate over another network (192.168.1.0/24) without Network Address Translation. What makes this work are two things:
First, the ESXi VMkernel module is like a VM with multiple vNICs, where each vNIC is a VMkernel and the routing table specifies the next hop address for each destination network. The addition of the 192.168.5.2/32 route means that the closest VMkernel to the next hop address will be used for NFS traffic. vmk0 is a directly connected network, which means that the vmk0 IP address is the source IP address, 192.168.1.24, instead of 192.168.5.1. All VMkernels are capable of NFS traffic, so no additional configuration is required (unlike Management, vMotion, vFT, Virtual SAN and iSCSI).
Second, the Nutanix CVM has been built to act as a router, which allows communication with the addresses on eth1 via eth0 (NAS target, 192.168.5.2). With normal servers, this would not work (ie. you have a standard Linux VM with two vNICs and you try to access the eth1 IP address by having the eth0 IP address as the Gateway IP of your PC).
Check-It-Yourself
- Attached are the Wireshark PCAP files from my testing.
- Download Wireshark and X11 for OS X or Wireshark for Windows 7.
- Open the PCAP files with Wireshark and use the expression “ip.addr == 192.168.5.2” to filter the traffic.
- If you have a functioning Nutanix cluster (TEST, not PRODUCTION!), you will need to SPAN/Mirror all VLAN 1 traffic to an Ethernet port that is connected to your PC running Wireshark in capture mode. You can then power off the CVM and use the esxcfg-route command to list, add and delete routes on the ESXi host with the failed CVM.
