 This is Part 4 of the Nutanix XCP Deep-Dive, covering the Nutanix System Engineer Toolkit.
This will be a multi-part series, describing how to design, install, configure and troubleshoot an advanced Nutanix XCP solution from start to finish for vSphere, AHV and Hyper-V deployments:
- Nutanix XCP Deep-Dive – Part 1 – Overview
- Nutanix XCP Deep-Dive – Part 2 – Hardware Architecture
- Nutanix XCP Deep-Dive – Part 3 – Platform Installation
- Nutanix XCP Deep-Dive – Part 4 – Building a Nutanix SE Toolkit
- Nutanix XCP Deep-Dive – Part 5 – Installing ESXi Manually with Phoenix
- Nutanix XCP Deep-Dive – Part 6 – Installing ESXi with Foundation
- Nutanix XCP Deep-Dive – Part 7 – Installing AHV Manually
- Nutanix XCP Deep-Dive – Part 8 – Installing AHV with Foundation
- Nutanix XCP Deep-Dive – Part 9 – Installing Hyper-V Manually with Phoenix
- Nutanix XCP Deep-Dive – Part 10 – Installing Hyper-V with Foundation
- Nutanix XCP Deep-Dive – Part 11 – Benchmark Performance Testing
- Nutanix XCP Deep-Dive – Part 12 – ESXi Design Considerations
- Nutanix XCP Deep-Dive – Part 13 – AHV Design Considerations
- Nutanix XCP Deep-Dive – Part 14 – Hyper-V Design Considerations
- Nutanix XCP Deep-Dive – Part 15 – Data Center Facility Design Considerations
- Nutanix XCP Deep-Dive – Part 16 – The Risks
- Nutanix XCP Deep-Dive – Part 17 – CVM Autopathing with ESXi
- Nutanix XCP Deep-Dive – Part 18 – more to come as the series evolves (Cloud Connect to AWS and Azure, Prism Central, APIs, Metro, DR, etc.)
Prerequisites
- You know what you are doing, or have a mentor who will guide you through the process.
- Employee or Partner Access to the Nutanix Portal.
- Access to the VMware and Microsoft software libraries.
- Access to a Nutanix XCP Block (3 or 4 nodes) to validate your toolkit with.
Bill of Materials
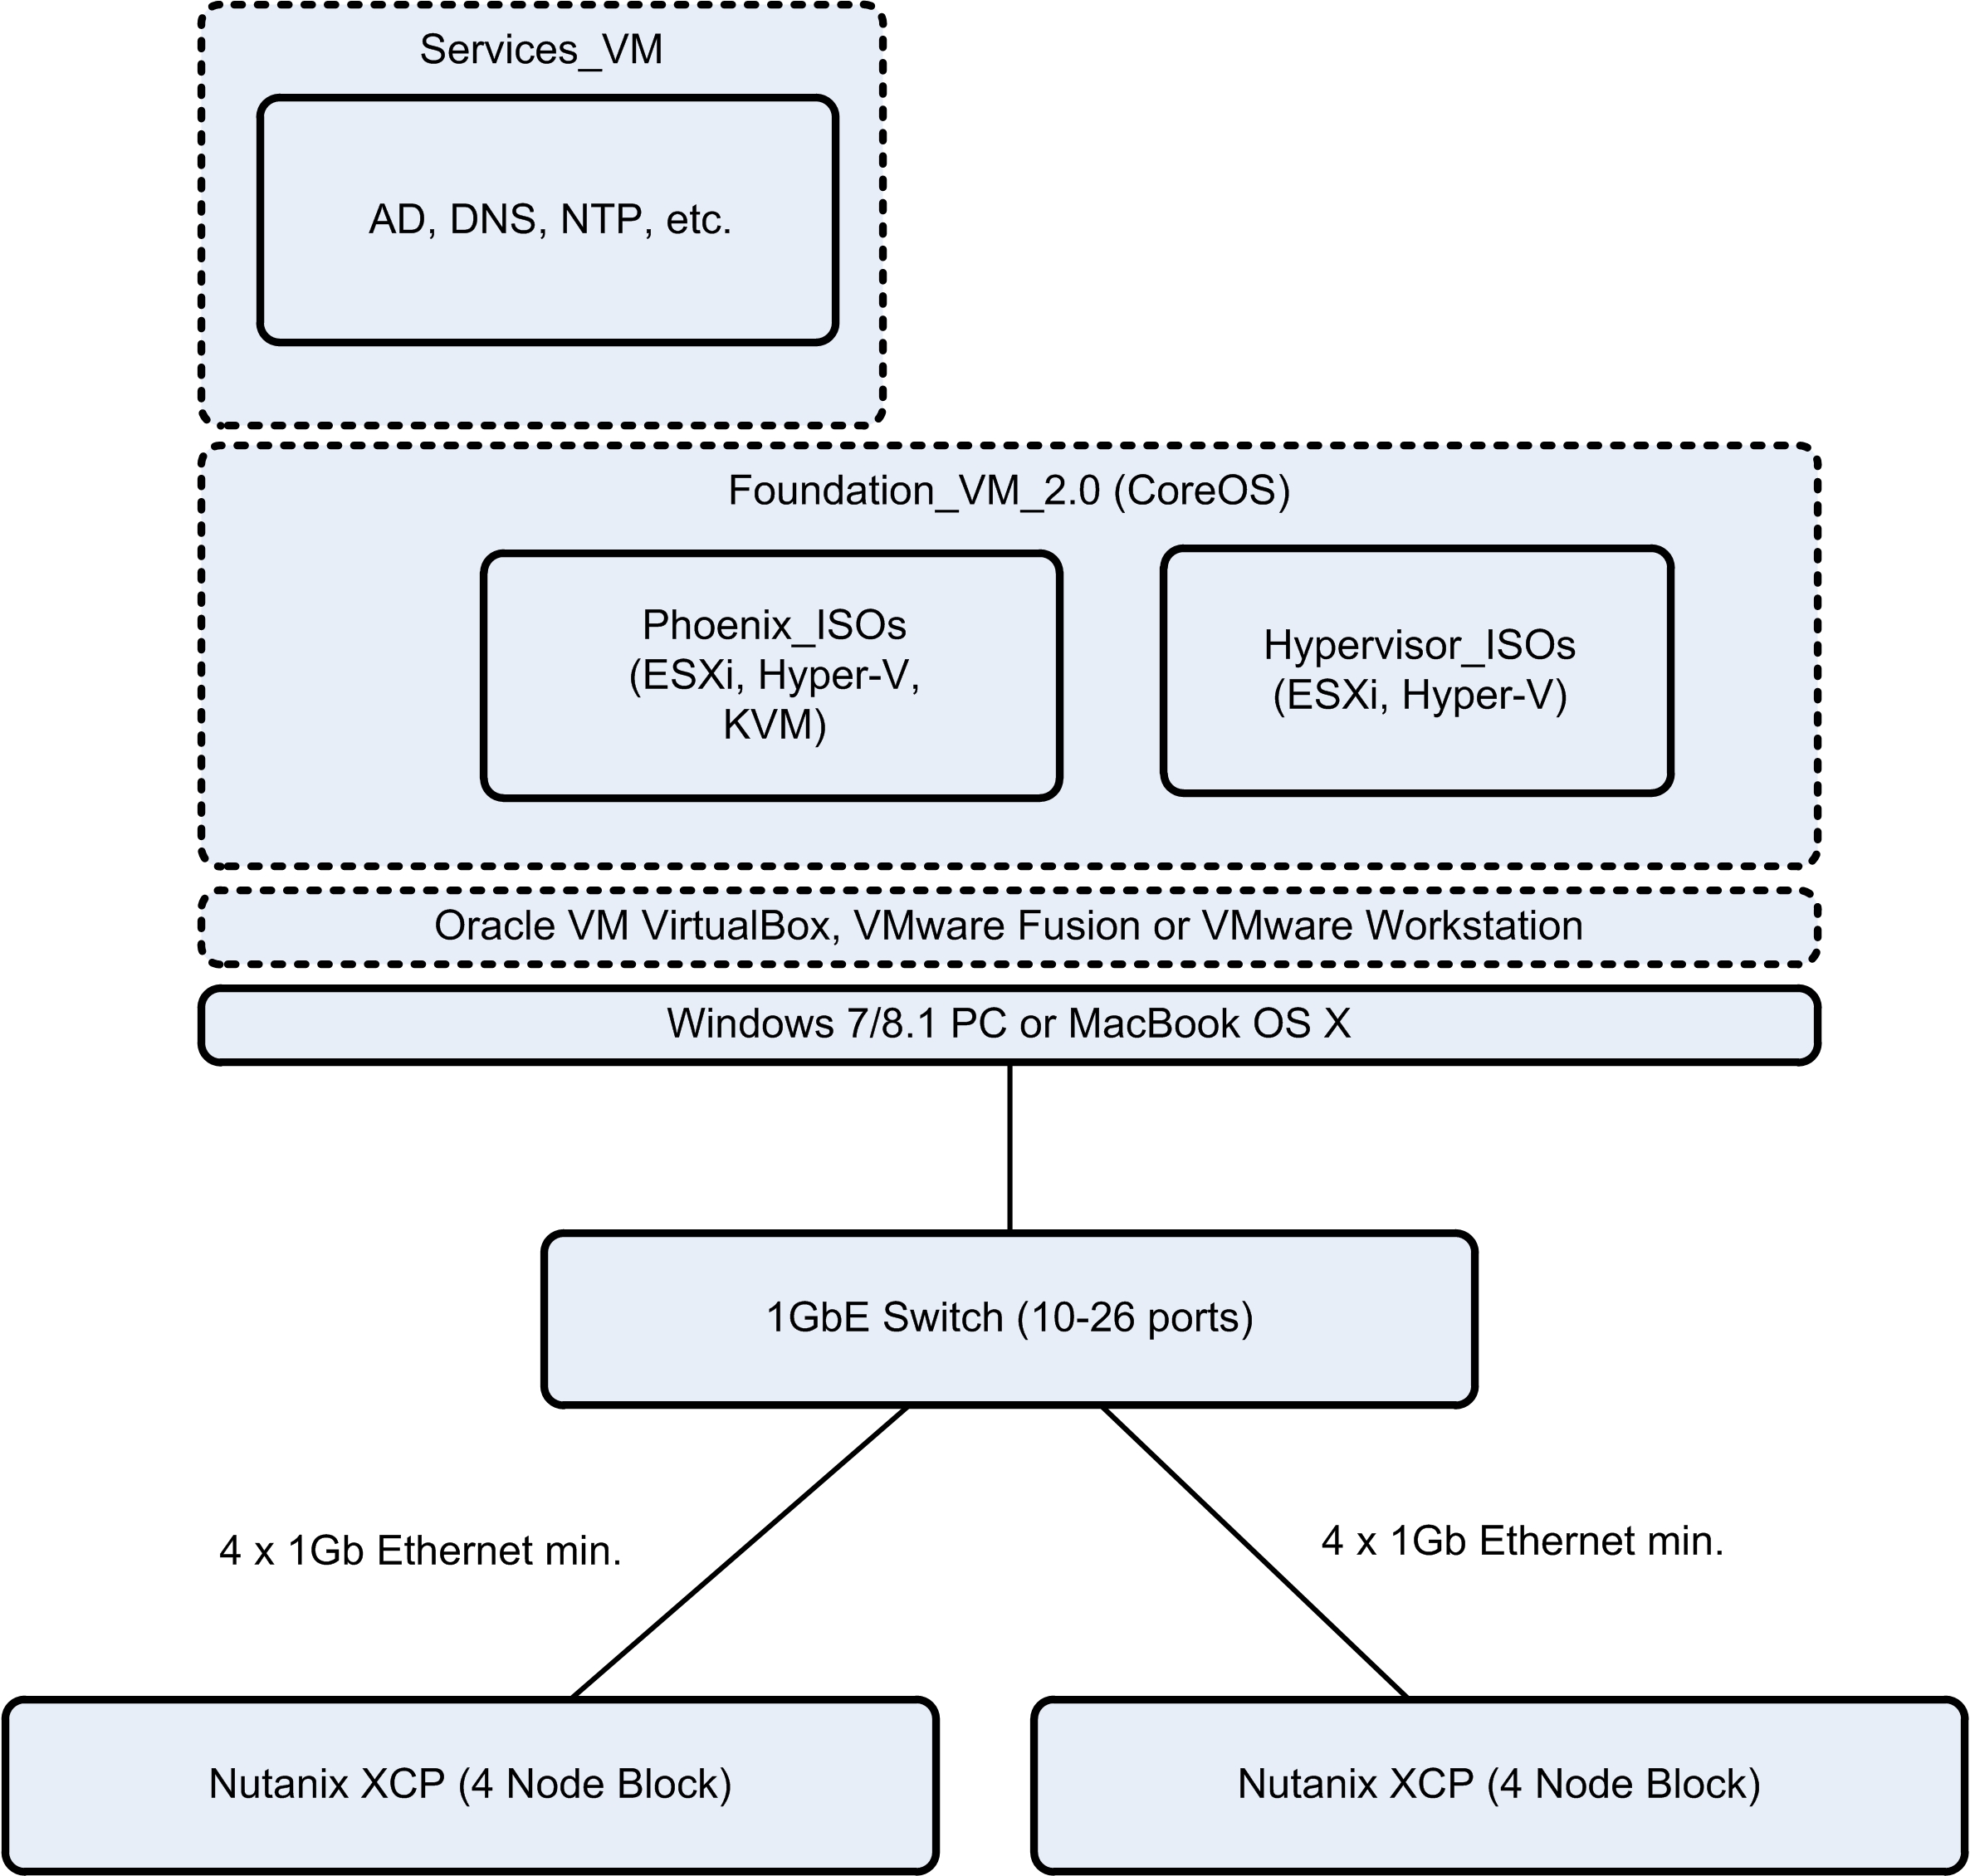
- Laptop/MacBook variant running Windows 7/8.1 or OS X with Intel Core i5 processor (i7 quad core is better), 8GB RAM (16GB/32GB is better), 1GbE interface and 200GB free on HDD/SSD (minimum)
- 10/12 Port or 24/26 Port 1GbE LAN Switch (I use the Cisco SG-200-26 – see last section) – recommended features: LAGs, Port Mirroring and 802.1q (Trunking/VLANs)
- Minimum of 5 x CAT5E/CAT6 LAN cables (recommend 13 – 4 x 3 per node plus 1 for your PC)
- Access to a VGA Monitor and USB Keyboard at each site (or carry your own in the trunk of your car)
- 6+ Socket Power Board/Strip with power cables (min. 3 for one Nutanix Chassis and LAN switch)
- Padded Trolley bag (or Pelican Case for airplane travel) for transporting it all
- Oracle VM VirtualBox, VMware Workstation or VMware Fusion
- Nutanix Foundation VM 2.0 and 2.1 – used to bulk image and provision a Nutanix XCP cluster (eg. filename “Foundation_VM-2.0.zip” containing vmdk and ovf files)
- For Nutanix Foundation VM 2.0: Phoenix images for ESXi, Hyper-V and KVM (eg. filename “phoenix-2.0_ESX_NOS-4.0.2.1.iso”)
- Nutanix supported ISO images: VMware vSphere 5.0/5.1/5.5/6.0 & Microsoft Hyper-V 2012 R2 (including associated patches for each version) – specified in the “Nutanix Field Installation Guide”.
- Nutanix KVM images (eg. filename “host-bundle-el6.nutanix.20150521.tar.gz” and “host-bundle-el6.nutanix.20150521-metadata.json”)
- Nutanix NOS library: 3.5.5 (swing image to get to 4.0), 4.0.3 (swing image to get to 4.1), 4.1.3, etc. (eg. filename “nutanix_installer_package-danube-4.1.3-1ecf.tar.gz” and “4.1.3-upgrade-metadata.json”)
- VMware vSphere Client: 5.0, 5.1, 5.5, 6.0 (provided by Windows Server 2012 R2 VM running on your laptop)
- Microsoft Hyper-V Client: 2012 R2 (provided by Windows Server 2012 R2 VM running on your laptop)
- Functioning SSH client (Putty for Win7, native Terminal ssh client for OS X)
- Functioning DNS server (provided by Windows Server 2012 R2 VM running on your laptop)
- Functioning NTP server (provided by Windows Server 2012 R2 VM running on your laptop)
- Functioning DHCP server (provided by Windows Server 2012 R2 VM running on your laptop)
- Wireshark Packet Capture and Analysis (used in conjunction with LAN Switch Port Mirroring)
- Chrome, Firefox, Safari, Internet Explorer Web Browsers with the latest version of Java (for IPMI)
- Internet connection – just use Hotspot on your SmartPhone – just make sure you have a data-plan to handle it (you will need it for getting remote support; the latest patches, fixes for issues you experience in the field)
- Library of Nutanix Product Documentation, Release Notes, Best Practices, Reference Architectures, etc.
- EUC/VDI binaries and test tools (for PoCs)
IMPORTANT: Have a validated set of tools that you can fall back on when you are experiencing issues with customer equipment. Just because the customer says they have everything prepared and functioning, does not mean you can leave your “toolkit” at home, you WILL need to use it for troubleshooting and problem isolation.
IMPORTANT: Make sure you have tested your entire toolkit on a Nutanix XCP chassis with all three hypervisors BEFORE you go to your first customer site. It will save you from looking like a dummy when things do not work.
IMPORTANT: If your customer configuration requires 10GbE (most of them will), you will bring up the Nutanix block with 1GbE (on your toolkit) and then migrate it to 10GbE (on the customer’s network).
IMPORTANT: Some of your customers will not be able to run the latest versions of Nutanix code (as a matter of corporate policy), so you need to maintain a library of software for each major release of NOS/KVM. The same is true for VMware vSphere and Hyper-V.
IMPORTANT: You may be tempted to use your vCenter Server Appliance or SCVMM instance to connect to the cluster and start configuring it from the single interface. Just be aware that you will not be handing this over to the customer and there are dependencies (eg. vSphere Distributed Switch control plane) upon that management system. A much better practice is to connect the Nutanix infrastructure to the customer network after you have imaged the system and performed some basic testing (eg. diagnostics.py) and then use the customer’s vCenter Server or SCVMM to connect to the cluster and bring it into service.
REMEMBER: Hyper-V has some prerequisites that must be met before you can bring it online (eg. AD, FQDN, SMB shares, Service Account), which will be provided by the customer infrastructure.
IMPORTANT: Do not plug your LAN switch into the customer network without consulting their network administrators first. Depending upon their network design and configuration, their spanning-tree settings may be vulnerable and your switch may become the root bridge and interrupt service.
Nutanix XCP Management Interfaces
- KVM (Keyboard, Video, Mouse) interfaces on each Node
- Node BIOS accessed via KVM or IPMI console (after IP address is manually configured) – Default Login: No Credentials
- IPMI – IP Address configured from BIOS – http: //<IPMI IP Address/ – Default Login: “ADMIN”/”ADMIN”
- Hypervisor Management Interface (SSH or Client) – IP Address configured manually or via Foundation – Default Login: “root”/”nutanix/4u” (ESXi/KVM), AD System Account configured (Hyper-V)
- Nutanix Controller VM – IP Address configured manually or via Foundation – Default Login: “nutanix”/”nutanix/4u”, “root”/”nutanix/4u”
- Nutanix Prism UI – Cluster IP address configured manually or via Foundation – Default Login: “admin”/”admin” (pre-4.1), “admin”/configured first time (NOS 4.1)
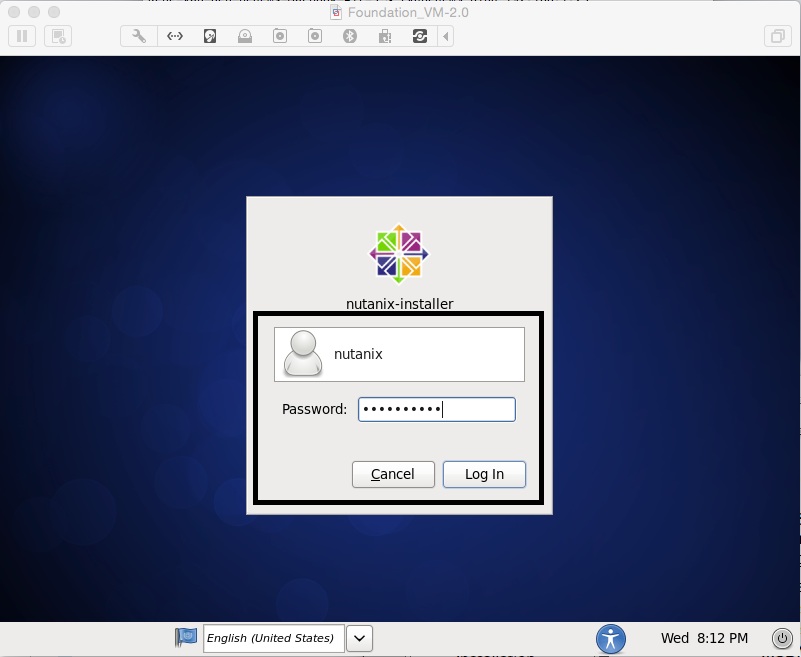
- Nutanix Foundation – VM Console – Default Login: “nutanix”/”nutanix/4u”, “root”/”nutanix/4u”
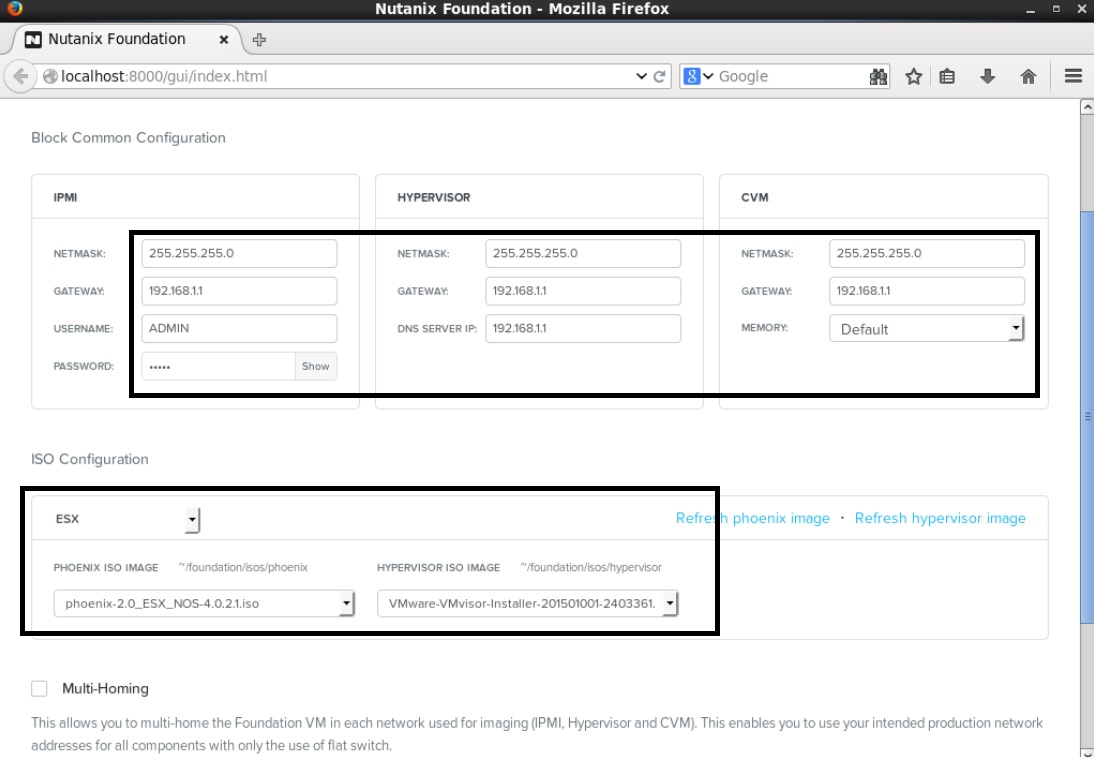
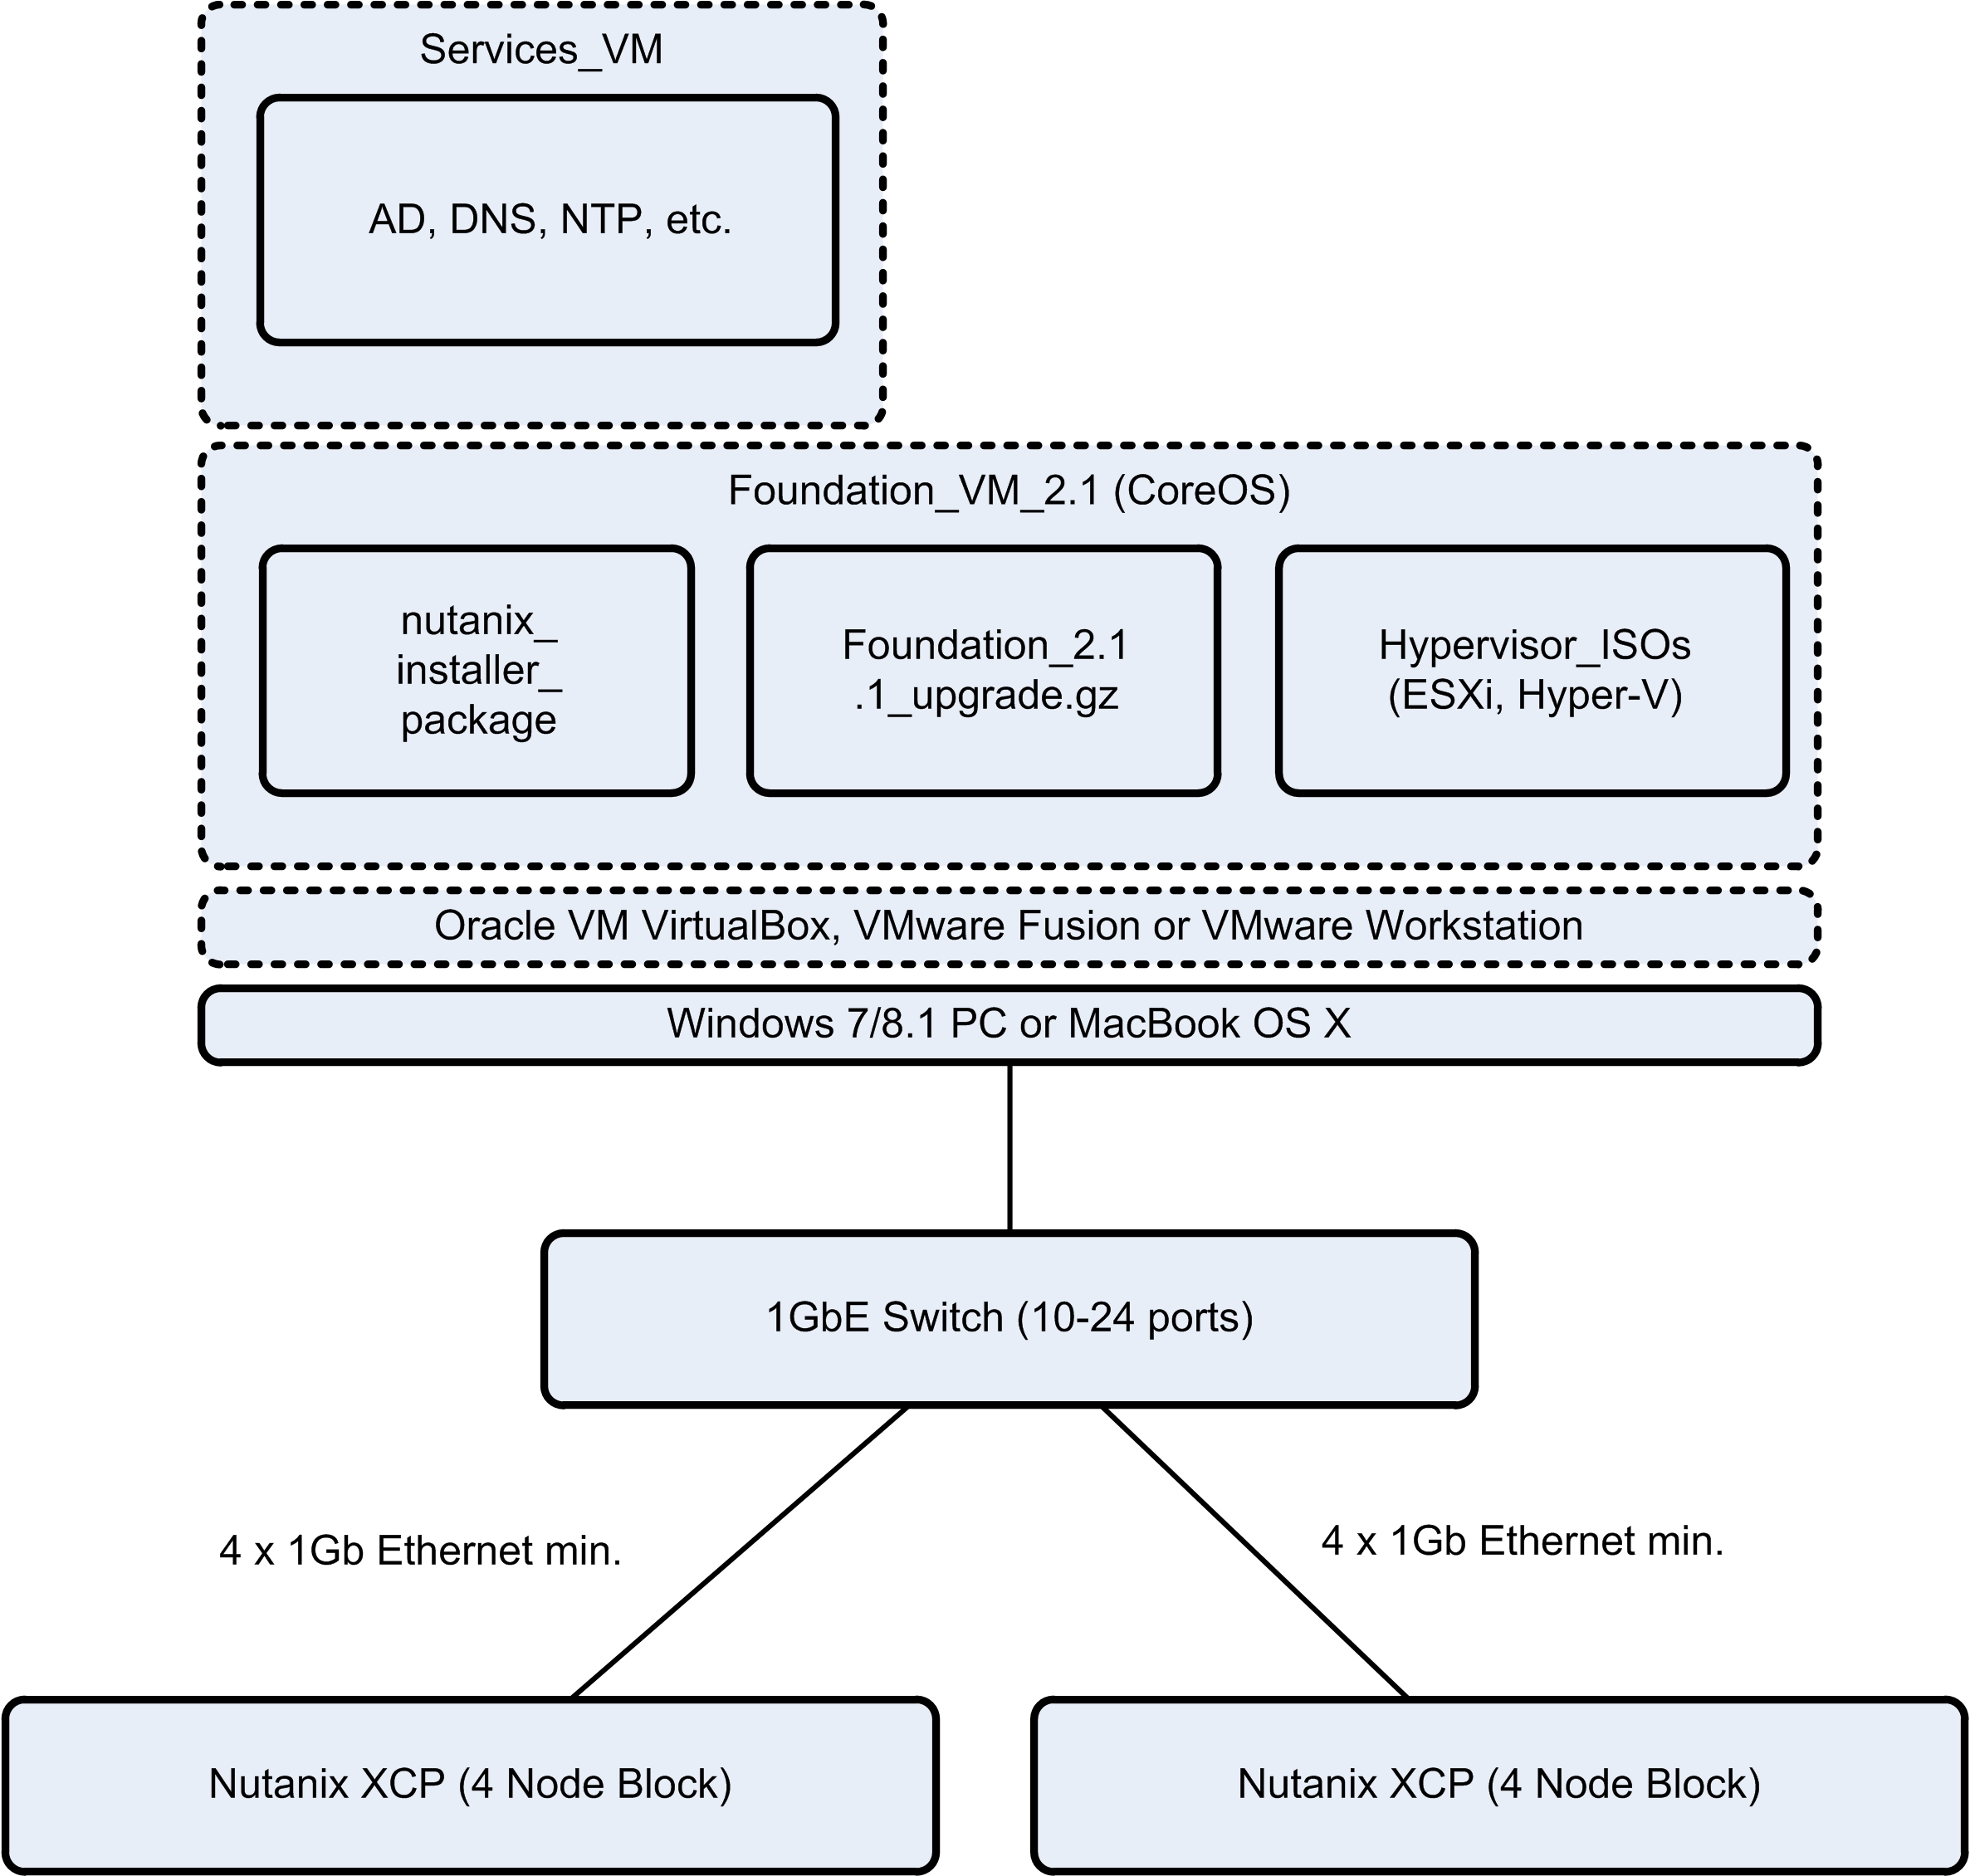
Foundation 2.0 VM
- Import the Foundation VM 2.0 ovf file (with companion vmdk) into your Hypervisor.
- If you are going to be deploying clusters with many nodes of Hyper-V, make sure you extend the Foundation VM disk to handle the caching of each node image (eg. 20 nodes = 20 x ~6GB = ~120GB free required).
- Power it on (2vCPU, 3GB RAM, 30GB vDisk).
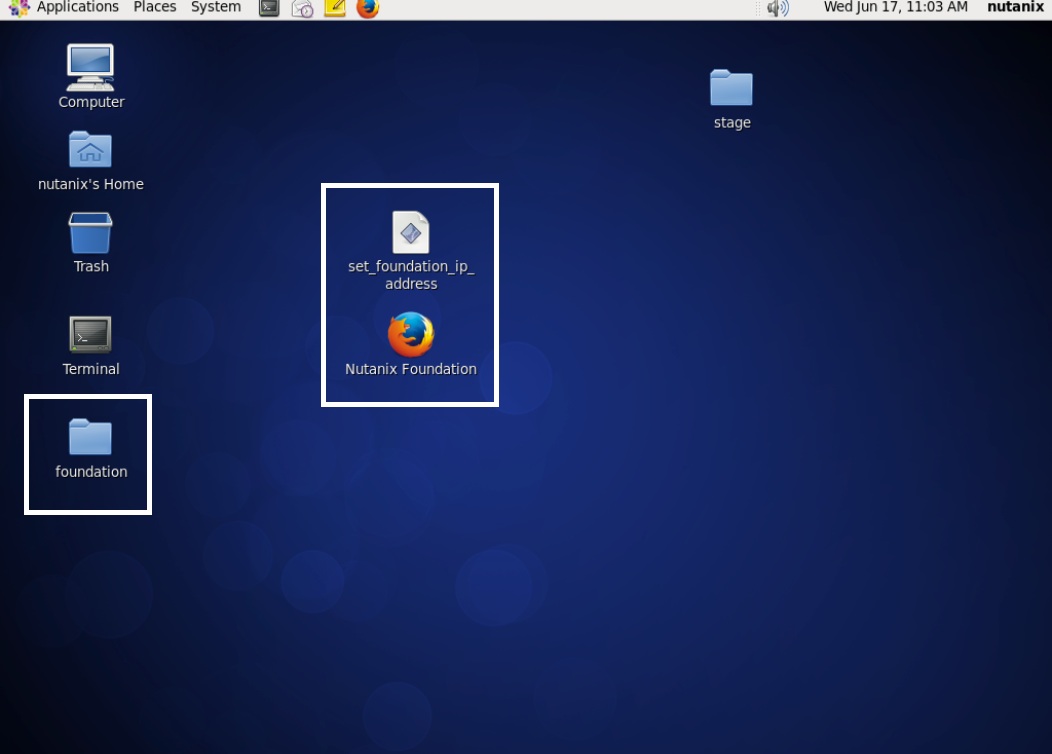
- If you are using Fusion or Workstation, make sure you install VMware Tools to allow the drag and drop of ISO images from your desktop.
- Access the “foundation/isos/phoenix/” folder and copy the ESXi, Hyper-V and KVM Phoenix images from your desktop.
- Access the “foundation/isos/hypervisor/” folder and copy the Nutanix supported ESXi and Hyper-V images from your desktop to the “esx” and “hyperv” sub-folders.
- Double click the “Foundation” wizard link on the VM Console Desktop to start the process. In the Phoenix and Hypervisor menus the ISO images you copied should be listed.

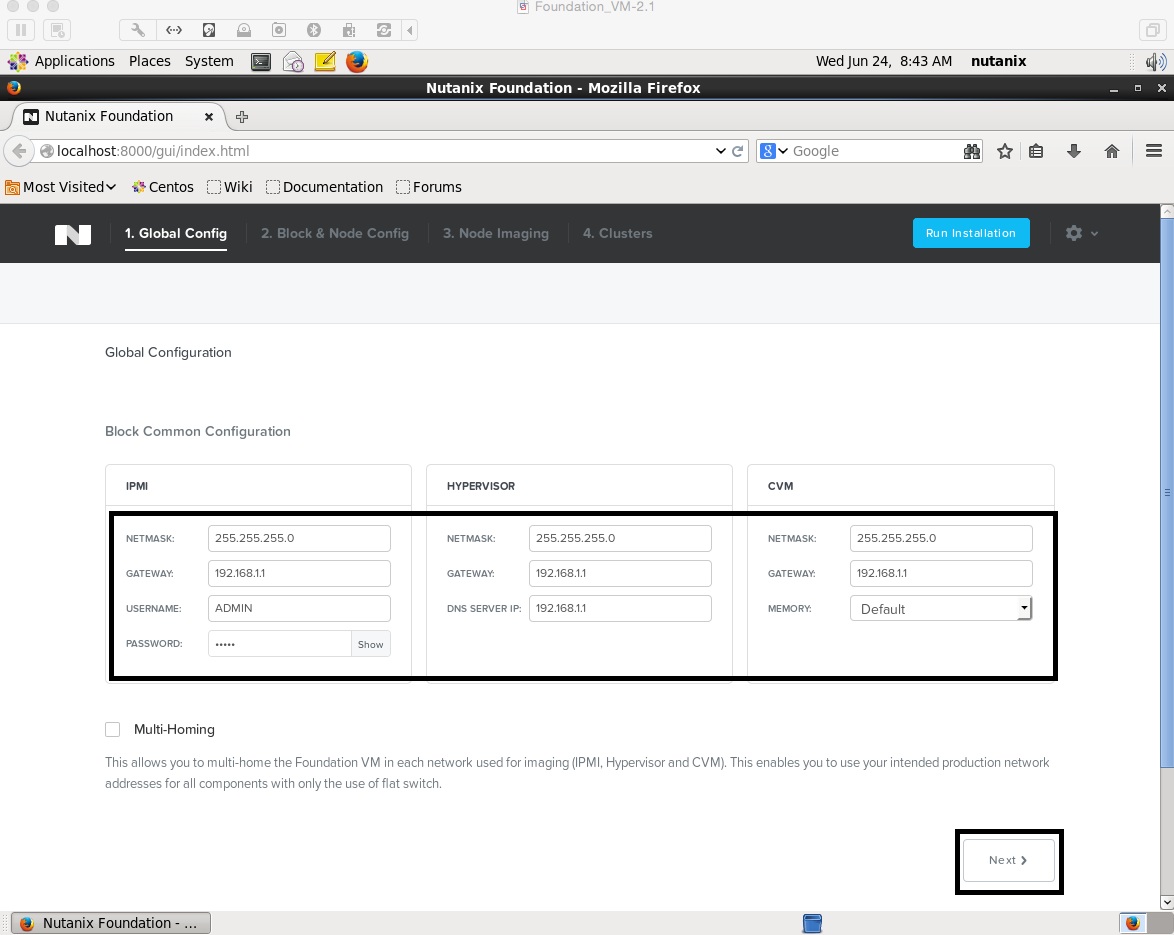
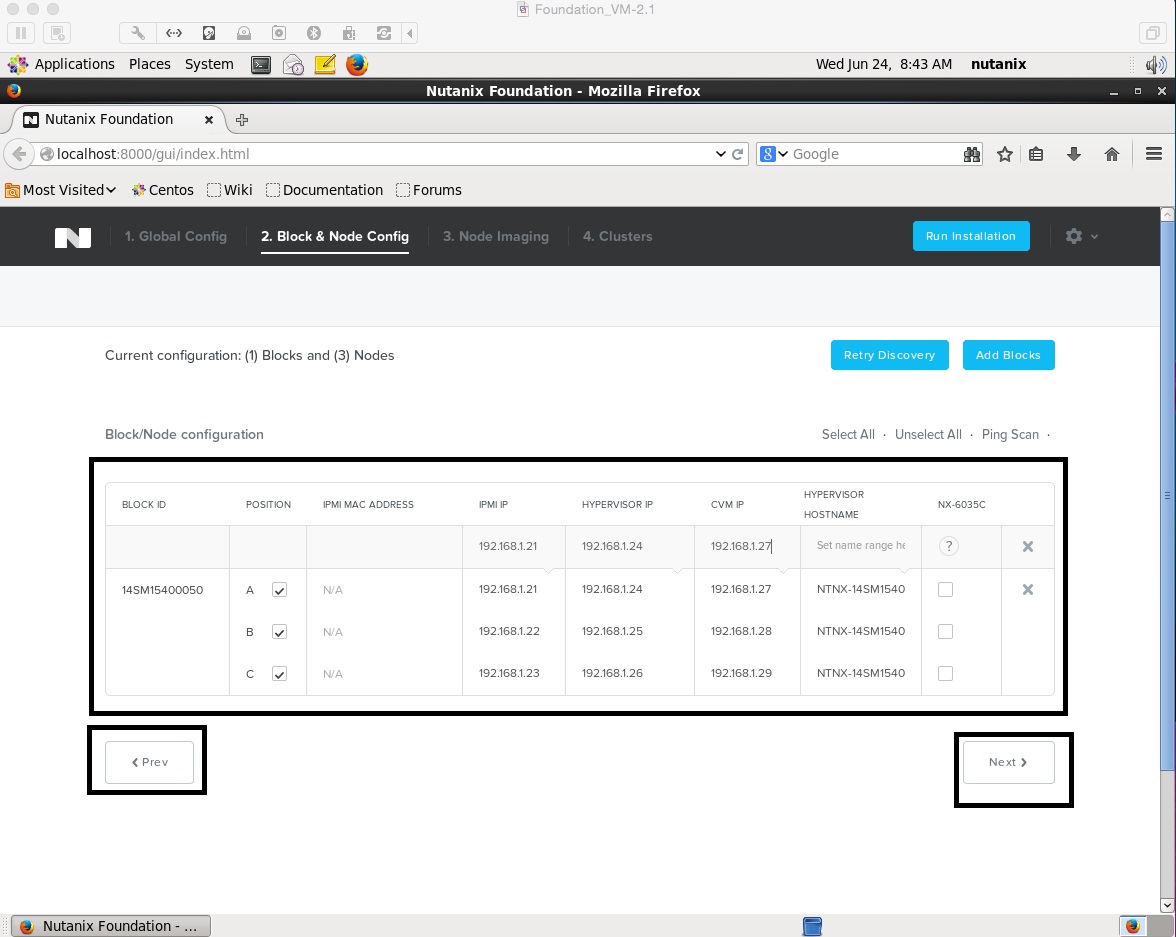
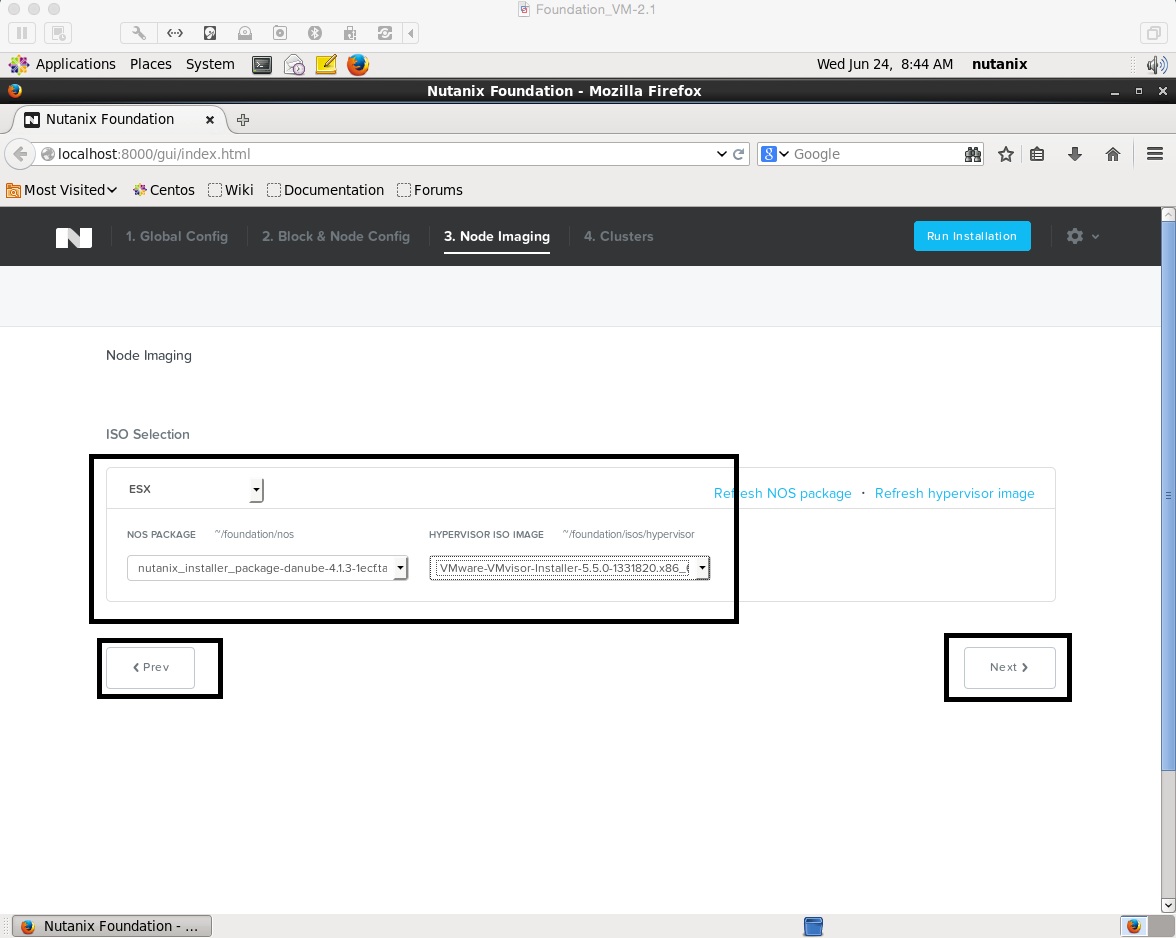
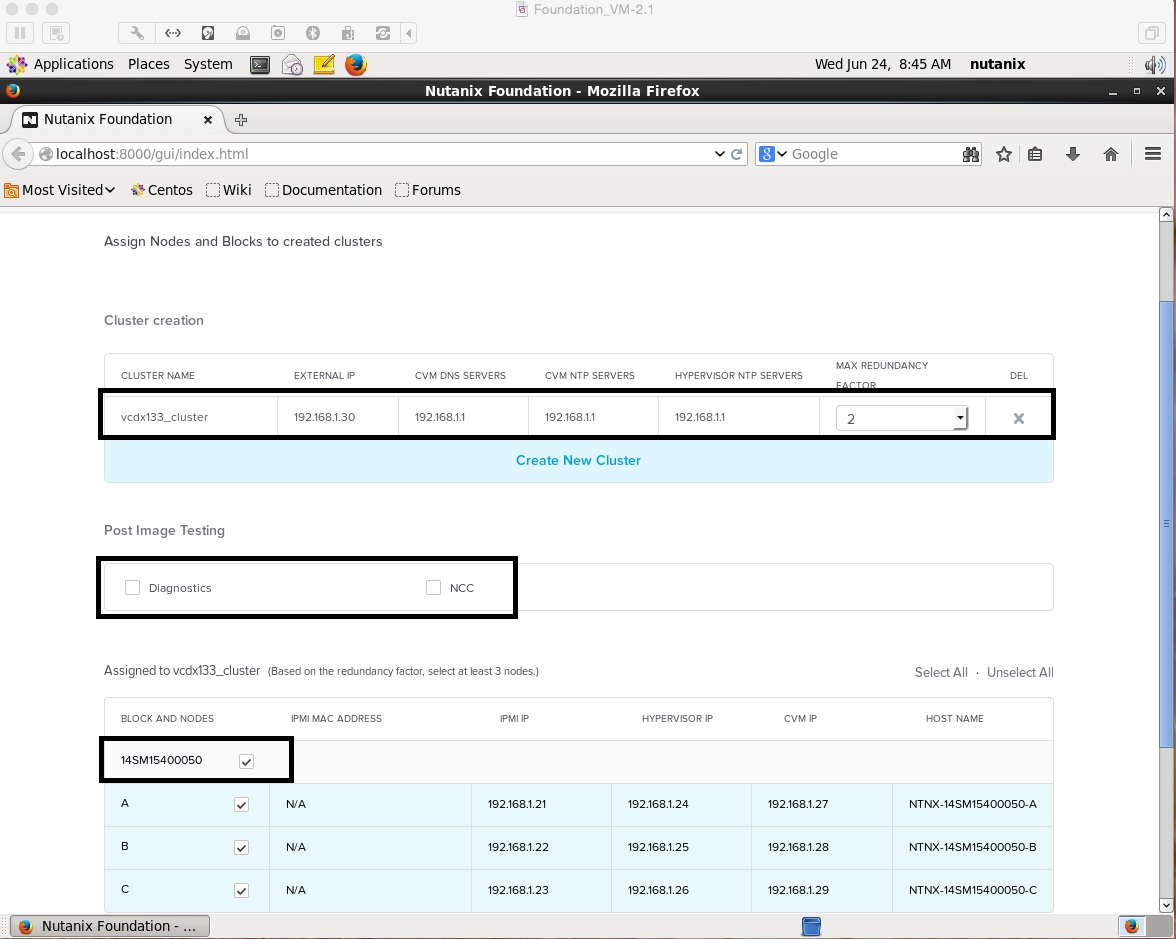
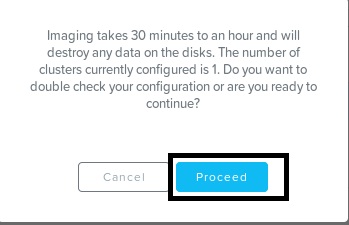
Foundation 2.1 VM
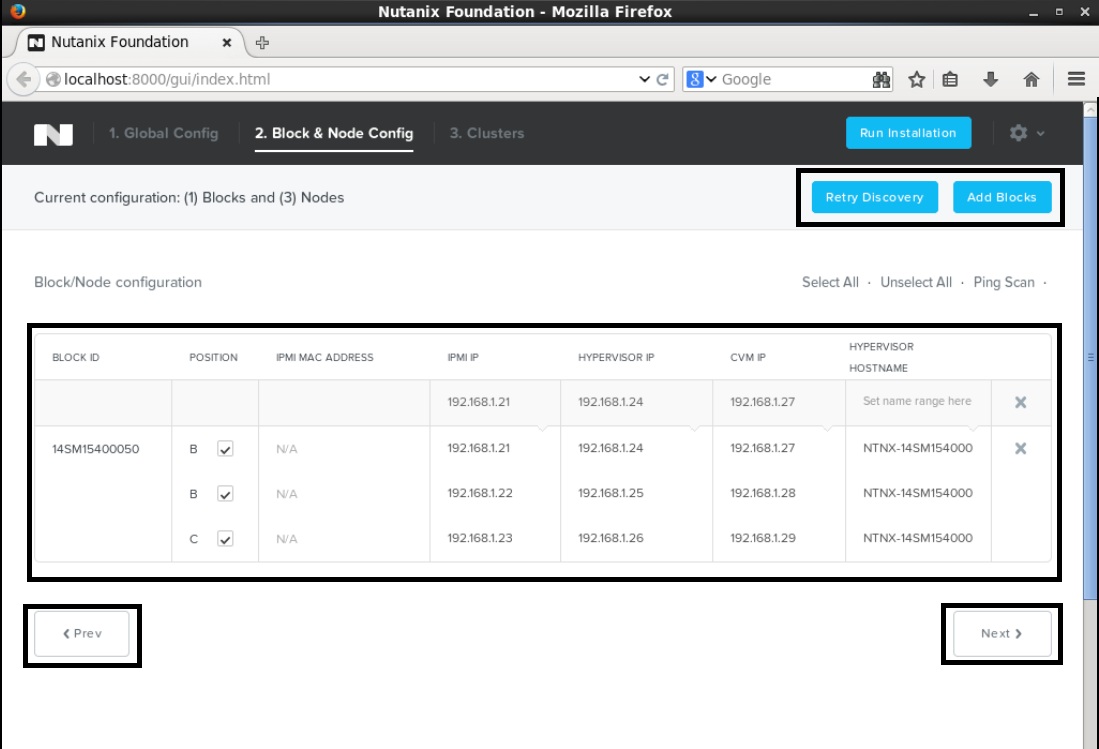
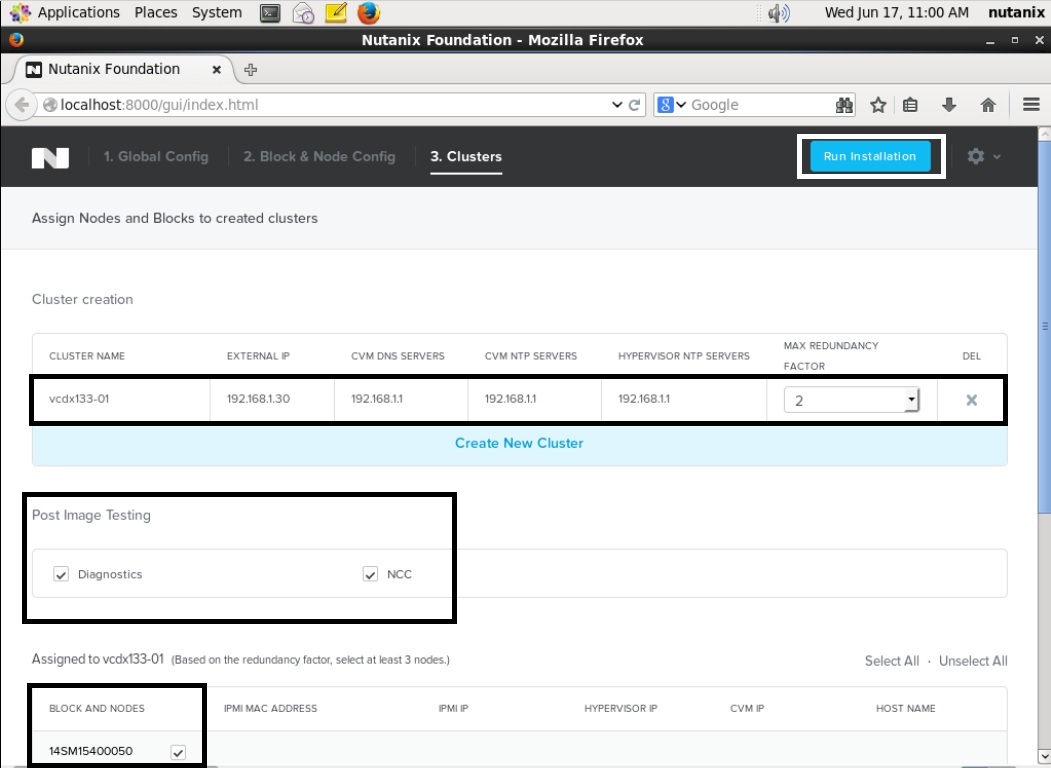
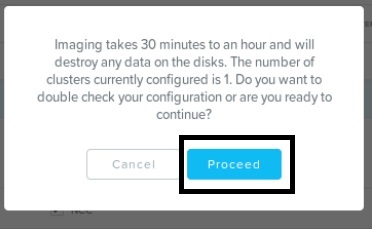
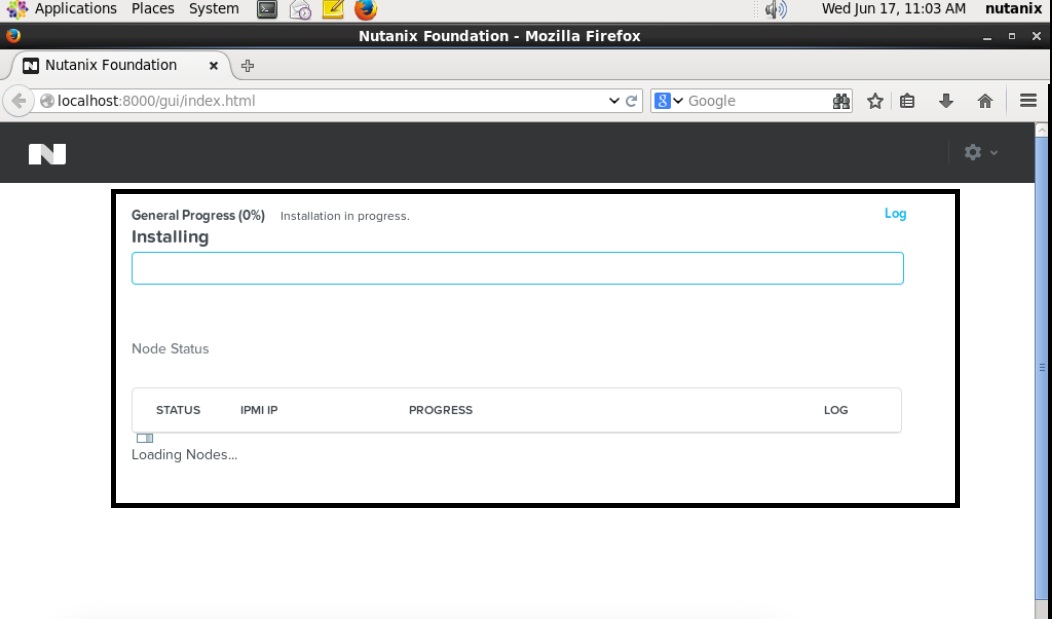
Foundation 2.1 is slightly different from previous versions. The Phoenix images are only used for the manual installation of a node. All that is required in 2.1, is the “nutanix_installer” software and the ESXi and Hyper-V vendor images. The layout of the Foundation wizard has changed slightly also. If you need the Phoenix images, you use Foundation to generate them.
Updated Foundation Wizard screens:
Cisco SG200-26 Configuration Options
Assuming you have the Cisco SG200/300 series as your LAN switch, here are some screenshots on how to use the core features as part of this toolkit.
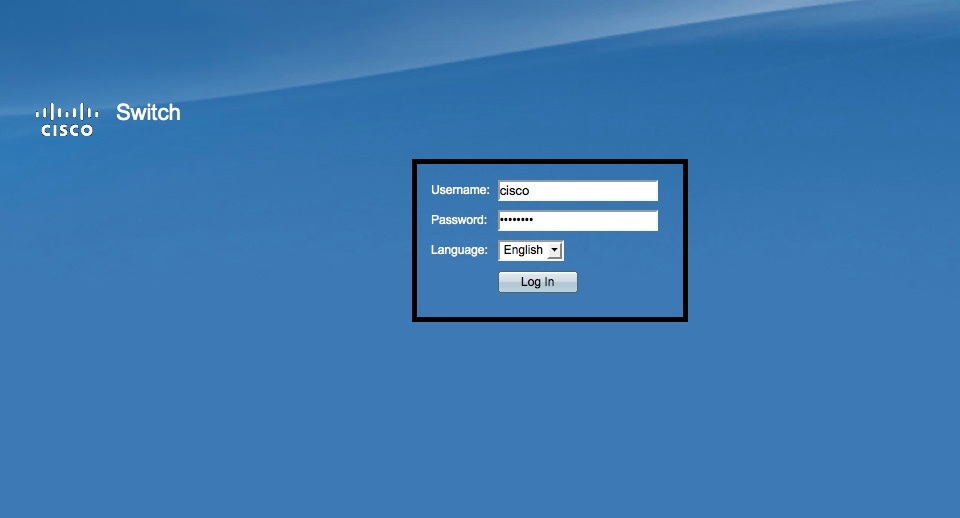
Login
- URL: http: //<Management IP of SG200/300 – default 192.168.1.254> – Login: “cisco”/”cisco”
Jumbo Frames
Use-case: You want to demonstrate or test the benefits of Jumbo Frames whilst running the “diagnostics.py” performance test.
- Go to the “Port Management” link and select “Port Settings”.
- Tick the box “Enable Jumbo Frames” and press “Apply”.
- Make sure you save the configuration by pressing the “Save” icon in the top right hand corner.

Port Mirroring
Use-case: You want to dump all or some of the traffic from the Nutanix nodes into Wireshark for detailed analysis or upload to technical support.
- Go to the “Administration” link and select “Diagnostics” and then “Port and VLAN Mirroring”.
- Press “Add” and then select a source interface (1 node) or VLAN (all nodes on a particular VLAN) and set the destination port to whatever your laptop is connected to and press “Apply”.
- Make sure you save the configuration by pressing the “Save” icon in the top right hand corner.
- Make sure you delete this one you have finished troubleshooting.

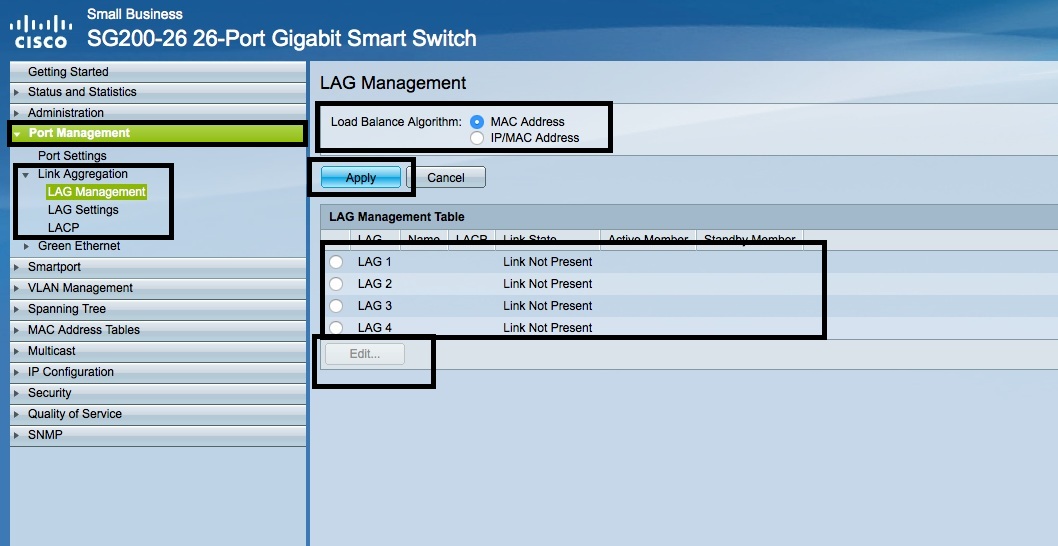
LAGs
Use-case: You want to test a Hypervisor LAG configuration from the Host to the LAN Switch
- Go to the “Port Management” link and select “Link Aggregation”.
- Select “LAG Management” and configure a LAG from there by adding member interfaces.
- Make sure the LAG Algorithm matches the Hypervisor LAG setting (and is supported).
- Make sure you save the configuration by pressing the “Save” icon in the top right hand corner.
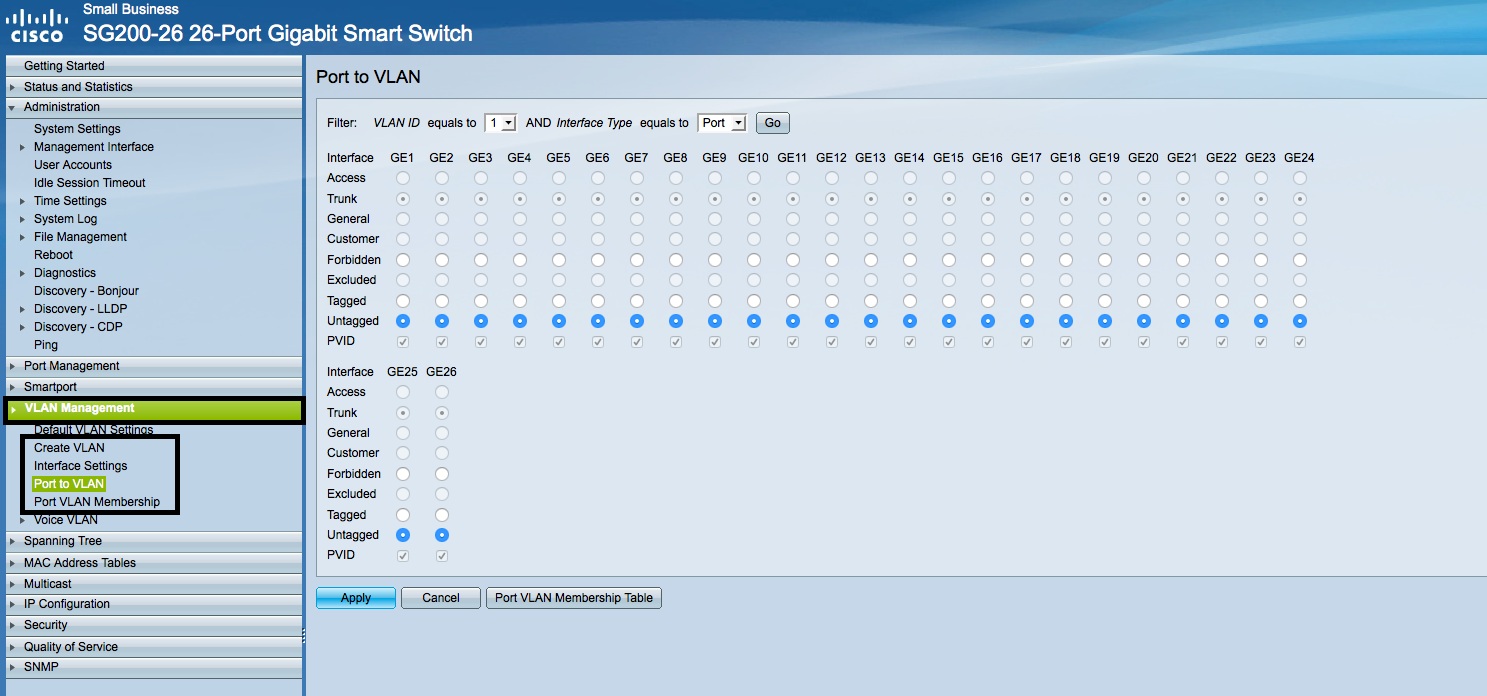
Trunking & VLANs
Use-case: You want to test the VLAN configuration of the Nutanix Management and VM Traffic interfaces before connecting it to the customer network.
- Go to the “VLAN Management” link and select “Create VLAN” to create your VLANs (eg. 100, 101, 102).
- Then select “Port VLAN Membership” to assign VLAN membership to the individual switch ports.
- Make sure you save the configuration by pressing the “Save” icon in the top right hand corner.

SNMP
Use-case: You want to test the Network Switch feature of NOS for a supported hypervisor.
- Go to the “Security” link and select “TCP/UDP Services” and tick the “SNMP Service” and press “Apply”.
- Go to the “SNMP” link and select “Communities” to add SNMP communities with a community string.
- Make sure you save the configuration by pressing the “Save” icon in the top right hand corner.

